
INDUSTRIAL LABYRINTH GUIDE — CODE 21323 SOLUTION
Table of Contents
Industrial Labyrinth is the puzzle room that trips up more Endfield players than any boss fight in the Delver of the Cryptic update. There are no enemies to grind down and no combat checks to pass — just a glowing code on a wall, a series of numbered doors, a laser room, and a corridor full of portals that all look identical. The trick is that the entire maze runs off a single five-digit number you see in the first thirty seconds, and miss it and you will spend the next twenty minutes walking in circles.
That number is 21323, and it is the key to every numbered door in the labyrinth. Read in order, it tells you the door sequence: two, then one, then three, then two, then three again. Around that core puzzle the run is padded with a chest room where the exit hides on the wrong side of an obvious landmark, a laser hallway that uses a yellow portrait as its only navigation cue, and a portal corridor that loops you back if you take any direction other than right. None of those side puzzles are hard once you know the rule — they are hard because the game does not tell you any of them.
This guide walks the full clear in order, screenshot by screenshot, with the explanation of why each door is the correct door so you can recover quickly if you take a wrong turn. Industrial Labyrinth is part of the Protocol Space rotation introduced in Delver of the Cryptic, the permanent content update that added the Protocol Space pool, so the run is one of the first-clear rewards still sitting on most accounts that have not finished sweeping the puzzles. The whole thing takes about five minutes if you follow the path; without the path it can stretch into half an hour of dead ends.
What this guide does not cover: the broader Protocol Space progression system, the combat-focused Protocol Space rooms, or the wider Endfield guide hub. Those live elsewhere. If you only need the door sequence and the landmark cues to get out of the maze with a clean first-clear chest, the rest of this page is the path.
Quick Answer
The whole solution to Industrial Labyrinth is the five-digit code on the wall at the start: 21323. That number is the order to pick the numbered doors later on — 2, then 1, then 3, then 2, then 3. Memorise it in the opening room and the rest of the puzzle is just navigation.
Around that code, four landmarks finish the run. In the first chest room, the exit door sits on the LEFT of the chest, not behind it. In the laser room, the correct door is in the corner with the yellow portrait on the wall. After all five numbered doors, you walk into a portal corridor — go RIGHT and keep stepping into portals until you reach the final chest. Then in the long exit corridor, take the door on the right that has no portals. That is the clear.
What Is Industrial Labyrinth?
Industrial Labyrinth is a Protocol Space challenge — a self-contained instanced room — added with the Delver of the Cryptic permanent content update. Unlike the combat-focused Protocol Space rooms that fill the same rotation, this one has zero enemies. The entire clear is observation and memory: read the code at the start, recognise the landmarks in each room, pick the correct door, repeat until the exit door drops you back out into the world.
The reason Industrial Labyrinth feels disproportionately frustrating for a no-combat room is that the puzzle teaches you nothing as you go. There is no on-screen hint about the chest room rule, no caption explaining that the yellow portrait marks the laser-room exit, and no obvious signal that the portal corridor only resolves if you commit to one direction. Everything is environmental, and the environment is repetitive industrial pipework that looks the same in every direction. Five minutes of confident play feels identical to twenty-five minutes of wrong turns, except for the chest in your inventory at the end.
The clear pattern is the same on every run because the layout itself is fixed — the labyrinth is not procedurally generated, so the 21323 code, the laser-room landmark, the portal direction, and the final exit door never change. That makes it one of the easier first-clear rewards to farm on alt accounts or pick up on the same run as the other Protocol Space puzzles, once you know the path. The reward pool follows the standard Delver of the Cryptic structure — premium currency on first clear, plus a handful of upgrade materials from the chests inside the maze.
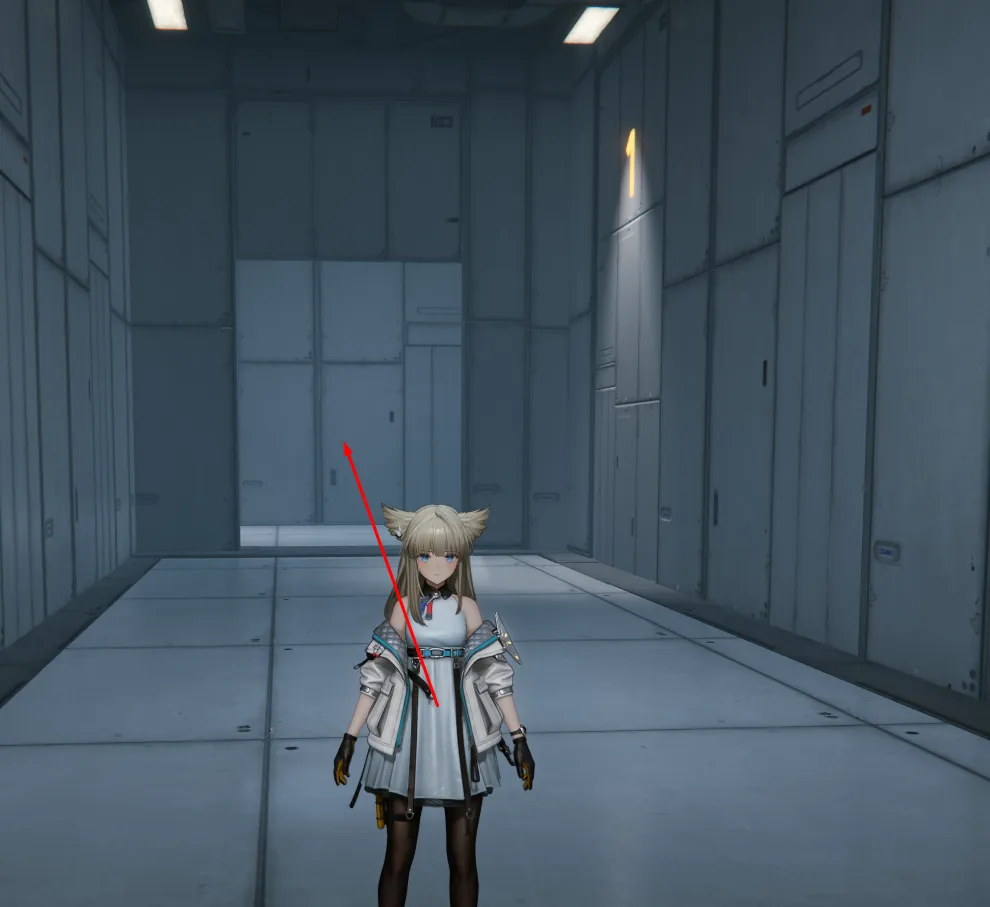
Step 1: Remember Code 21323
The opening room of Industrial Labyrinth has a single piece of information you need, and the game does the unusual courtesy of putting it directly in your line of sight. On the wall, in glowing characters, the digits 21323 are displayed. That five-digit number is the only thing you need to carry through the rest of the puzzle — every numbered door choice later in the run reads off this code, left to right, one digit per door.
Read as a door sequence, the code tells you to take door 2 first, then door 1, then door 3, then door 2 again, and finally door 3. There is no hidden second code, no rotation, and no twist where the digits reverse halfway through. The single rule for the entire labyrinth is to walk through the numbered doors in the order 2-1-3-2-3, and the only way to fail it is to forget the sequence between rooms.
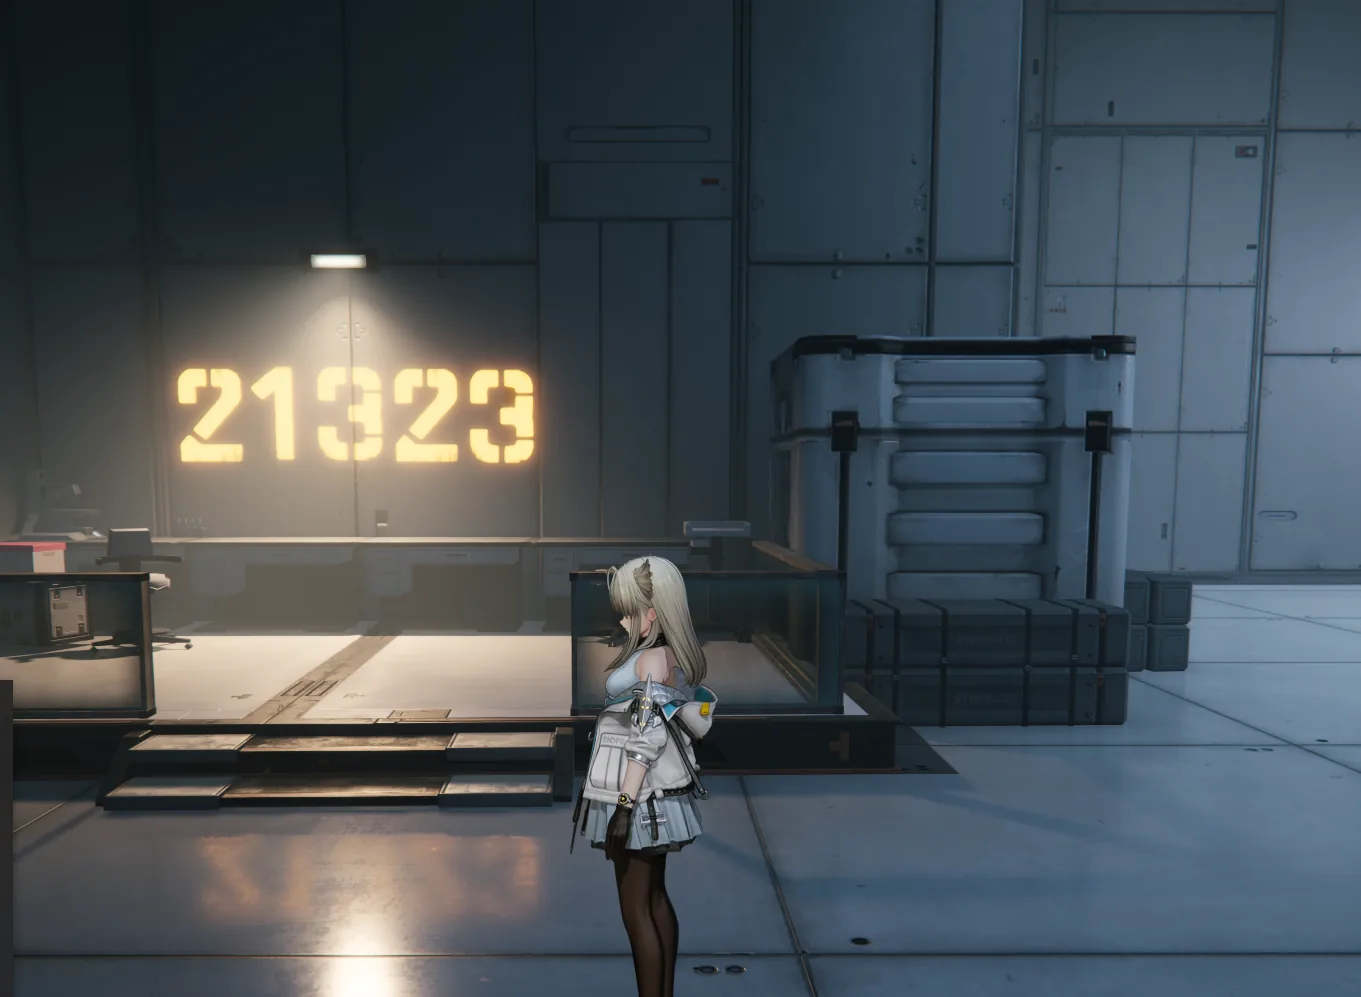
The code 21323 displayed at the starting area.
It is worth writing the code on paper or in a phone note before you move, especially if you are running the labyrinth at the end of a long session when number recall is brittle. The code does not appear anywhere else in the maze — once you leave the opening room, the wall is gone and the numbered doors will not give you a refresher. Players who try to clear the run from memory most often slip on the fourth and fifth digits, where the sequence repeats 2 and 3 in a way that pattern-matches incorrectly to 2-3-2 or 3-2-3.
Step 2: First Chest Room
The first room after the code is the navigation trap that catches players who are still scanning the walls for hints. You step into a small chamber with an obvious chest sitting in front of you. The instinct is to walk toward the chest and look for a door directly behind it or off to the right where a logical sightline would land. Both instincts are wrong, and both will leave you in a room with no exit.
The correct path is to ignore the chest as a destination and treat it as a landmark instead. When the chest is positioned directly in front of you, the door you need is on the LEFT. Not behind, not on the right, not above — left of the chest, at roughly the same depth in the room. Walk to the left, the wall opens, and that is the route to the laser room. Grab the chest while you are there if you want the loot, but do not let it pull you off the path.
When the chest sits in front of you, the door is directly on the LEFT.
This room is a small example of the broader design language of Industrial Labyrinth. Every room has one obvious thing — a chest, a beam pattern, a portrait — and the correct path is keyed off that obvious thing in a way that is not pointed out anywhere. Once you internalise the rule that the landmark is the cue, the rest of the maze stops feeling random and starts feeling like a series of simple two-or-three-option decisions.
Step 3: Laser Room Navigation
Past the chest room you enter the laser room, which is the only obstacle in Industrial Labyrinth that involves any kind of physical movement check. The chamber is criss-crossed with red laser beams that deal damage on contact — they are not insta-kill, but they will chip off chunks of your operator's HP if you walk through them carelessly. The room reads like a stealth puzzle from a different game, and players often spend several minutes trying to time the beams before realising the beams are not the puzzle.
The beams are scenery. The actual puzzle is finding which corner of the room has the exit, and the answer is the corner with the yellow portrait or yellow sign mounted on the wall. That is the only visual cue, and it is the same on every run. Navigate carefully through the laser pattern toward the portrait, watch for safe gaps between the beams, and the door is right there once you reach the corner.
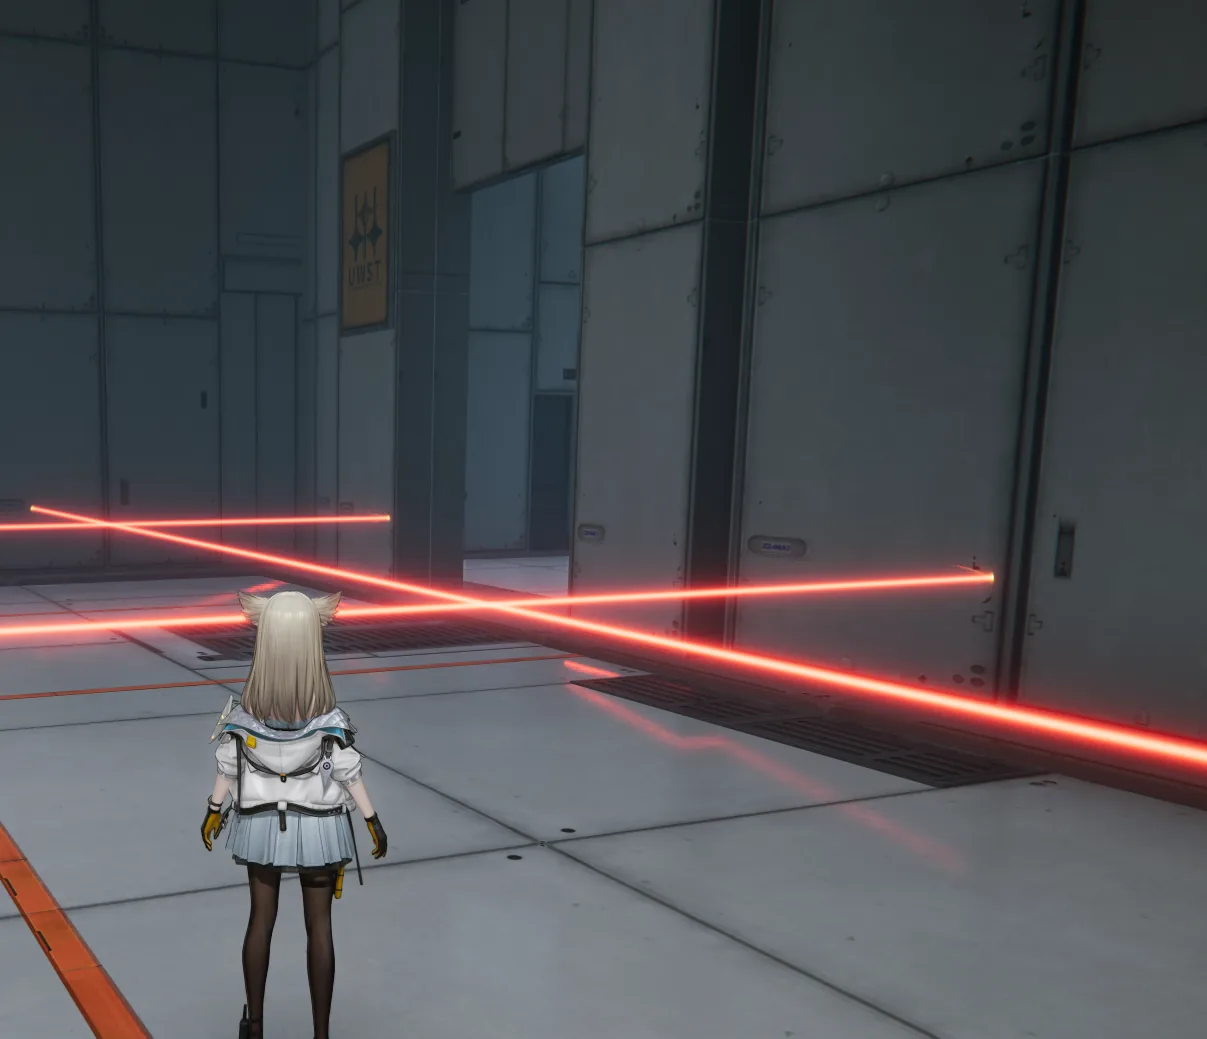
The laser room — head for the corner with the yellow portrait on the wall.
If the beams are moving in a pattern, time your runs through the gaps; if they are static, find the diagonal sight line that gives you a clean path. Either way the laser damage is recoverable, so taking one or two hits to reach the correct corner is far cheaper than the time you waste trying to find a different exit. The yellow portrait is the only door in this room, no matter how many side passages look like alternatives.
Step 4: Numbered Doors — Follow 21323
From the laser room you finally reach the part of Industrial Labyrinth the entire puzzle was set up for. The next several rooms each present you with multiple doors, each marked with a different number. Using the code you memorised at the start, you walk through them in the order 2-1-3-2-3 — five numbered choices in a row, in that exact sequence, no exceptions.
The first room you enter wants door 2. The second wants door 1. The third wants door 3. The fourth wants door 2 again. And the fifth and final numbered room wants door 3. Each correct door leads to the next room of doors, and each wrong door either dead-ends or kicks you back out into a loop, costing you time but not progress.
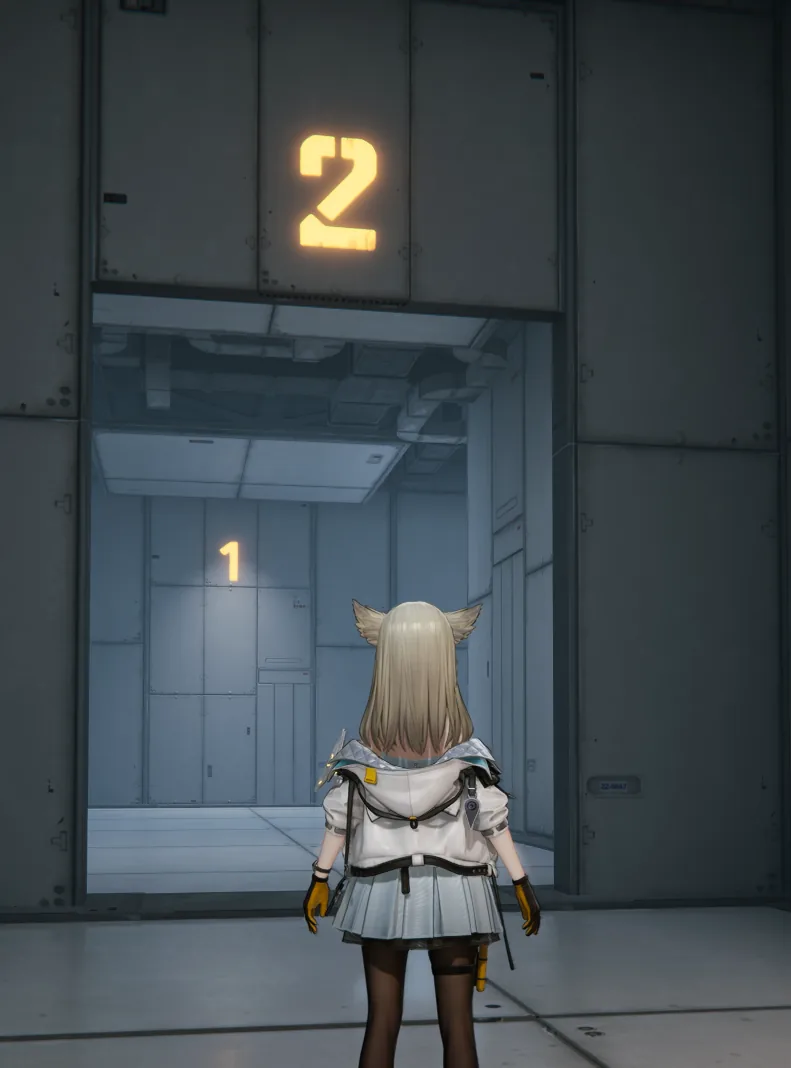
Numbered doors — enter door 2 first, then you'll see door 1 inside.
The clean way to keep the sequence straight is to repeat the code out loud as you move — "two, one, three, two, three" — rather than counting in your head. The fourth and fifth choices are where most clears go wrong, because after the 2-1-3 the pattern feels like it should reverse or break. It does not. Two, then three, and you are done with the numbered phase of the puzzle.
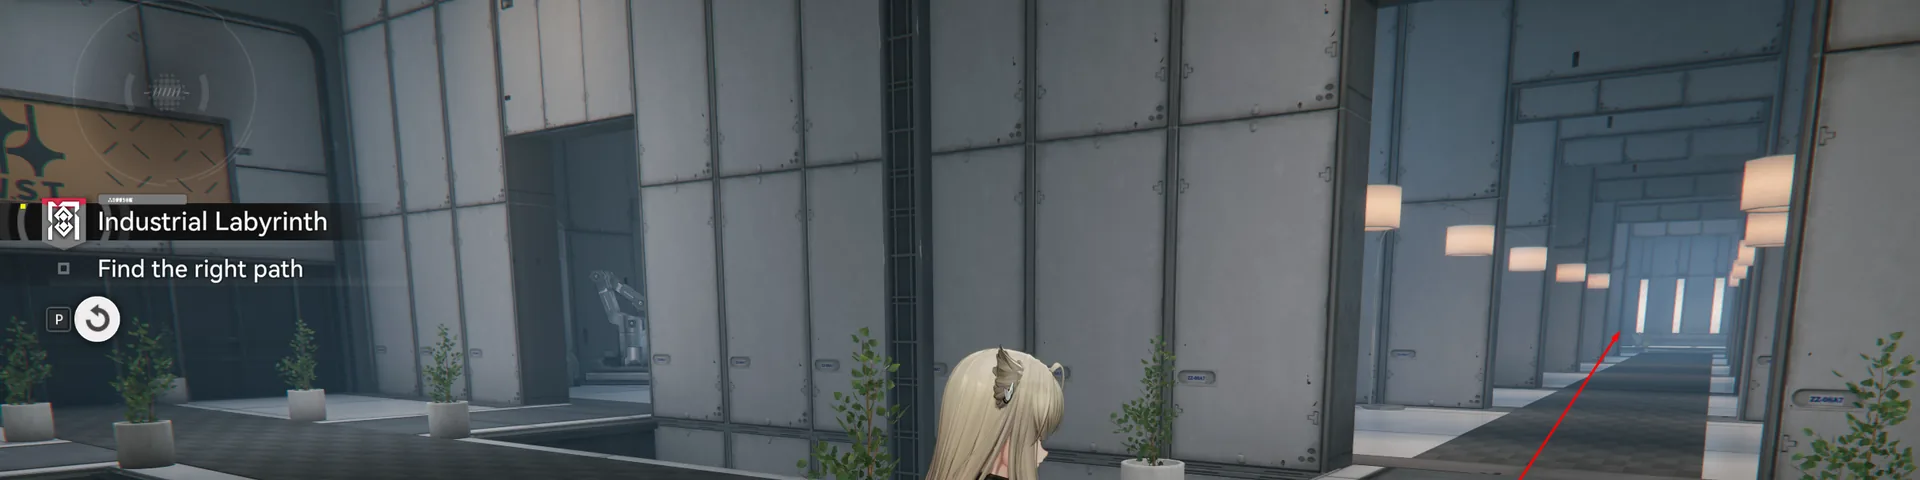
After the Fifth Door
Once you have committed the final "3" of the sequence, the next room is no longer marked with a numbered door. You walk into a short hallway and the path opens directly in front of you, with a faint number "1" on the right wall as confirmation that you are still on the correct route. That "1" is not another door selection — it is a checkpoint marker telling you the numbered phase is complete and the next puzzle is starting.
After the 21323 sequence, walk straight ahead — the number 1 on the right confirms the path.
Take the door directly in front of you, glance at the "1" on the right wall to confirm, and step through. That drops you into the portal corridor, which is the last real puzzle in the labyrinth and the one that wastes the most time if you take it wrong.
Step 5: Portal Corridor
The portal corridor is the section of Industrial Labyrinth that feels designed to make you give up and look for a guide. It is a long corridor with multiple shimmering portals down its length, each visually identical, each capable of teleporting you somewhere — and only one direction of travel through them actually resolves to the final chest. Step into the wrong portal first and you can spend ten minutes bouncing between rooms that all look like the same industrial corridor.
The rule is simple once you know it. When you enter the corridor, go directly to the right. Walk past the leftmost portals, pick the first portal on the right side of the corridor, and step through. Keep entering portals as they appear, always favouring the rightmost option, and within a few jumps you will land in the room with the final chest.
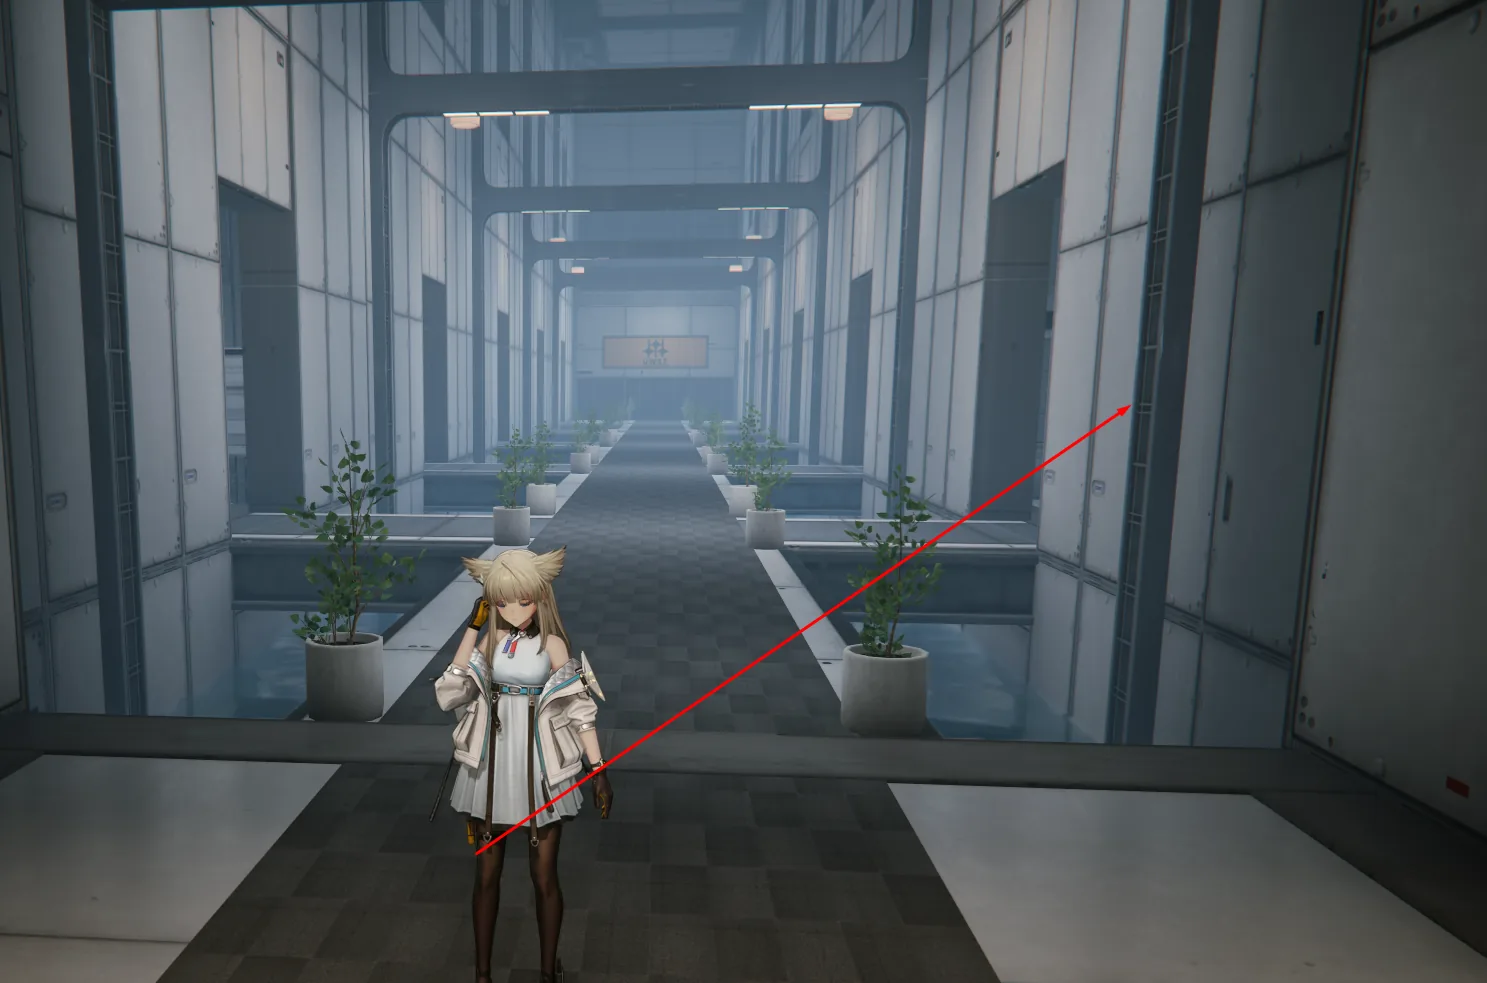
The portal corridor — go directly to the RIGHT and keep entering portals.
Do not panic if the corridor seems to reset or if you land somewhere unfamiliar after a jump — the portals are meant to disorient. The visual cue you are looking for is a chest sitting at the end of a small chamber, with another portal directly behind it. That chest is the final reward of the maze itself, and once you have collected it, the same chamber leads into the exit corridor.
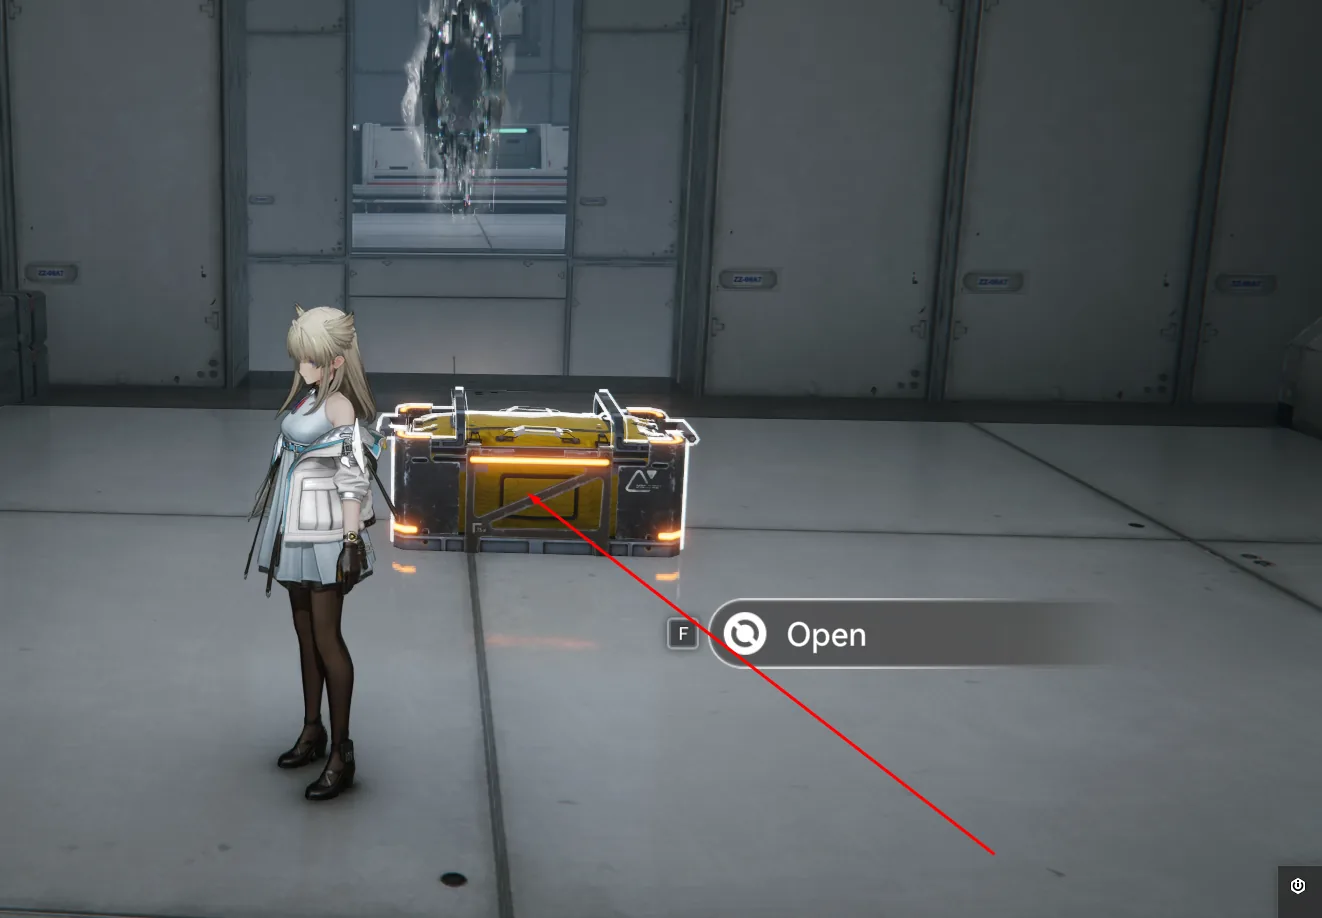
The final chest sitting at the end of the portal sequence.
Collect the chest before you move on. If you skip it for the exit, you will not be able to backtrack — once Industrial Labyrinth drops you out the other side, the portal corridor is closed and the chest is no longer reachable on that run. The first-clear loot in this chest is part of what the puzzle pays out, so make sure it is in your inventory before you head for the door.
Step 6: Long Corridor Exit
From the final chest, the labyrinth opens into a long, straight corridor lined with multiple doors. Some of those doors have portal effects rippling across their frames; one does not. The exit you want is the plain door — the one without the portal animation — on the right side at the far end of the corridor.
Walk all the way to the end of the corridor first. Do not pick a door midway, no matter how clean it looks. At the very end, turn right, find the door that has no portal effect, and step through. That is the run complete. The labyrinth dumps you back into the overworld with the first-clear reward popup if this is your first time finishing it, plus whatever loot was inside the chests you collected on the way.
The long corridor — go to the end and choose the door on the RIGHT without portals.
The reason the portal doors are even in this corridor is to bait the same instinct the portal corridor used a moment earlier. After a section where stepping into portals was the right answer, your brain assumes the rule still holds. It does not — the puzzle flips here. A plain unportalled door is the only correct exit, and a portal-frame door at the end will throw you back into the loop.
Rewards
Industrial Labyrinth pays out the standard Delver of the Cryptic Protocol Space reward pool on first clear. The headline drop is Oroberyls, the premium gacha currency used for recruiting operators on the central banner. On top of the premium currency, the first-clear chest carries a meaningful Credits payout for in-game upgrades and purchases, plus a bundle of crafting materials — Circuit Boards and Crystallized Materials are the most common drops, and they feed directly into the operator upgrade tracks. Each of the chests you collect along the way during the run adds incremental loot to that total, so the labyrinth is worth running fully rather than rushing through.
For perfect completion, make sure to grab both chests — the one in the first chest room (behind the LEFT-of-chest rule), and the final chest at the end of the portal corridor. Both contain reward pulls that are gated to this specific Protocol Space and do not repeat on subsequent clears, so the first run is the high-value run. After that, repeat clears still pay a smaller materials bundle, which makes Industrial Labyrinth a reasonable side-pickup on the same session you tackle the other puzzle Protocol Spaces.
Complete walkthrough for Arknights Endfield's Industrial Labyrinth Protocol Space puzzle from Delver of the Cryptic. Learn the code 21323 door sequence (2-1-3-2-3), navigate the laser room using the yellow portrait landmark, choose correct numbered doors, traverse the portal corridor by going right, and find the final exit. Includes 8 detailed screenshots, step-by-step instructions, and FAQ for this permanent Protocol Space challenge.
Frequently Asked Questions
That is the full Industrial Labyrinth clear — one code, two chest pickups, three landmark rooms, five numbered doors, and a final straight-line exit. If you are working through the rest of the Delver of the Cryptic puzzle rooms in the same session, the wider Delver of the Cryptic hub covers the other Protocol Spaces in the rotation, and the broader Endfield guide hub indexes every walkthrough on the site by category.
