Skip to content

BLUEPRINTCURATION

Efficient factory layouts for optimal production

Last updated: 2026-06-21

About these blueprints

Blueprints are exportable factory layouts that let you skip the trial-and-error phase of AIC design. Every code on this page has been tested by the Endfield Hub team or sourced from verified community designers — we list the exact footprint, the region the code works on (ASIA or EU/NA), and the resources you need to pipe in before production starts.

Focus your reading on the layouts that match your current PAC slot: the Valley IV Megabase is the gold standard for Main PAC endgame economy, the 7x19 Liquid Xiranite codes are the most efficient SubPAC drop-ins, and Liquid Heavy Xiranite is the fastest way to clear Blight zones without designing a new factory from scratch.

Base Layout Reference

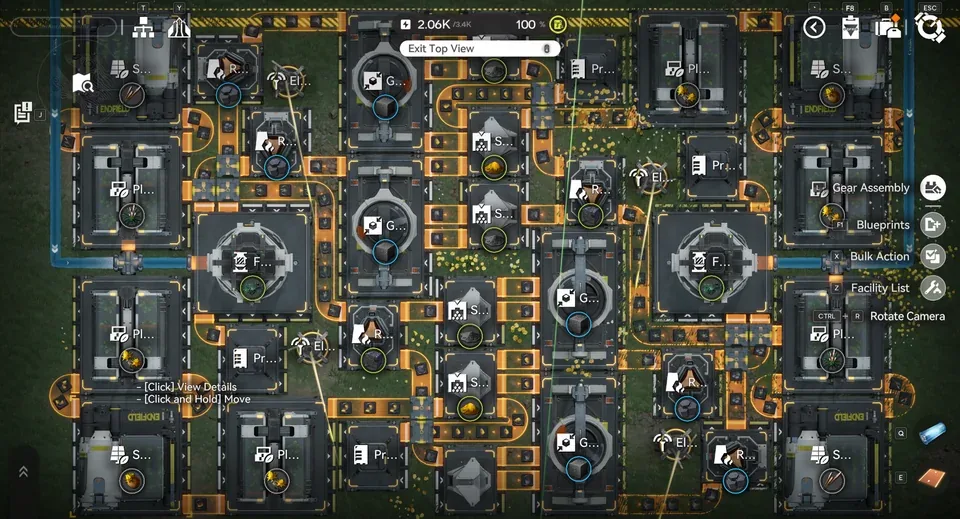
Xiranite Factory Base Layout - Top View

36x21 factory footprint optimized for Xiranite production chains

Liquid Heavy Xiranite — Quick Blight Clearing Blueprint

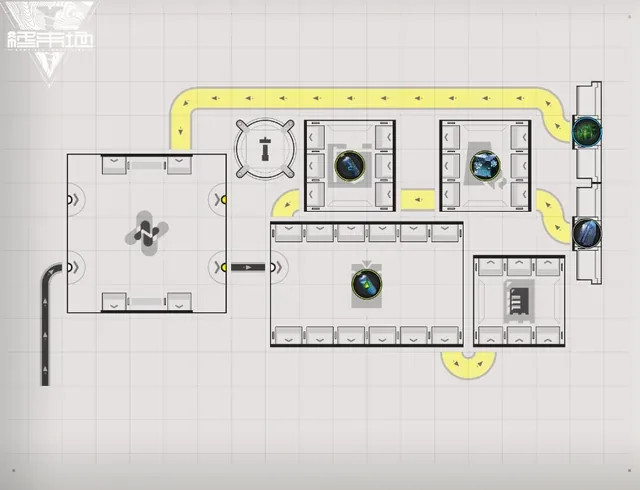
A compact 13x22 Liquid Heavy Xiranite blueprint designed to clear Blight quickly in Arknights: Endfield. Drop-in BP for fast Blight purification runs — no resource juggling, no manual reroutes.

Best for: Players hitting Blight zones who need a ready-made Liquid Heavy Xiranite production layout without designing one from scratch.

Why this BP: Most Liquid Heavy Xiranite layouts shared online are oversized or assume specific terrain. This one is small enough to fit in any sub-PAC and produces enough Liquid Heavy Xiranite to clear Blight on contact.

ASIA code only.
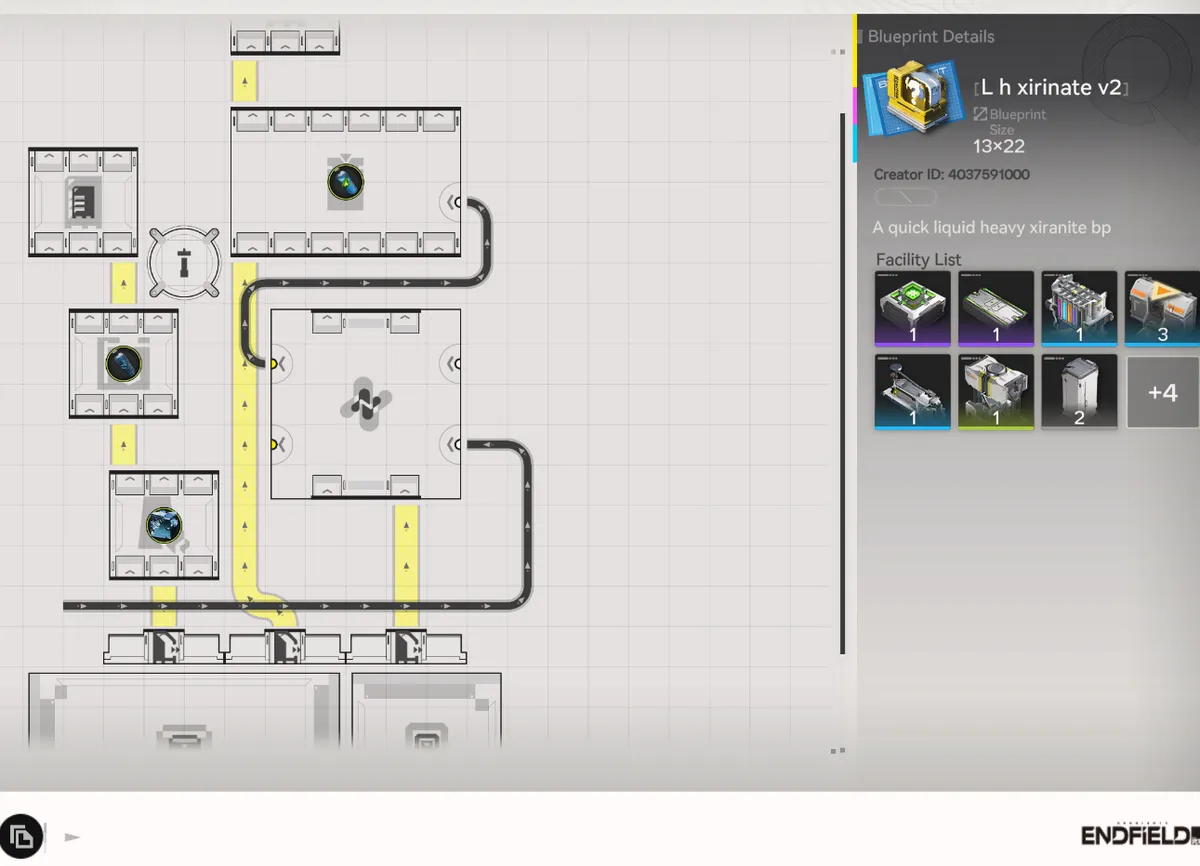
Liquid Heavy Xiranite blueprint layout — quick Blight clearing BP for Arknights: Endfield (13x22, ASIA server)

Liquid Heavy Xiranite — Blight Clearing (ASIA)

XiraniteASIA
EFO01Ue37ai325Oe7Oa8
Dimensions: 13x22

Liquid Xiranite — 7x19 Compact Blueprint (NA/EU)

Two compact 7x19 Liquid Xiranite blueprints forNA/EU servers. Both layouts share the same footprint — pick the one that matches your depot setup.

Setup: Add Precipitation Acidto the crucible. Conduits help!

V1 — 2 Depots + P Stash: P Stash will needexternal power not included in the blueprint (the original was powered by nearby facilities).

V2 — 3 Depots: Self-contained variant if you'd rather drop the P Stash for an extra Depot.

NA/EU codes only.
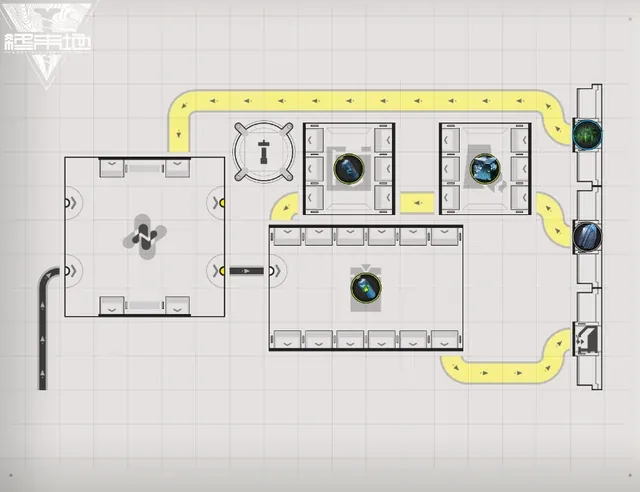
Liquid Xiranite V1 blueprint layout — 7x19 with 2 Depots + P Stash (NA/EU)

V1 — 2 Depots + P Stash

Liquid Xiranite V2 blueprint layout — 7x19 with 3 Depots (NA/EU)

V2 — 3 Depots

Liquid Xiranite V1 — 2 Depots + P Stash (NA/EU)

XiraniteEU/NA
EFO01893i03eE0127UI73
Dimensions: 7x19 — 2 Depots + P Stash

Liquid Xiranite V2 — 3 Depots (NA/EU)

XiraniteEU/NA
EFO01u1I76IU4602AoOU
Dimensions: 7x19 — 3 Depots

Available Blueprints

Xiranite Blueprint

XiraniteASIA
EFO0101O3u4e57i1iE179
Dimensions: 36x21

Xiranite Blueprint

XiraniteEU/NA
EFO01eE7UUO7aO4aAoAi8
Dimensions: 36x21

Buckwheat Capsule A Blueprint

Buckwheat Capsule A Blueprint Layout

Xiranite Blueprint

XiraniteASIA
EFO018IeoOo3ae19UI73
Dimensions: 30x30

HC Valley Battery Blueprint

HC Valley Battery Blueprint Layout
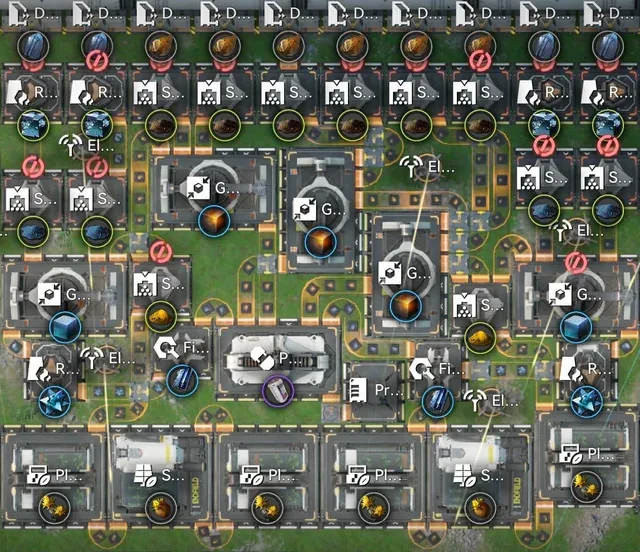
Xiranite Blueprint

XiraniteASIA
EFO01ouiI5I81i6uIieO
Dimensions: 30x25

Wuling Modular Base Collection

Modular ASIA blueprints sized around a max Depot Unloader, built for swapping base layouts and changing mining output. Mix and match the production and feeder modules below.

Compact SC Battery

SC BatteryASIA
EFO012O9A5o6U186IeIOo
Dimensions: 8 Originum + 1 Xircon depot, 6/m SC Battery

4 Row 2x Xircon (No Sewage)

XirconASIA
EFO01iUIa7Eo182o272U4
Dimensions: Cuprium + Ferrium + 2 Xiranite depot + water, 1/m Inert Xircon (no sewage)

Xtreme Xiranite (Self-Sustaining)

XiraniteASIA
EFO01194o075IOUii34O7
Dimensions: Self-sustaining (Sandleaf + Yazhen/Jincao), 30/m Xiranite

Xtreme Xiranite (With Input)

XiraniteASIA
EFO01194o075IOUii34O7
Dimensions: 1 Sandleaf + 1 Yazhen/Jincao depot, 30/m Xiranite

Compact Cuprium

CupriumASIA
EFO01I3A580i4e9a45o08
Dimensions: 2 Cuprium depot + water, 2 Hetonite depot (1/m sewage)

Full Output Hetonite

HetoniteASIA
EFO01521eE3ai0u16eIoe
Dimensions: 8 Cuprium + 1 Ferrium depot, 0.5/m sewage, 1/m acid

1/2 Hetonite (7.5 Output)

HetoniteASIA
EFO01Ue36i5u9IOO47Oa8
Dimensions: 4 Cuprium + 1/2 Ferrium depot, 0.25/m sewage, no acid

Inert Recycling (Heavy Xiranite)

XiraniteASIA
EFO01a6589UOoEAUIoe5e
Dimensions: 4/m Inert Xircon effluent + 2 Xiranite depot, 6/m Heavy Xiranite

Flat Yazhen

YazhenASIA
EFO0101O36AE82i24E179
Dimensions: Yazhen feeder (flat layout)

Small Sandleaf

SandleafASIA
EFO01Ue36i5u9IO17Oa8
Dimensions: Sandleaf feeder (compact)

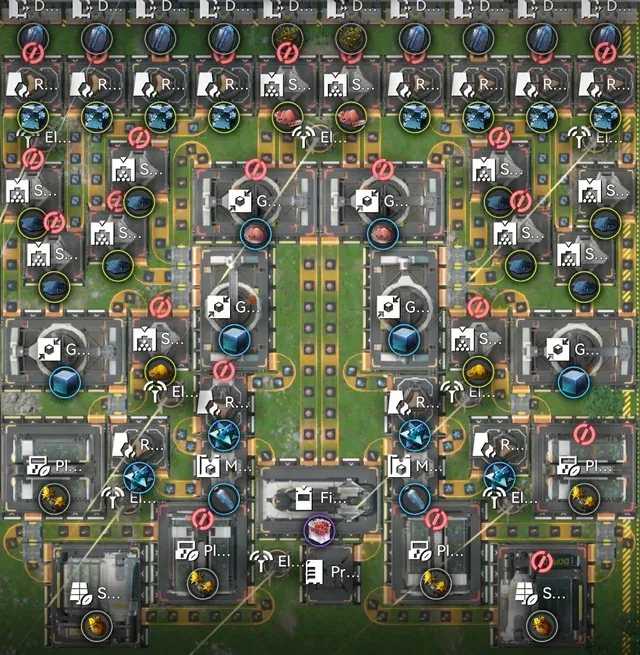
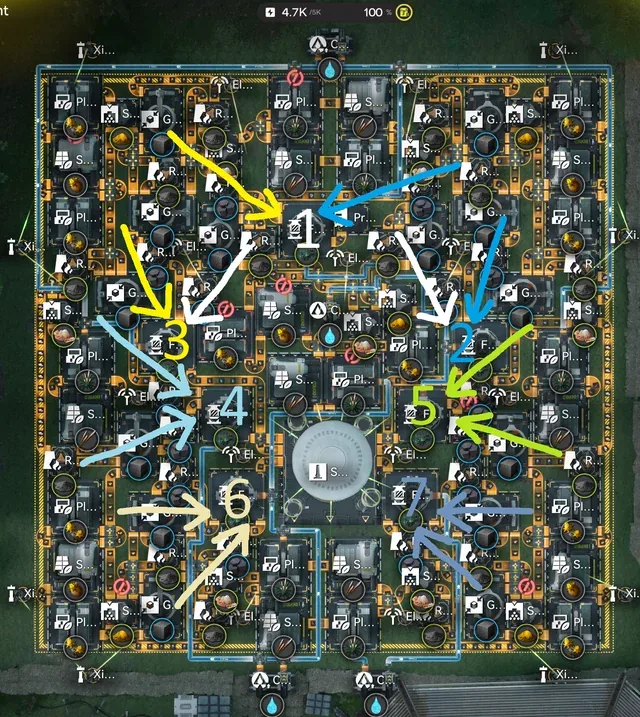
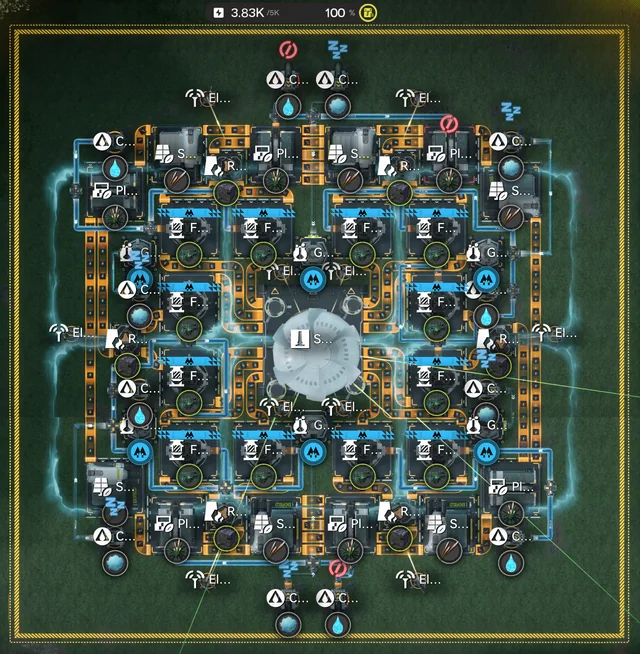
Symmetric Valley V4

Mega factory layout combining Capsule A + Battery HC

Note: No external planter needed

Setup: Add one Electric Pylon in the corner

All 4 parts required - combine for full production setup
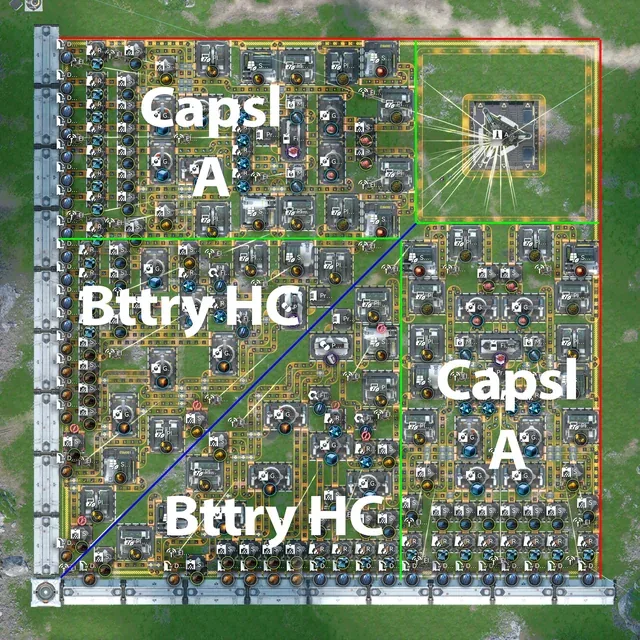
Symmetric Valley V4 Blueprint Layout with Labels

Xiranite Blueprint

XiraniteASIA
EFO01A7uUiAUIOE859ieO
Dimensions: Capsule A - First Half

Xiranite Blueprint

XiraniteASIA
EFO01u8U3Iu3Aa099AoOU
Dimensions: Capsule A - Second Half

Xiranite Blueprint

XiraniteASIA
EFO01I3AuoIui09045o08
Dimensions: Battery HC - Part 1

Xiranite Blueprint

XiraniteASIA
EFO018Ieo38o761uiUI73
Dimensions: Battery HC - Part 2

Hetonite Parts V2.2

Compact 26x21 Hetonite Parts production from unrefined ore to finished product

Features:

  • Handles all waste products (sewage)
  • Runs continuously at full throughput
  • Self-sustaining acid production
  • Space-efficient crucible routing

Startup: Draw pipe from center-top acid to rightmost converger to jumpstart acid production

Credit: Community blueprint from Reddit
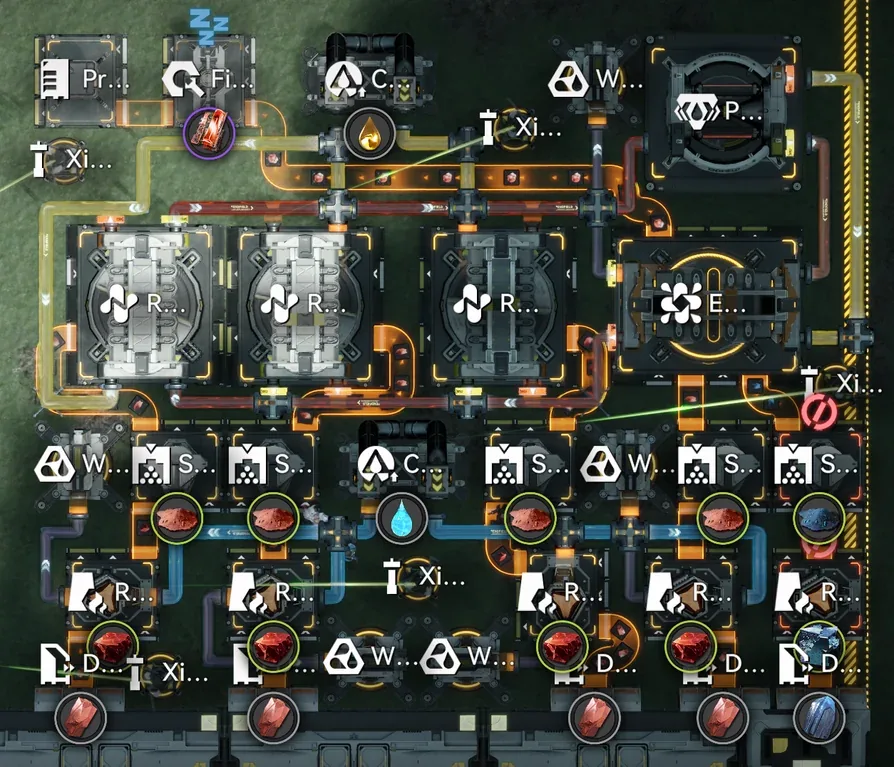
Hetonite Parts V2.2 Blueprint Layout - Compact 26x21

Hetonite Blueprint

HetoniteEU/NA
EFO01o083ao7uE608IieO
Dimensions: 26x21

Hetonite Parts 16.5/min Flow Limiter (Splitter Setup)

Auto-regulates Hetonite Parts belt flow to exactly 16.5/min using a splitter setup.

Use Case: For setups with 22.5/min Hetonite production but only consuming 6/min — excess is 16.5/min.

The Math:

  • Belt full speed = 30/min
  • 16.5/min = 11/20 of full speed
  • Splitter config limits output to exactly 11/20 throughput

Why: No need to manually check ore numbers daily — belt stays controlled barring minor fluctuations from server hiccups.

Note: Only works if you aren't already full on Hetonite Parts.
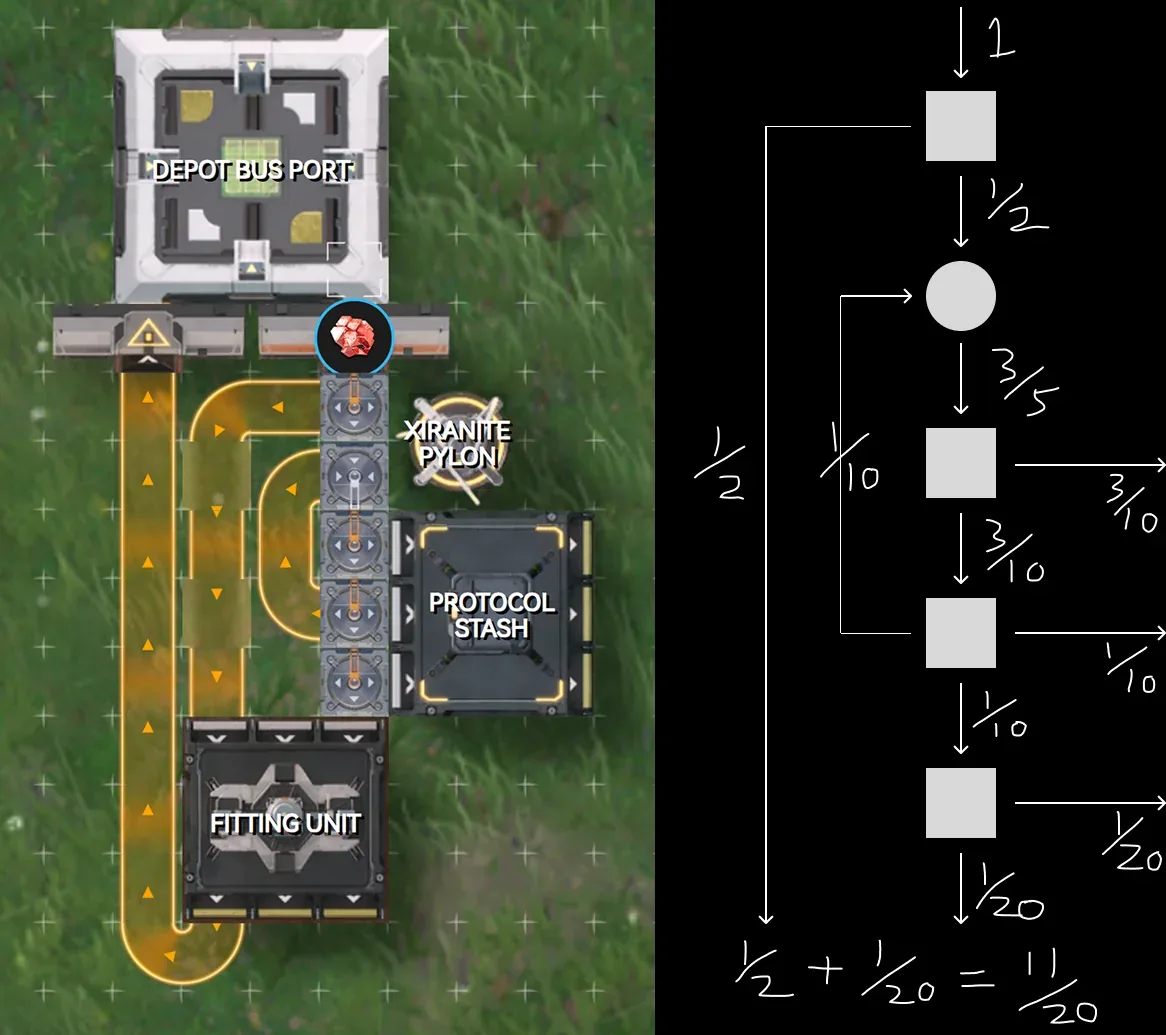
Hetonite Parts 16.5/min Splitter Flow Limiter Setup

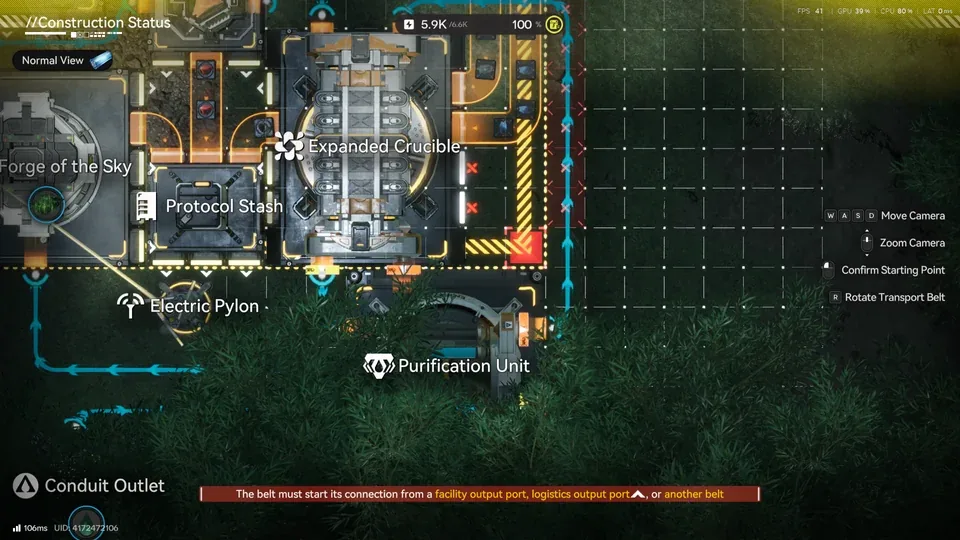
Hetonite + Heavy Xiranite & Xircon (Event Setup)
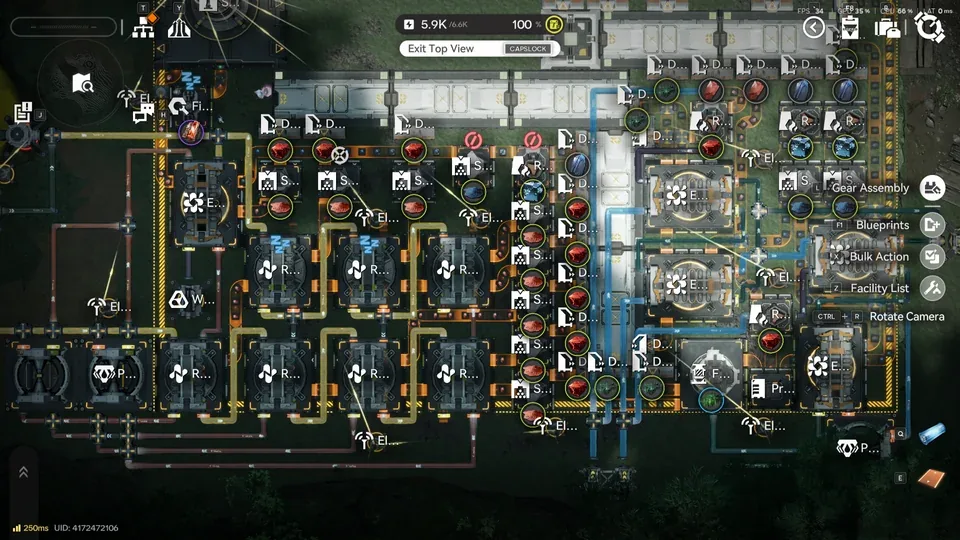
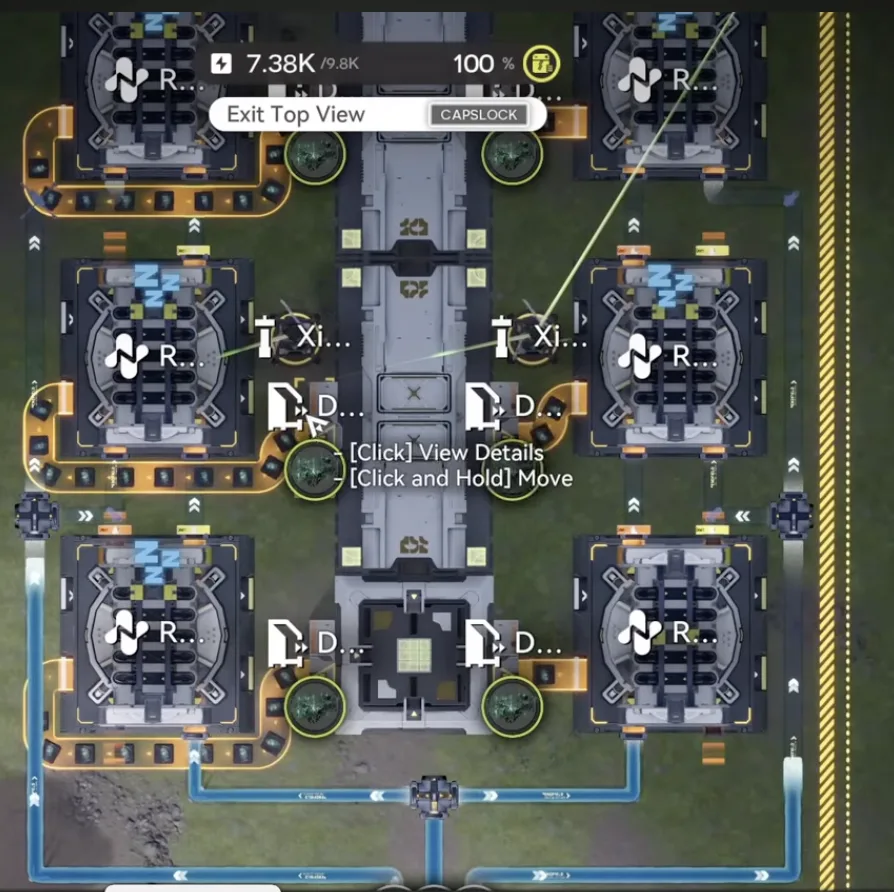
Hetonite + Heavy Xiranite Factory Overview
Hetonite + Heavy Xiranite Factory Detail View
Hetonite + Heavy Xiranite Purification Alignment

Hetonite Blueprint

ASIA Code:

ASIA — Hetonite 180/min (Current)

HetoniteASIA
EFO01I3AiEuo1i985308
Dimensions: 180/min — Current

ASIA — Heavy Xiranite & Xircon

Heavy Xiranite + XirconASIA
EFO01u8UAO3I6A07AoOU
Dimensions: Full Setup

Current (180/min Cuprium Ore):

  • Pipe in 2 Acid pumps to Purification's Pipe Converger
  • Pipe in 1 Acid pump to Extended Crucible's Pipe Splitter
  • Belt in 1 Cuprium to the Shredder closest to Extended Crucible

Future / Max Production (240/min+):

  • Pipe in 1 Acid pump to Purification's Pipe Converger
  • Pipe in 2 Acid pumps to Extended Crucible's Pipe Splitter
  • Belt in 3 Cuprium to all 3 Shredders

Belt out Hetonite from Extended Crucible into a Depot Loader along the Depot Bus, directly to sub-PAC, or replace Water Treatment Unit with a Protocol Stash.

You'll still need 4 Cuprium refineries elsewhere for Hetonite production.

Heavy Xiranite & Xircon Blueprint

  • Align Purification to the corner end outside of AIC area (see 3rd photo above)
  • Manifold needs 2 Water pumps
  • Due to terrain: place a Conduit Inlet with Pipe Converger for Inert Xircon Effluent, then connect to Conduit Outlet to Purification

This blueprint is fully self-sufficient — unloads Ores directly rather than processed products.

Tips

  • If already using the old Hetonite blueprint, shift Depot Unloaders 1 tile upward
  • Align the Depot Bus to fit the whole setup
  • There's plenty of space available for Event Setup additions

Xircon + Heavy Xiranite

Compact Xircon + Heavy Xiranite production blueprint.

Setup:

  • Water: 2 pumps
  • Sewage: 1/s (from 2 refining units)
  • Remember to output the water from the Purification Unit to the river

ASIA code only.
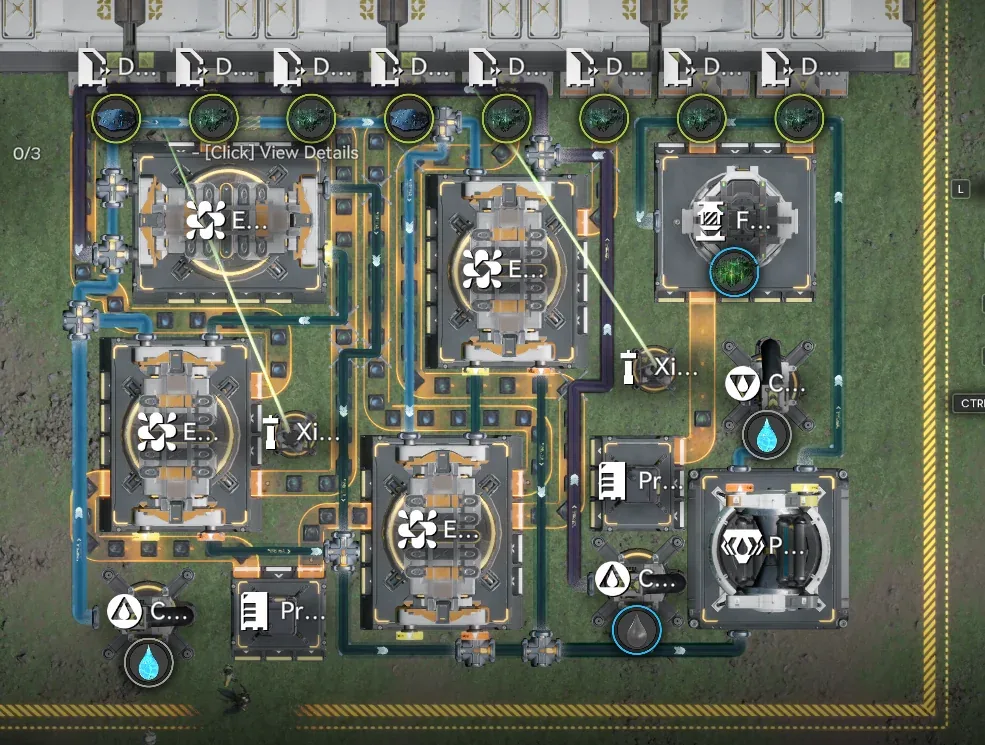
Xircon + Heavy Xiranite blueprint layout (ASIA server)

Xircon + Heavy Xiranite (ASIA)

Xircon + Heavy XiraniteASIA
EFO01eAoi7uA3E4aAoAi8
Dimensions:

Hetonite Part

Hetonite Part production blueprint that pairs with the Xircon + Heavy Xiranite BP — sewage outputs feed back into the Xircon side.

Setup (per unit):

  • Water: 2 pumps each
  • Acid: 3 pumps (4 pumps is also OK — it won't clog)
  • Sewage: 2/s each — split 1 outlet into 2 inlets and connect to the Xircon

Leftover sewage: 2/s and 1/s remaining — either ship them to a new map or run Water Treatments.

ASIA code only. Pairs with the Xircon + Heavy Xiranite BP above.
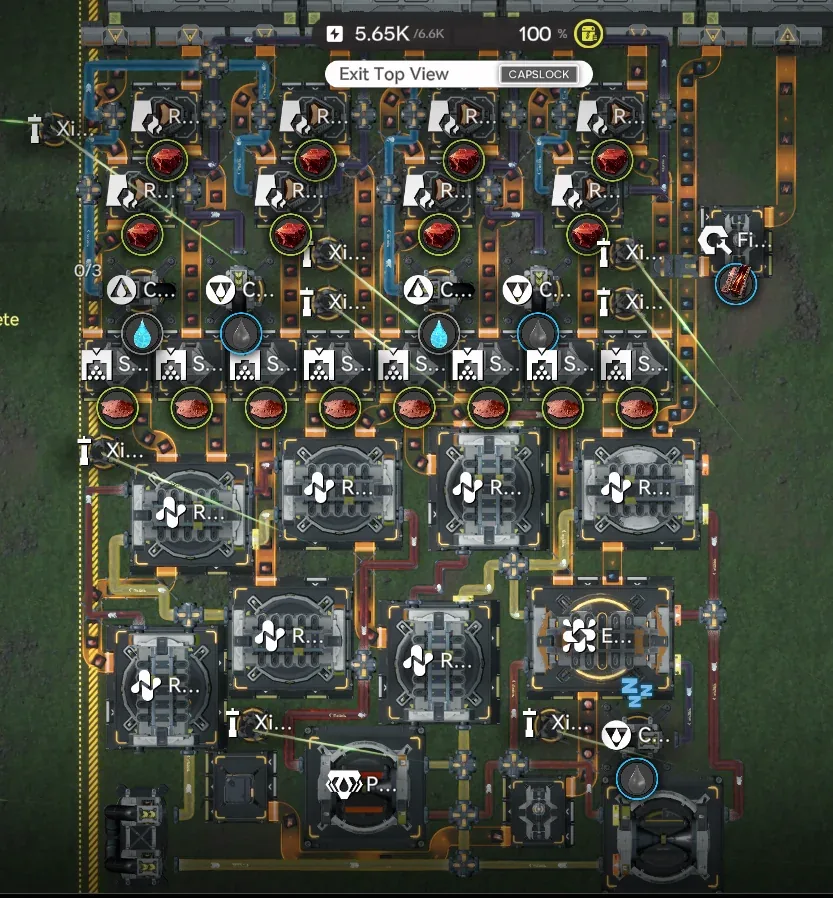
Hetonite Part blueprint layout with sewage routed to Xircon (ASIA server)

Hetonite Part (ASIA)

Hetonite PartASIA
EFO018Ieo3AIU9125UI73
Dimensions:

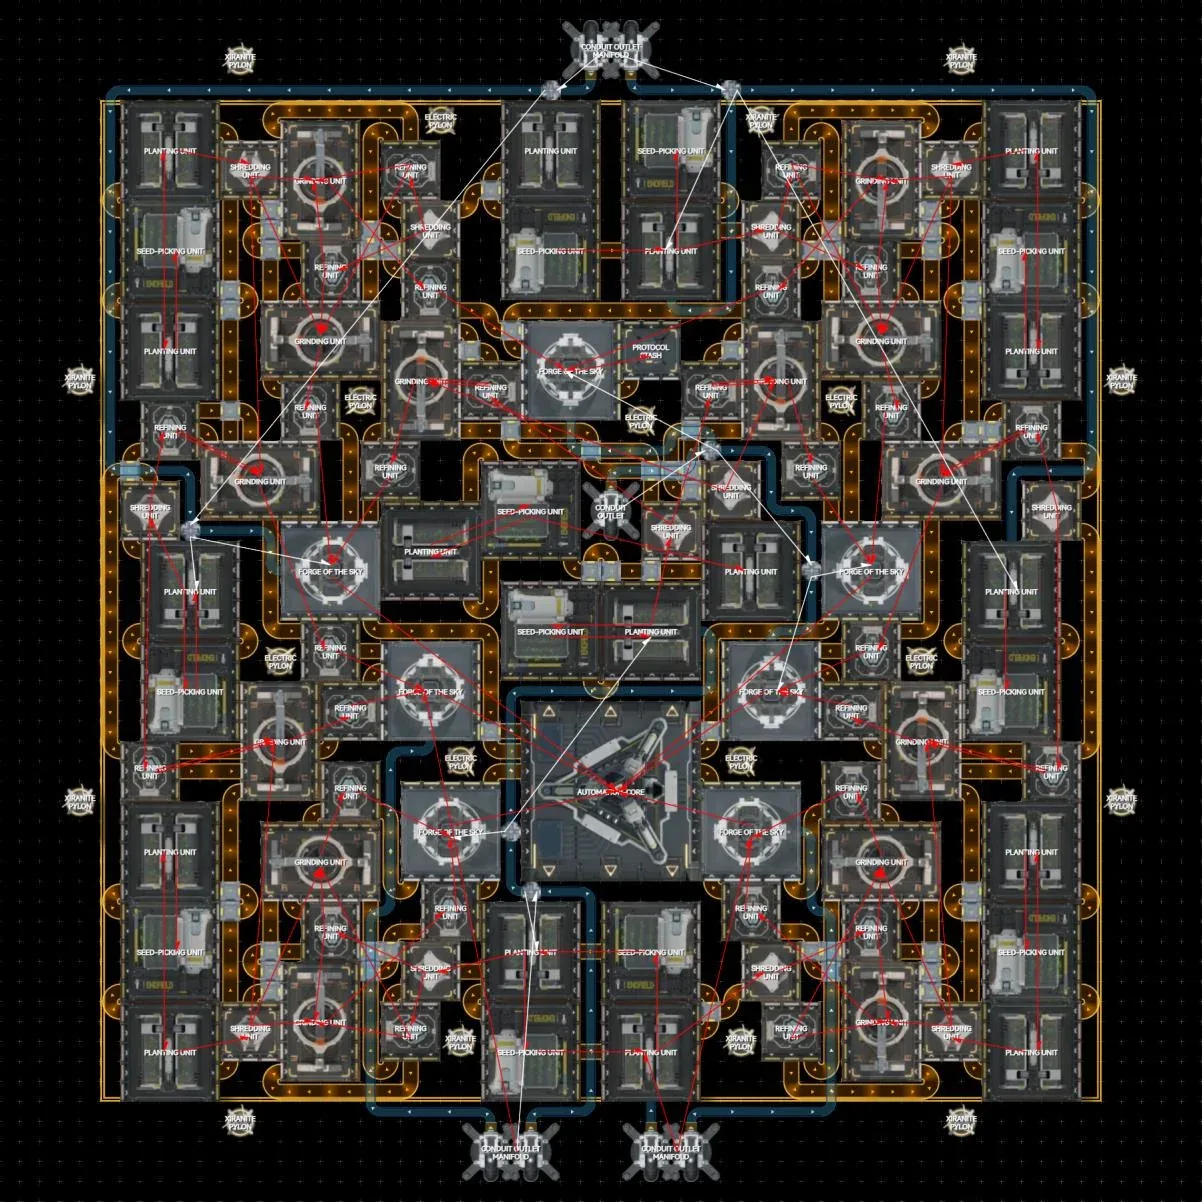
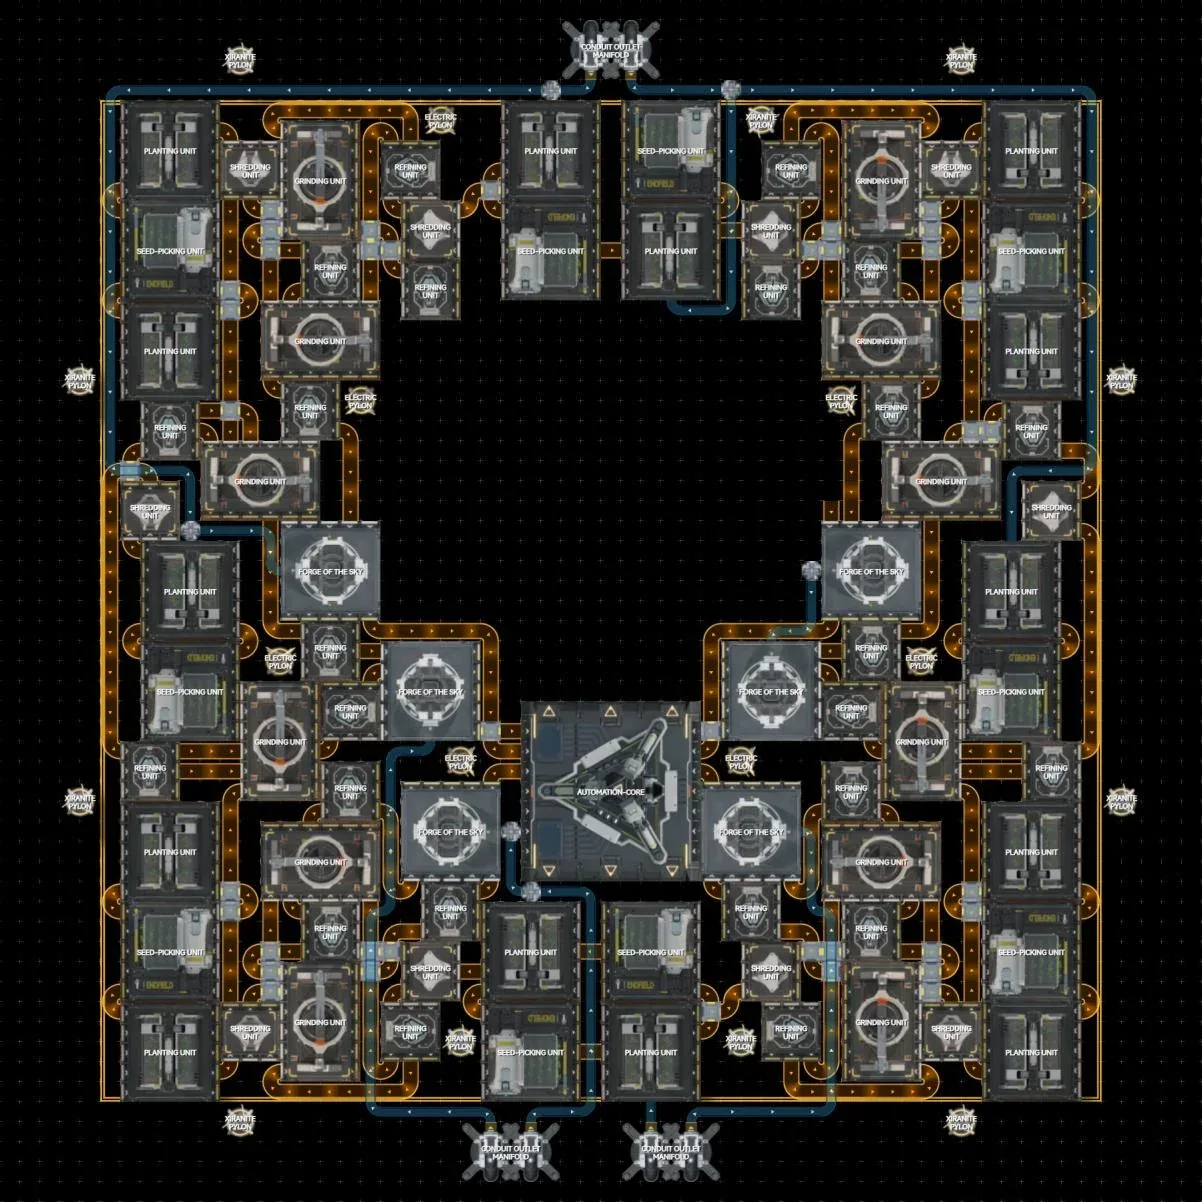
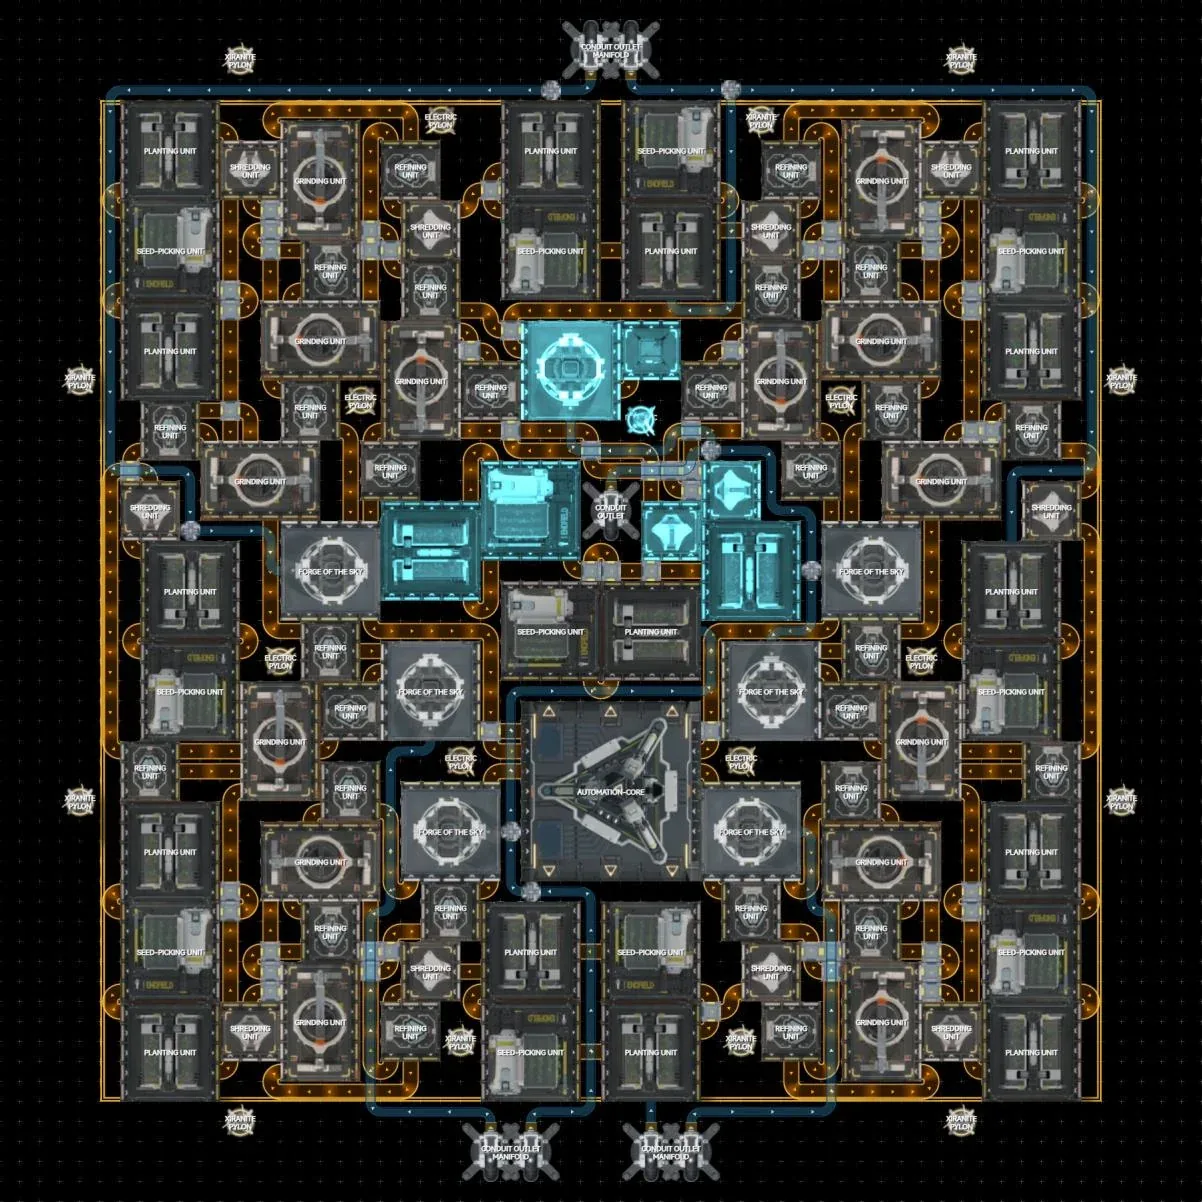
7-Line Xiranite Production (210/min)

7 self-sufficient Xiranite production lines at 210/min output. Near-symmetrical layout with only 8 asymmetrically placed facilities.

Key Space-Saving Tricks:

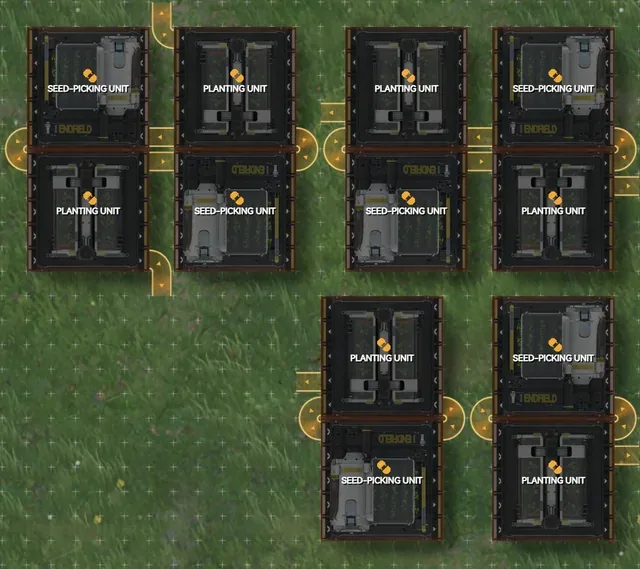
  • Chain-linked Jincao/Yazhen planter/seed-picker groups (2-unit recursive loop)
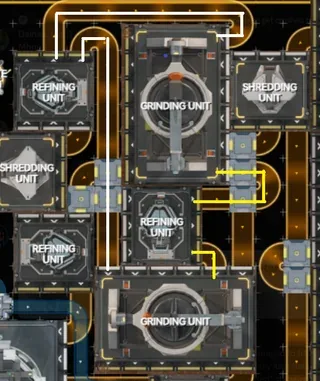
  • Corner design: 1 refiner feeding 2 grinders via carbon powder
  • Cross-line forge feeding with stabilizing carbon

Water Split:

  • North conduit: 2.5 water pumps
  • Southwest conduit: 2 pumps
  • Southeast conduit: 1 pump
  • Central conduit: 1.5 pumps

Setup Notes:

  • Requires 7 forges
  • Move AIC away before placing (dense placement)
  • 3 separate blueprints for EU/NA
  • 4 separate blueprints for ASIA

Credit: Community blueprint from Reddit
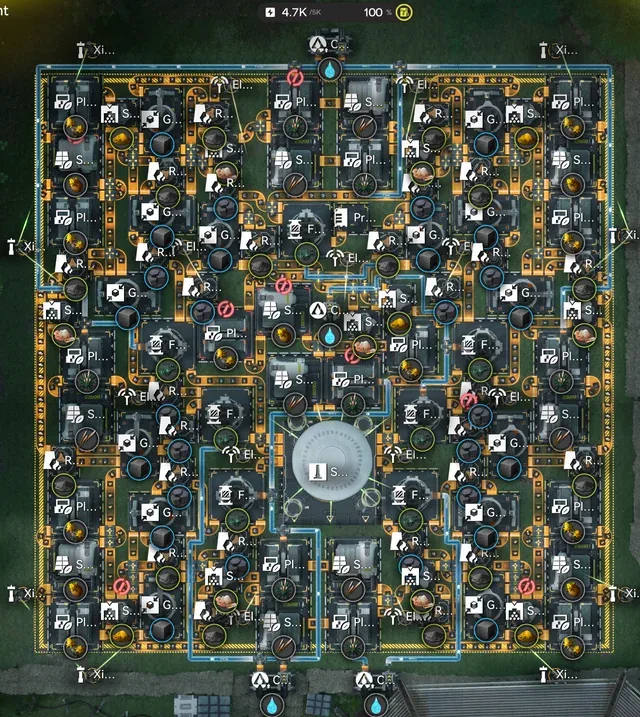
7-Line Xiranite Production Overview - Top View
Chain-linked planter/seed-picker groups
Corner refiner feeding two grinders design
Cross-line forge feeding with stabilizing carbon
Connection path between facilities
Space remaining after placing six production lines
Asymmetrically placed facilities in the 7th production line

EU/NA Blueprints

Xiranite Blueprint

XiraniteEU/NA
EFO010U96Ao037i34E179
Dimensions: North

Xiranite Blueprint

XiraniteEU/NA
EFO012I45o72Au83ueIOo
Dimensions: Southwest

Xiranite Blueprint

XiraniteEU/NA
EFO01O3E2uiO78IE29oe4
Dimensions: Southeast

ASIA Blueprints

Xiranite Blueprint

XiraniteASIA
EFO018Ie7785Oi1eUI73
Dimensions: North West

Xiranite Blueprint

XiraniteASIA
EFO017i8337a0o5eO0Ai
Dimensions: North East

Xiranite Blueprint

XiraniteASIA
EFO12O96627U08AeIOo
Dimensions: South West

Xiranite Blueprint

XiraniteASIA
EFO018Ie7785OiEUI73
Dimensions: South East

Valley IV Megabase — Best Endgame Base

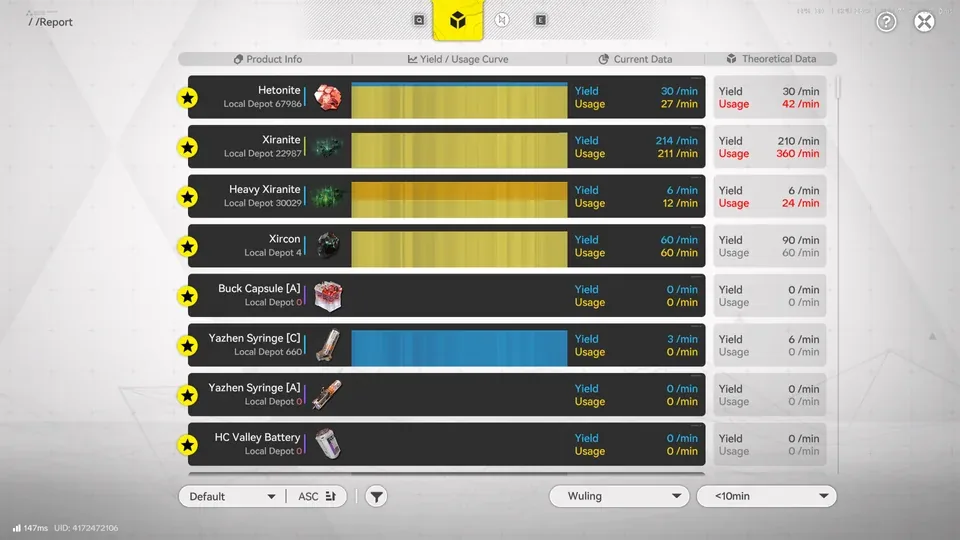
Optimized for money, power, and space. Runs at the lowest possible power of 4250 (factory+mining nodes), producing max value of 2780 stock bills/min worth of goods. Fits in just Core + 1 SubPac, leaving 2 SubPacs free.

Produces per minute:

  • 18 Buck Capsule A
  • 18 HC Battery
  • 120 Amethyst Bottle
  • 20 Origocrust

With SubPac 2 add-on: 30 Amethyst bottles, 18 Buck C, 30 Buckflower powder (depot quests), filling in 44h instead of 11h.

Requirements: Full upgrades in Core AIC and one SubPac. Rest can be unupgraded.
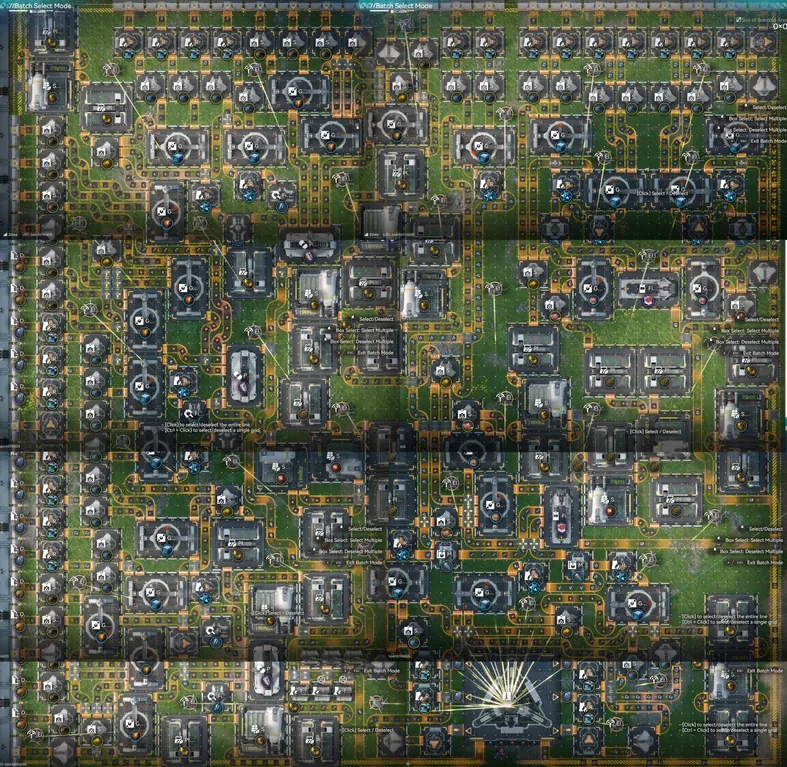
Valley IV Megabase Endgame Layout

Parts Required + Recommended SubPac 2:

Grinding Unit: 33Depot Unloader: 54Depot Loader: 1Planting Unit: 38Seed-picking Unit: 19Filling Unit: 9Moulding Unit: 16Shredding Unit: 73Refining Unit: 68Electric Pylon: 41Thermal Bank: 6

Placing Guide:

  • Gather 250 Buckflower, 500 Sandleaf, 400 HC Battery
  • Main PAC: orient depots to top and left. Place 6 pieces starting from top left.
  • Fill plants into seed pickers (every seed picker that needs filling has an item control port showing sandleaf or buckflower)
  • Set Core AIC outputs to 6 ferrium. Fill thermal banks with HC Battery
  • SubPAC: place right, then left. Fill seed pickers and set AIC output per item control ports
  • Switch off excess power thermal banks in Main PAC

EU/NA Codes — Main PAC

Main PAC — Top Left

BuckEU/NA
EFO016i1a32I957AUO83e
Dimensions: Main PAC — Top Left

Main PAC — Bottom Left

BuckEU/NA
EFO010U96oO3a2iAAE179
Dimensions: Main PAC — Bottom Left

Main PAC — Top Middle

BuckEU/NA
EFO01Eu24e0UO6o103uIa
Dimensions: Main PAC — Top Middle

Main PAC — Bottom Middle

BuckEU/NA
EFO019A618Eu04eIi5uI2
Dimensions: Main PAC — Bottom Middle

Main PAC — Top Right

BuckEU/NA
EFO011ea0u4o6OUi634O7
Dimensions: Main PAC — Top Right

Main PAC — Bottom Right

BuckEU/NA
EFO0172UAa89eu5uiO0Ai
Dimensions: Main PAC — Bottom Right

EU/NA Codes — SubPAC

SubPAC — Left

BuckEU/NA
EFO01iOe76IaA82a172U4
Dimensions: SubPAC — Left

SubPAC — Right

BuckEU/NA
EFO01a709I581EAU9oe5e
Dimensions: SubPAC — Right

EU/NA Codes — Optional Extensions

SubPac 2 — 18 Buck C, 30 Buckflower powder

BuckEU/NA
EFO012I4579AE186ueIOo
Dimensions: +170 Power

SubPac 2 — 12 Buck C, 45 Sandleaf powder

BuckEU/NA
EFO011ea0u4o6OUoE34O7
Dimensions: +130 Power

SubPac 2 — 24 Buck C

BuckEU/NA
EFO014o5OU6i2a3U3Ea1A
Dimensions: +190 Power

SubPac 2 — 24 Buck C, 45 SL powder

BuckEU/NA
EFO012I4579AE186UeIOo
Dimensions: +225 Power

SubPac 2 — 24 Buck C, 90 SL powder

BuckEU/NA
EFO010U96oO3a2i28E179
Dimensions: +245 Power

ASIA Codes — Main PAC

Main PAC — Top Left

BuckASIA
EFO012O9A06U4i8aOeIOo
Dimensions: Main PAC — Top Left

Main PAC — Top+Middle Right

BuckASIA
EFO01602IE4u1o7A7O83e
Dimensions: Main PAC — Top+Middle Right

Main PAC — Middle Left

BuckASIA
EFO01I3A5Ui4oO99E5o08
Dimensions: Main PAC — Middle Left

Main PAC — Bottom Left

BuckASIA
EFO01ouiIi09046AIieO
Dimensions: Main PAC — Bottom Left

Main PAC — Bottom Right

BuckASIA
EFO01u8U47A2I5031AoOU
Dimensions: Main PAC — Bottom Right

ASIA Codes — SubPAC

SubPAC — Left

BuckASIA
EFO017i89o30U65uoO0Ai
Dimensions: SubPAC — Left

SubPAC — Right

BuckASIA
EFO01521e6aiO7u1EeIoe
Dimensions: SubPAC — Right

ASIA Codes — Optional Extension

SubPac 2 — 18 Buck C, 30 Buckflower powder

BuckASIA
EFO013o71u2I81a50579
Dimensions: +170 Power

Complete Wuling Factory (1.3)

A full Wuling 1.3 factory complex built from three linked sites: the main Wuling base, a JG. Valley extension, and an M. Stone extension. Import the parts for each site, then pipe in water and acid pumps where the overview image marks them.

Setup: Follow the pump labels in the layout below (the Wuling and JG. Valley sites take several water pumps, M. Stone needs an acid pump). For the exact facility-by-facility breakdown of each site, open the detailed Enkad projects linked under each group.

EU/NA codes only. Credit: community blueprint from Reddit.
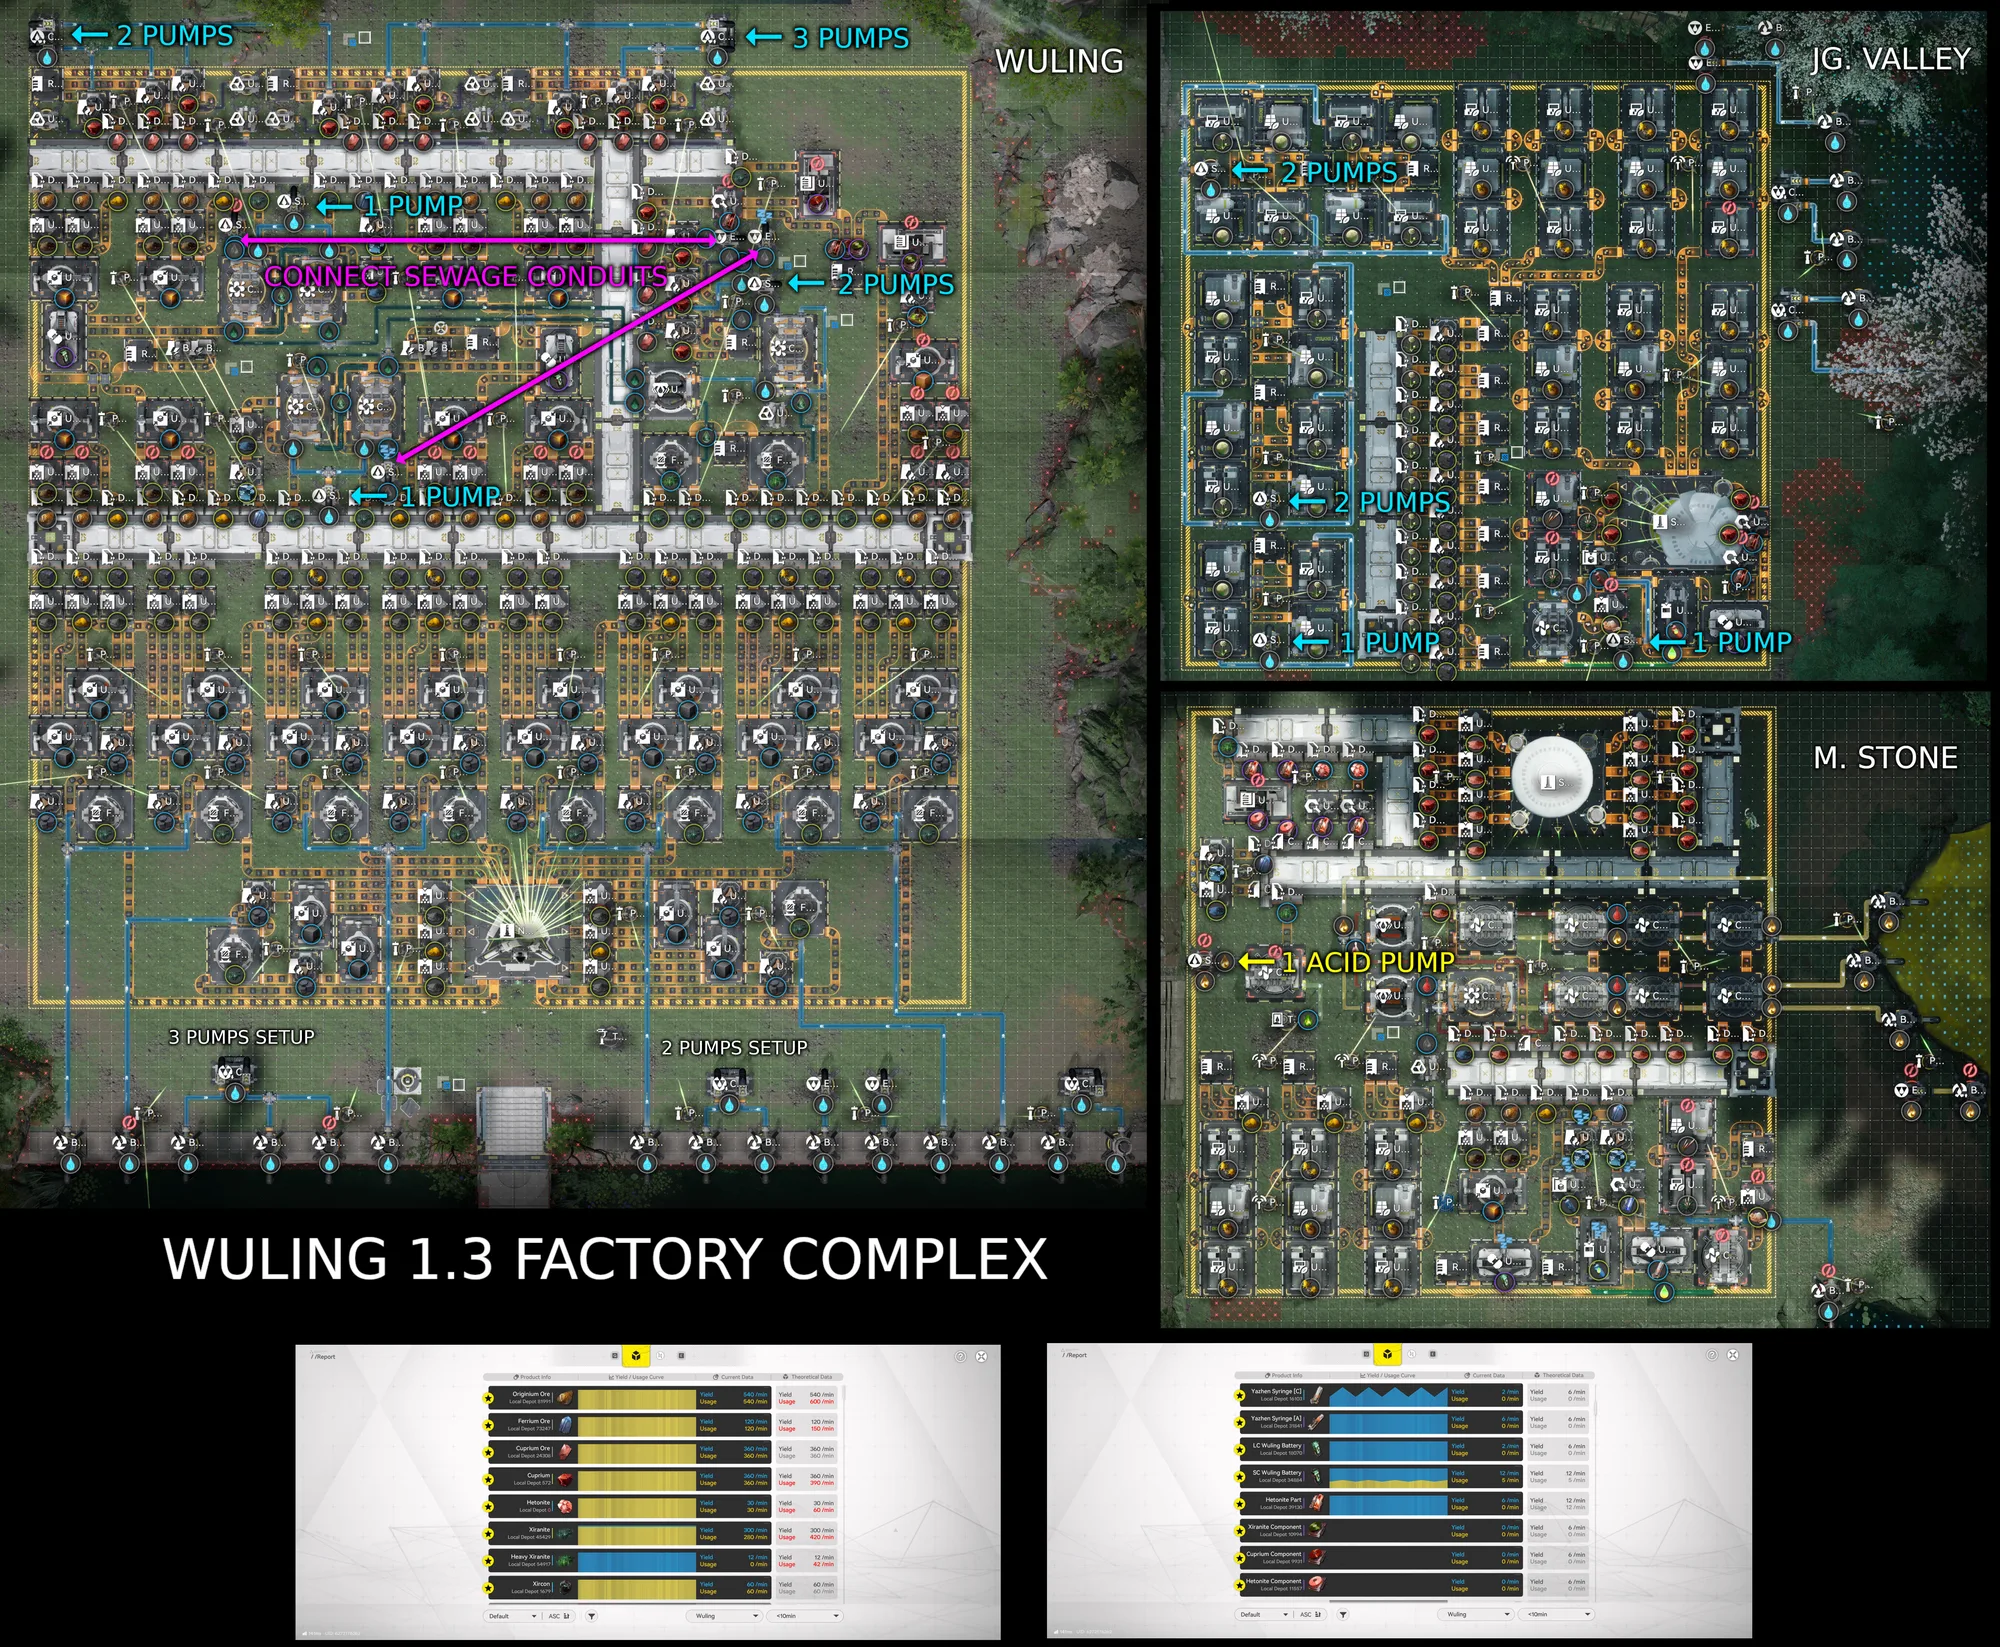
Complete Wuling 1.3 factory complex: Wuling, JG. Valley, and M. Stone sites with pump requirements labeled (EU/NA)

Wuling: Main Base

Wuling 1.3-1

WulingEU/NA
EFO014o5IE0E86323Ea1A
Dimensions: Part 1 of 5

Wuling 1.3-2

WulingEU/NA
EFO01O3E8464uaI6O94e4
Dimensions: Part 2 of 5

Wuling 1.3-3

WulingEU/NA
EFO01a70e626U5A93Oou5e
Dimensions: Part 3 of 5

Wuling 1.3-4

WulingEU/NA
EFO0172UEiIi4855U3O2Ai
Dimensions: Part 4 of 5

Wuling 1.3-5

WulingEU/NA
EFO01A5i4787OuEI0191eO
Dimensions: Part 5 of 5

Detailed project on Enkad:Wuling base layout

JG. Valley Extension

WL-JG.V 1.3-1

JG. ValleyEU/NA
EFO012I4uOaOo985o0eIOo
Dimensions: Part 1 of 2

WL-JG.V 1.3-2

JG. ValleyEU/NA
EFO011eai9E974U25834O7
Dimensions: Part 2 of 2

Detailed project on Enkad:JG. Valley layout

M. Stone Extension

M.Stone 1.3-1

M. StoneEU/NA
EFO019A6Ua5aiEeA075uI2
Dimensions: Part 1 of 2

M.Stone 1.3-2

M. StoneEU/NA
EFO016i1A0O0e271uiO83e
Dimensions: Part 2 of 2

Detailed project on Enkad:M. Stone layout

Expanded Crucible Item Incinerator (Auto-Unclog Depots)

Worried about clogged depots? The new Multi-Line Auto-Unclog feature lets you automatically destroy excess solids using the Expanded Crucible as an item incinerator.

How it works: Using the converger trick plus medicine powders, items loop back into the depot while it still has space. Once the depot is full, overflow is routed into the Expanded Crucible instead. Every 100 seconds the Expanded Crucibles clog both medicine solutions and clear everything inside them.

Bonus: It can also handle 1 refiner's worth of sewage if you move the top-right-most stash to add a 2nd liquid input.

NA/EU code only. Credit: community blueprint from Reddit.
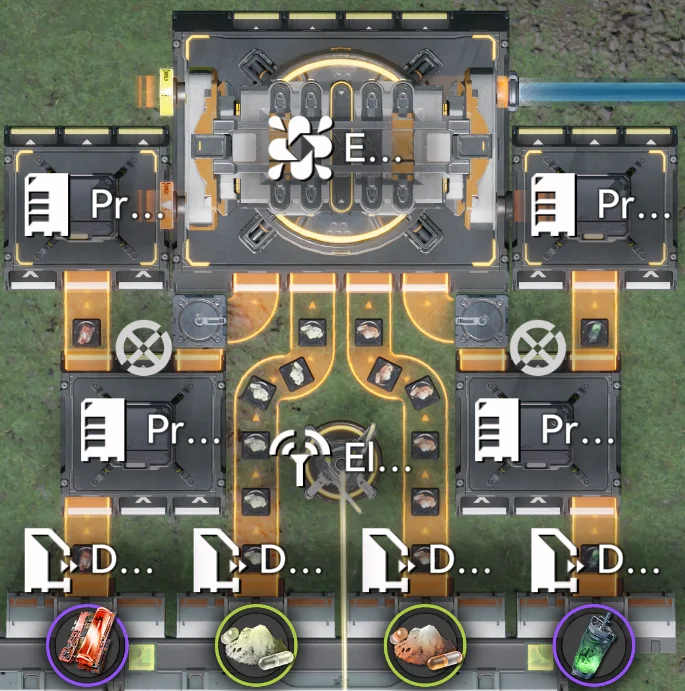
Standalone Expanded Crucible item incinerator using the converger trick and medicine powders (NA/EU)

Standalone Item Incinerator (NA/EU)

IncineratorEU/NA
EFO01A5ie48567E489ieO
Dimensions: Standalone

YazhenA Line Integration (Theoretical)

A theoretical way of incorporating the incinerator into a YazhenA line. This variant is not fully tested, so treat it as a starting point rather than a drop-in build.
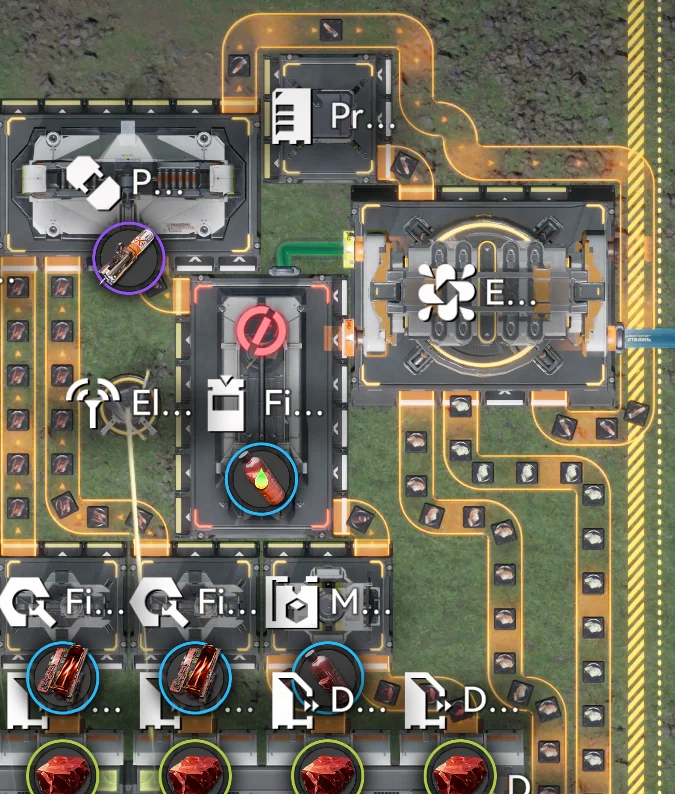
Theoretical integration of the Expanded Crucible incinerator into a YazhenA production line

Meme Blueprint

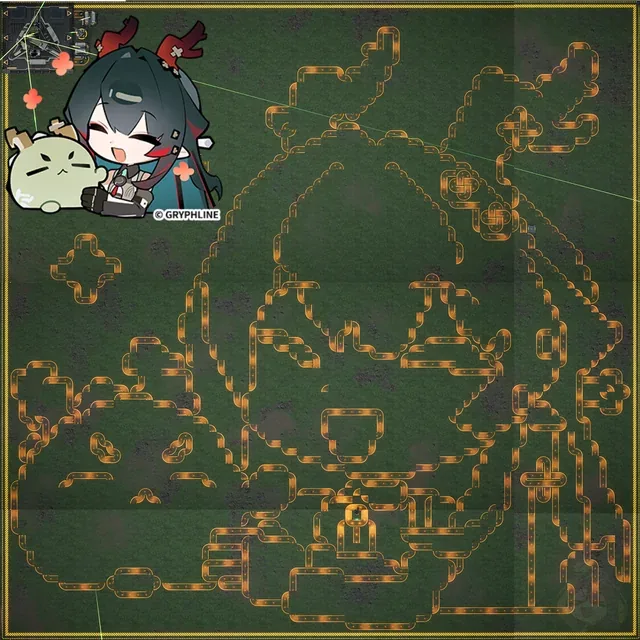
Meme Blueprint Layout

Meme Blueprint

MemeEU/NA
EFO01Iao8017Eo9665o08
Dimensions: Part 1

Meme Blueprint

MemeEU/NA
EFO011ea07iE3aU6u34O7
Dimensions: Part 2

Meme Blueprint

MemeEU/NA
EFO01Iao8017Eo96A5o08
Dimensions: Part 3

Meme Blueprint

MemeEU/NA
EFO0136uI19i5uaIa0579
Dimensions: Part 4

Liquid Logic Gates (XOR / AND / NOR / NOT)

A novelty set of blueprints that build working boolean logic gatesout of liquid flow in Arknights: Endfield. By using one fluid stream to block another, a Conduit only transfers its Xircon Effluent under specific on/off combinations of Water and Acid — giving youAND, NOR,XOR, and NOT behavior.

More of a fun engineering showcase than a production base — but the Double Starter and the individual gates are handy primitives if you want to experiment with fluid logic.

Credit: community blueprint from Reddit. EU/NA codes only.

Setup & Wiring
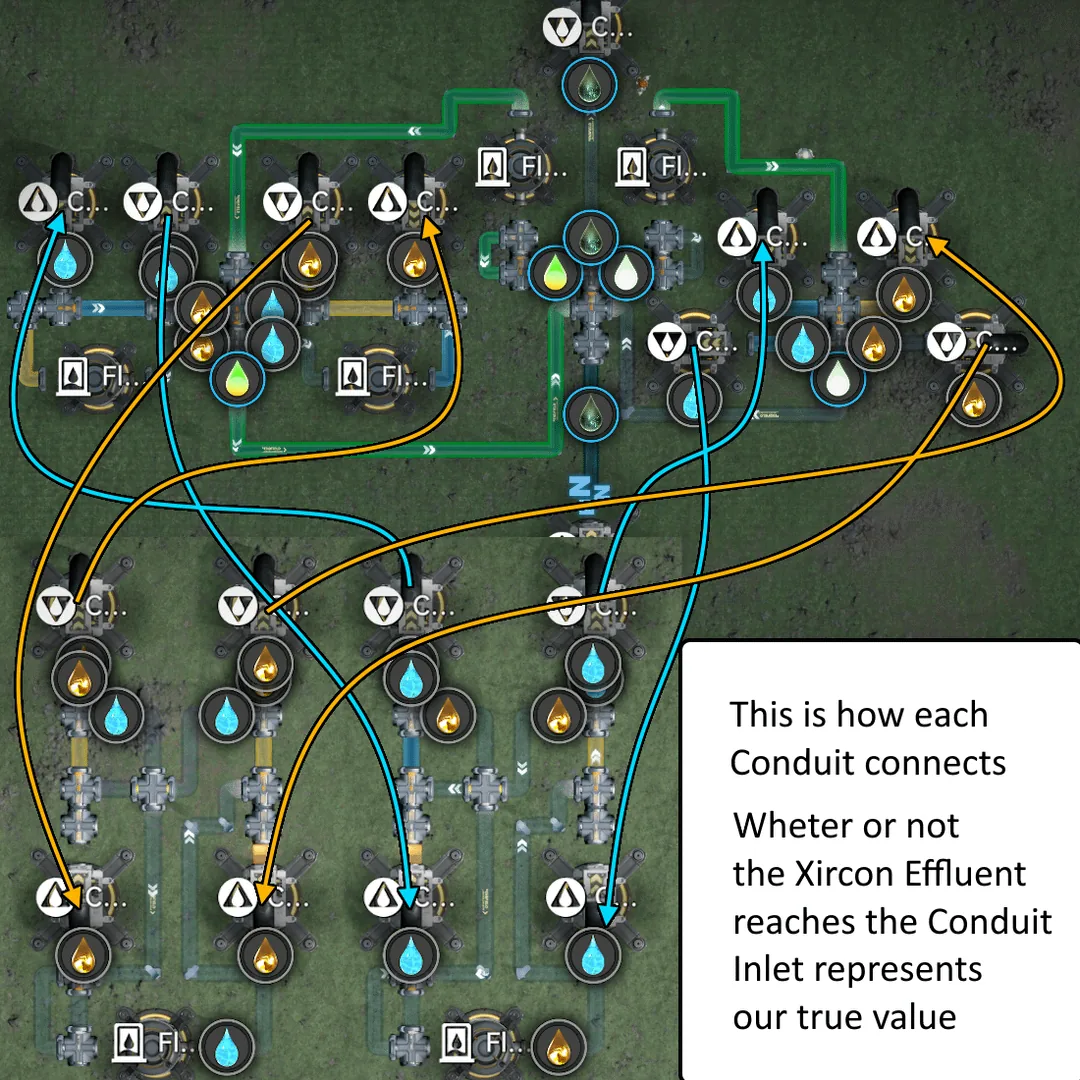
Liquid logic gate overview — how each Conduit connects and is gated by fluid flow

How each Conduit connects — fluids gate the Xircon Effluent

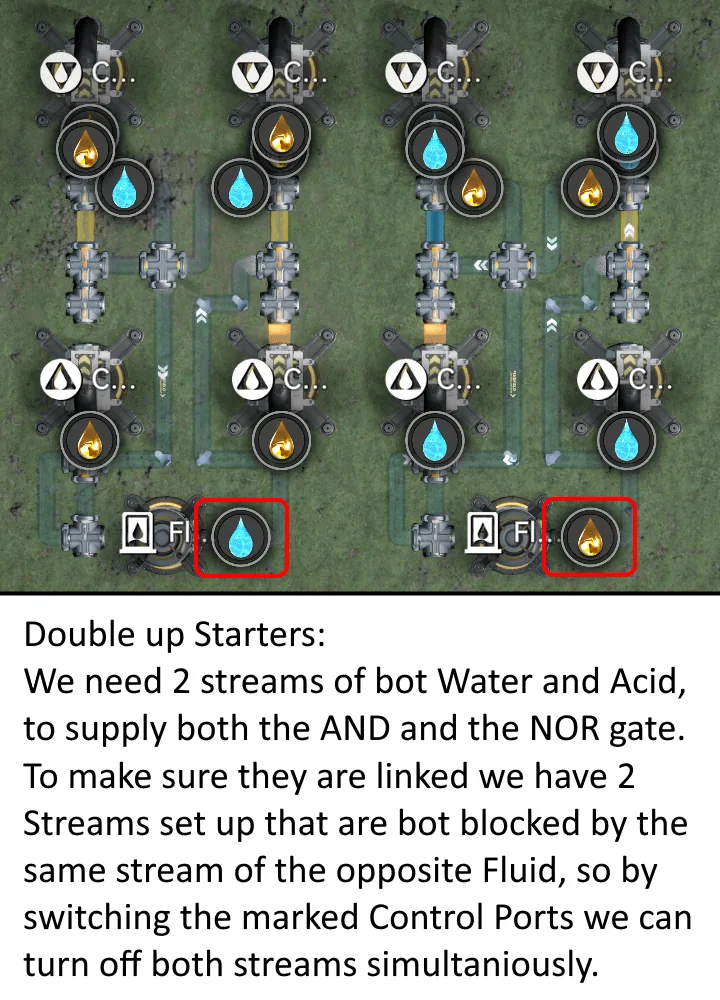
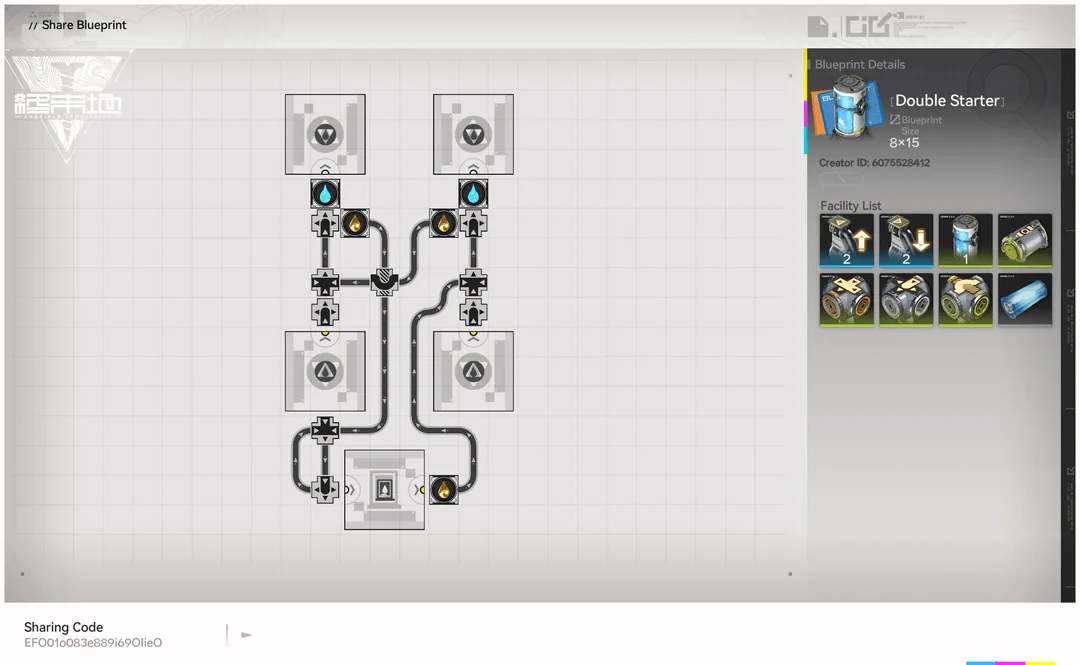
Double Starter — two linked Water and Acid streams that can be toggled together

Double Starter — two linked Water/Acid streams toggled together
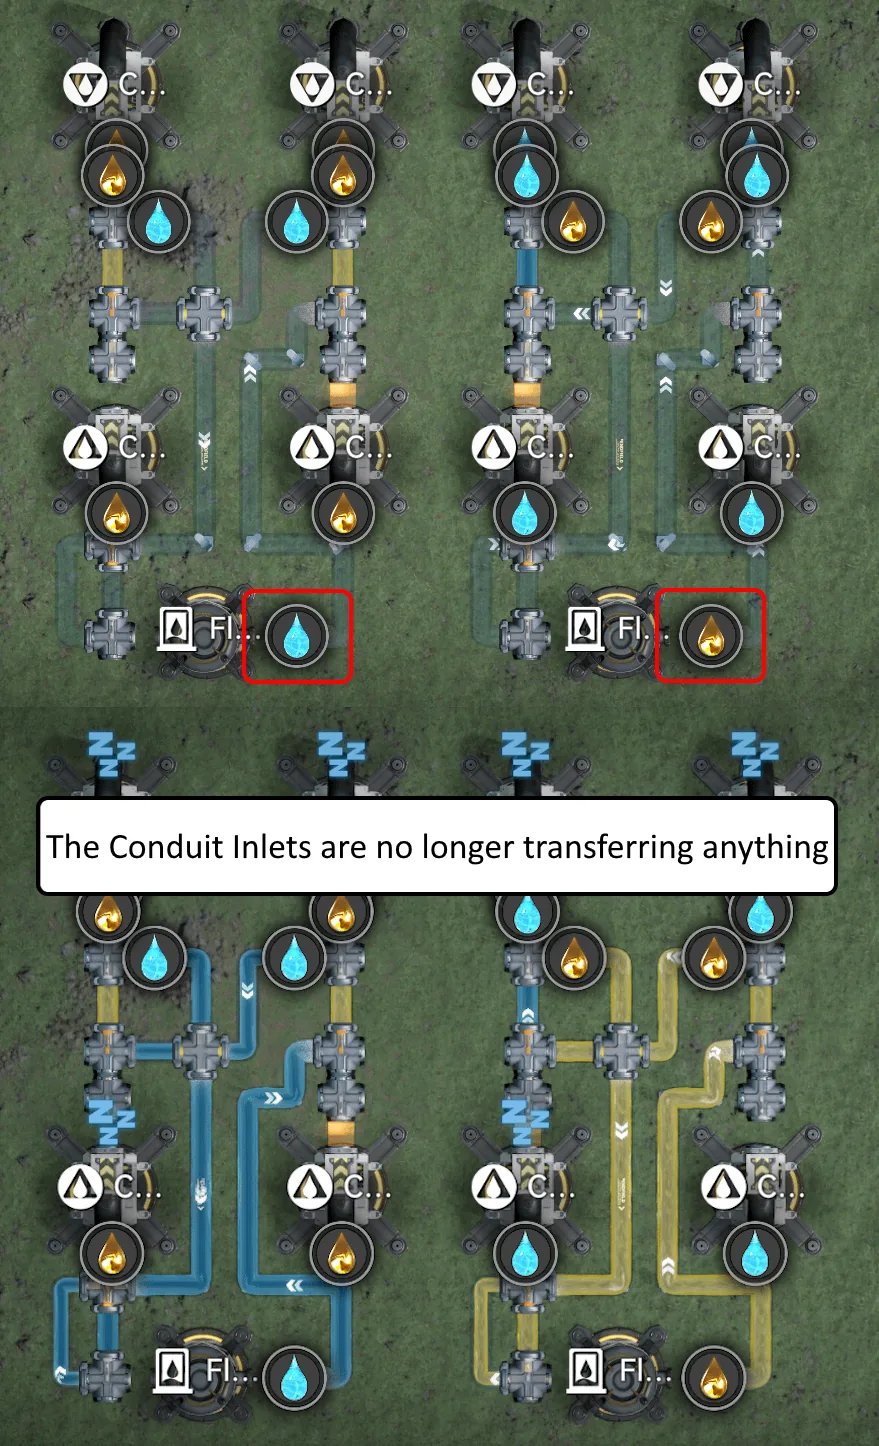
Conduit inlets switched off so nothing is transferred

Conduit inlets switched off — nothing transfers

AND Gate — flows only when both fluids are on

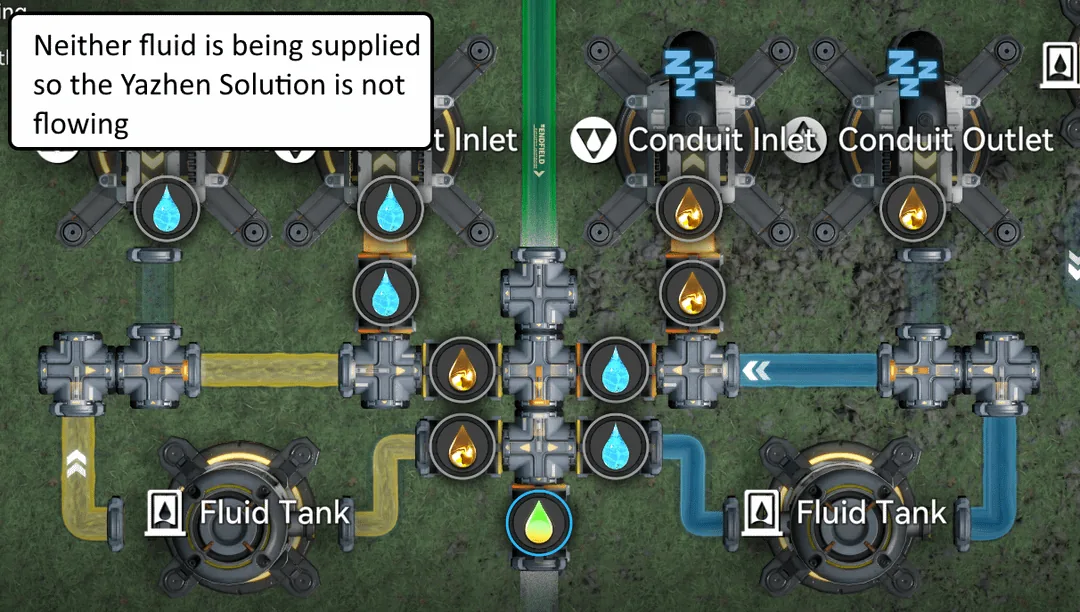
AND gate — neither fluid supplied, so the Yazhen Solution does not flow

Neither fluid supplied — Solution does not flow

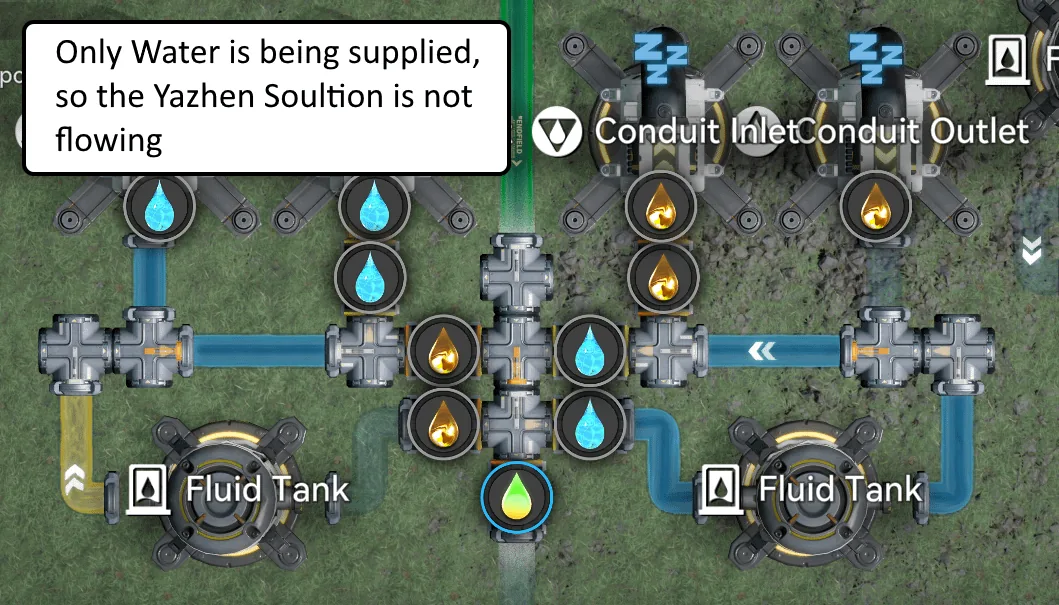
AND gate — only Water supplied, so the Yazhen Solution still does not flow

Only Water on — still does not flow

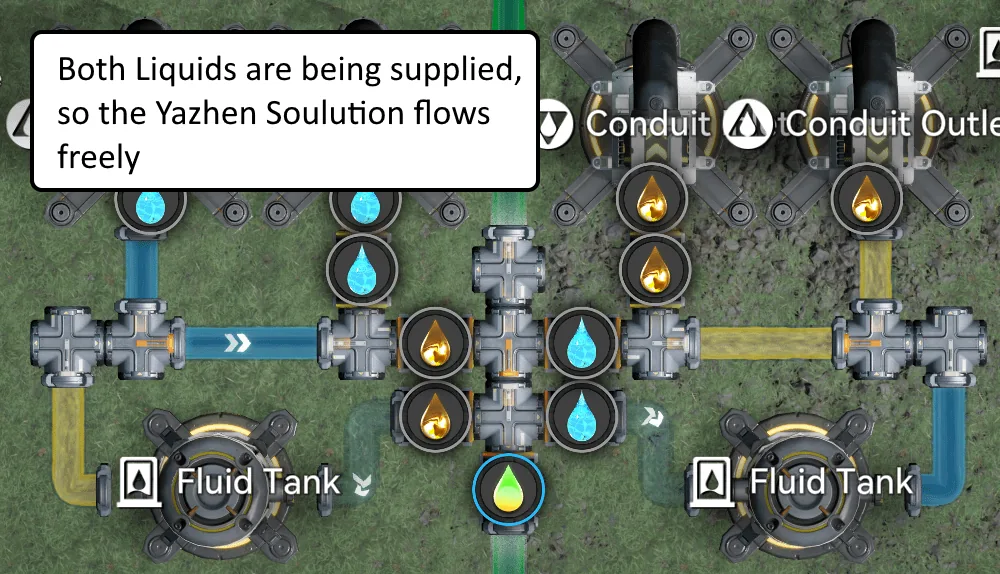
AND gate — both liquids supplied, so the Yazhen Solution flows freely

Both liquids on — Solution flows freely

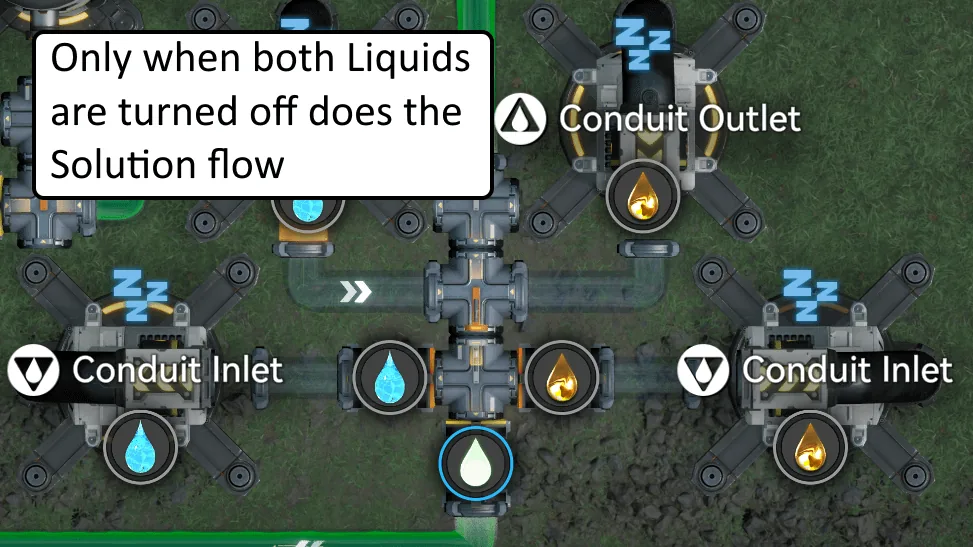
NOR Gate — flows only when both fluids are off

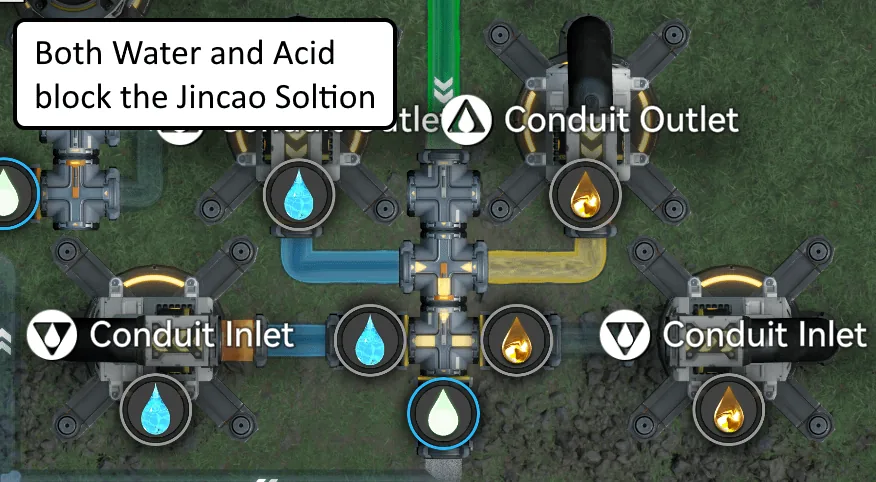
NOR gate — both Water and Acid on, blocking the Xircon Solution

Both on — Solution blocked

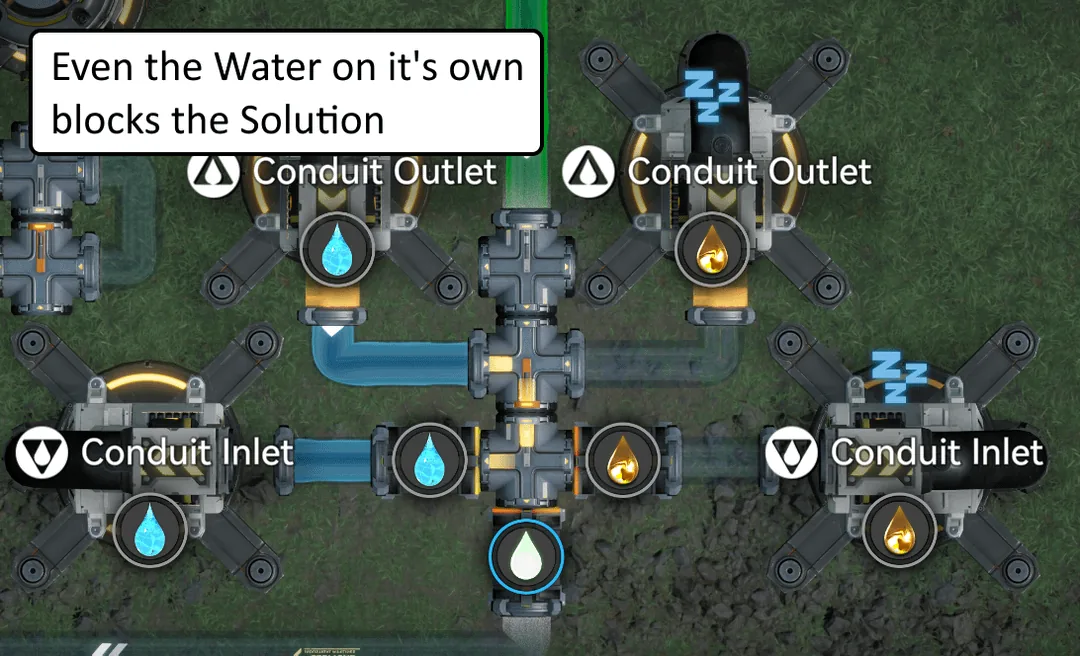
NOR gate — Water on its own still blocks the Solution

Water alone — still blocked

NOR gate — only when both liquids are off does the Solution flow

Both off — Solution flows

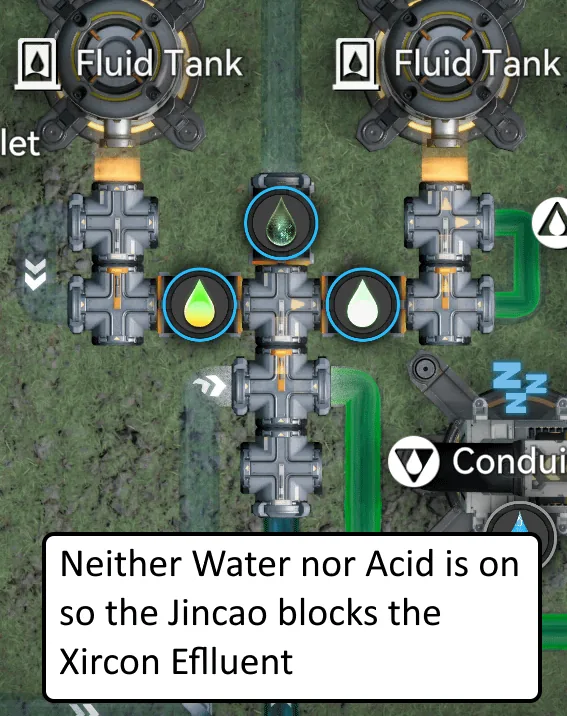
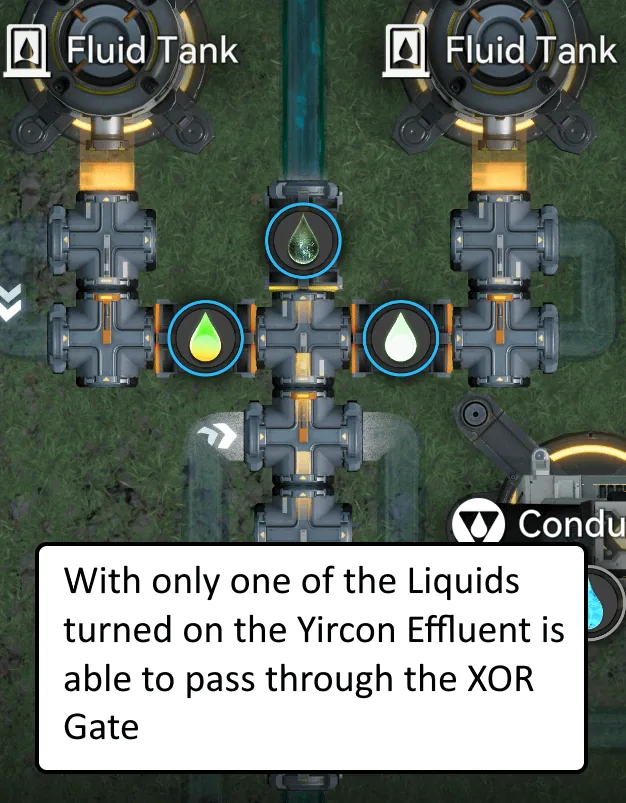
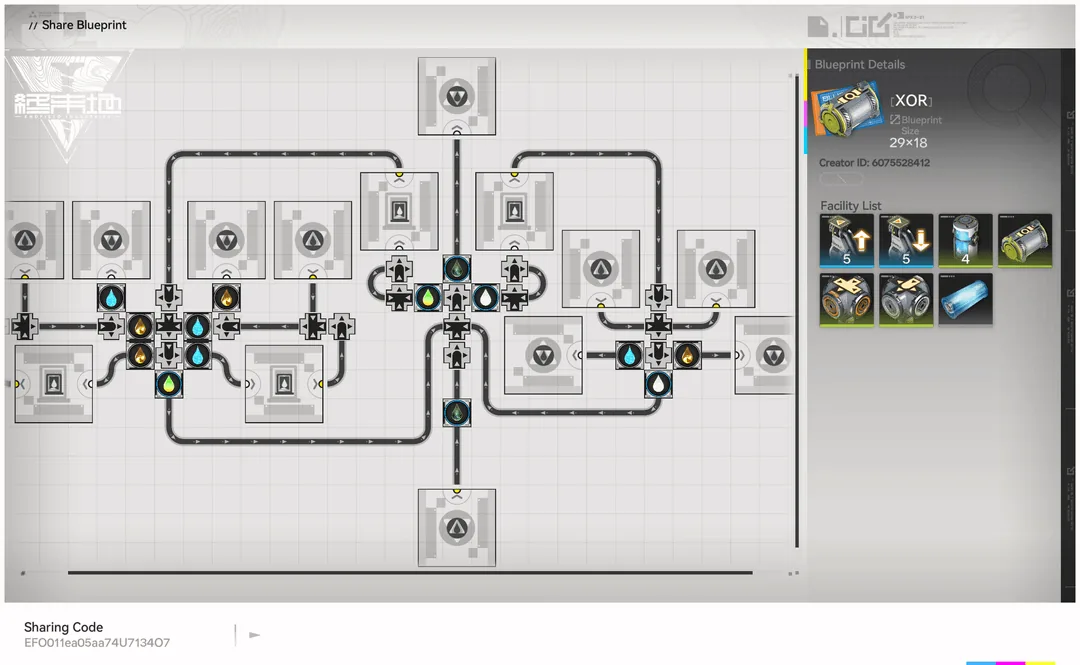
XOR Gate — flows only when exactly one fluid is on
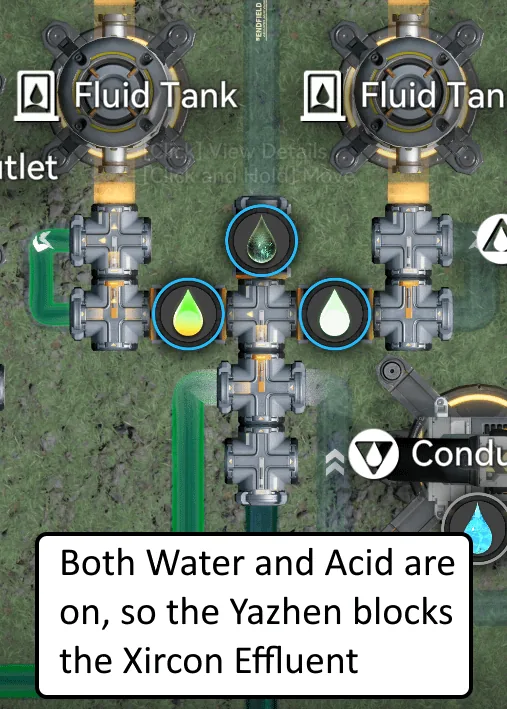
XOR gate — both on, so the Yazhen blocks the Xircon Effluent

Both on — Effluent blocked

XOR gate — neither on, so the Jincao blocks the Xircon Effluent

Neither on — Effluent blocked

XOR gate — exactly one liquid on, so the Xircon Effluent passes through

Exactly one on — Effluent passes

Blueprints & Codes (EU/NA)
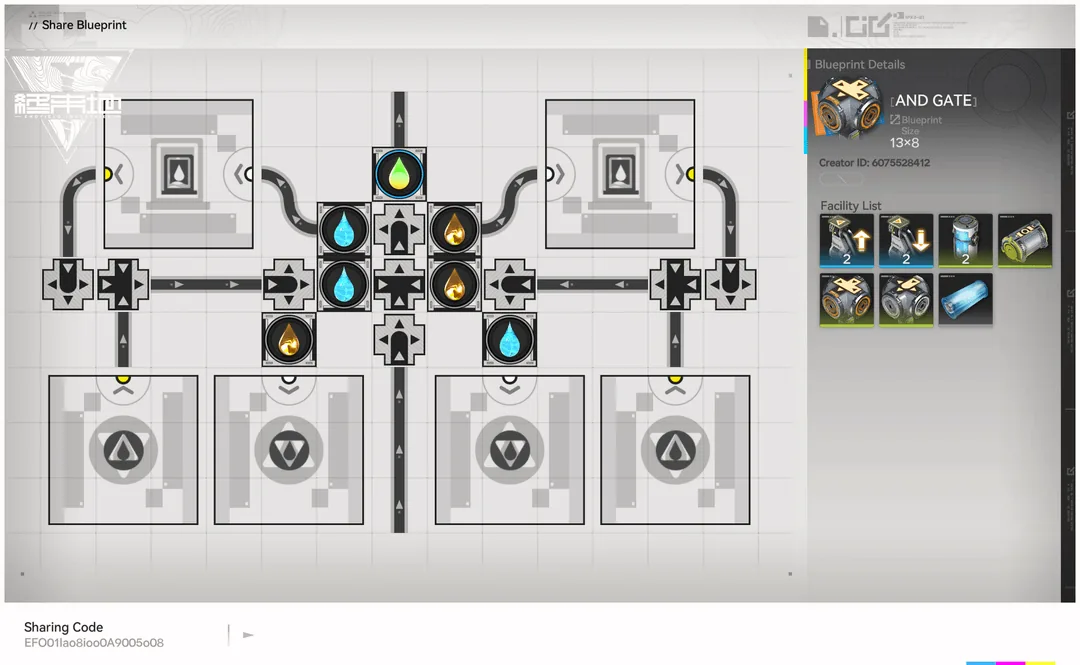
AND Gate share blueprint screen (13x8, EU/NA)

AND Gate

Logic GateEU/NA
EFO01Iao8ioo0A9005o08
Dimensions: 13x8
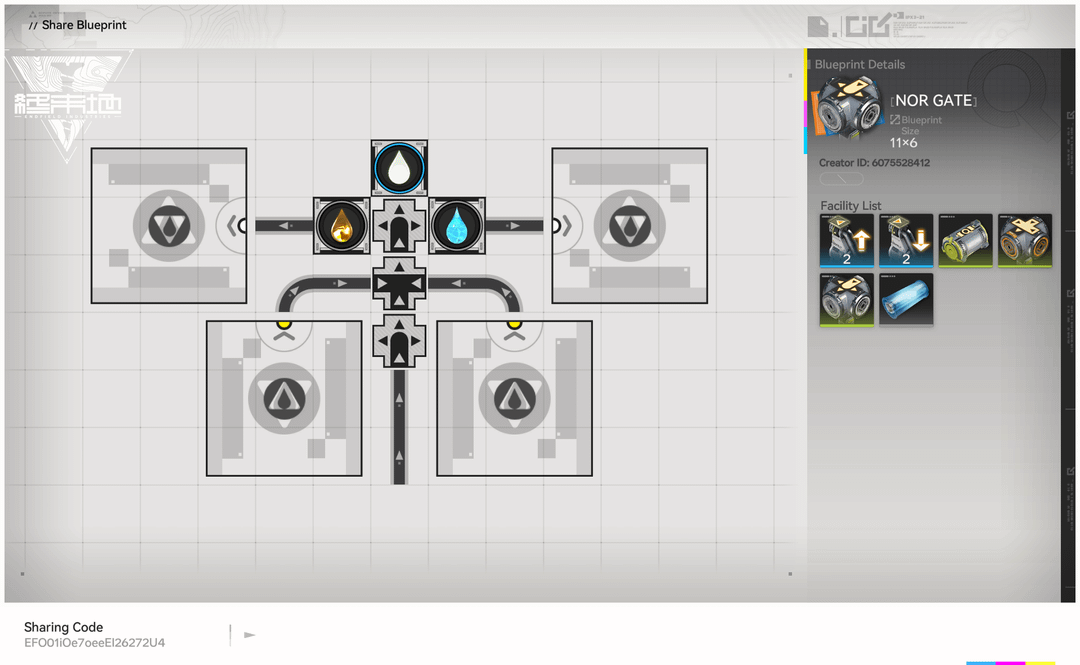
NOR Gate share blueprint screen (11x6, EU/NA)

NOR Gate

Logic GateEU/NA
EFO01iOe7oeeEI26272U4
Dimensions: 11x6
Double Starter share blueprint screen (8x15, EU/NA)

Double Starter

Logic GateEU/NA
EFO01o083e889i69OIieO
Dimensions: 8x15
XOR Gate share blueprint screen (29x18, EU/NA)

XOR

Logic GateEU/NA
EFO011ea05aa74U7134O7
Dimensions: 29x18
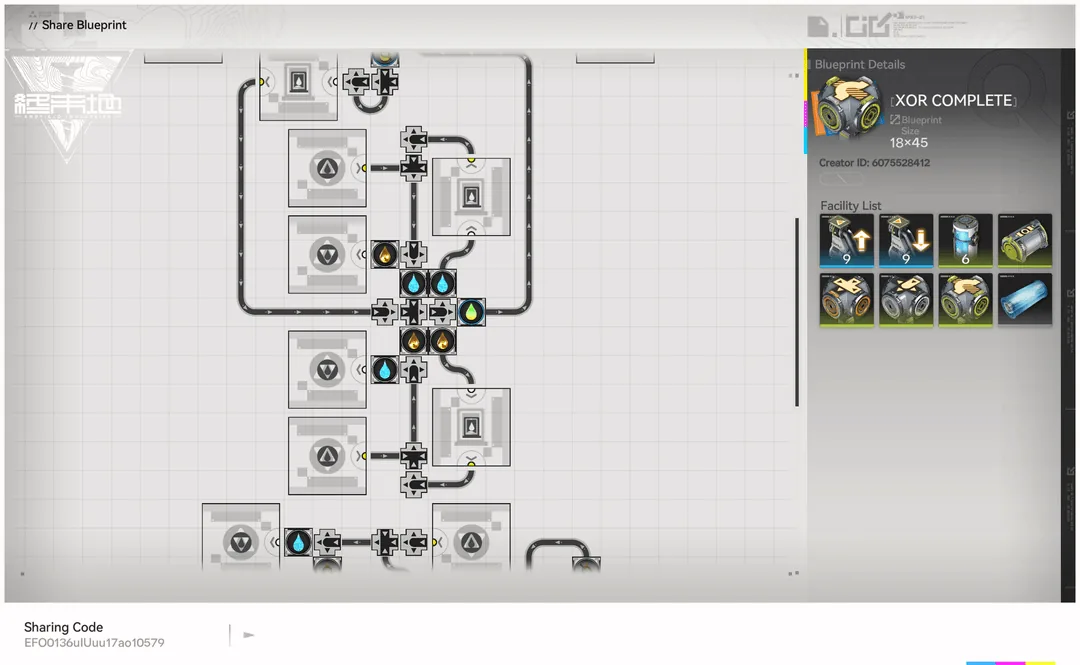
XOR Complete share blueprint screen (18x45, EU/NA)

XOR Complete

Logic GateEU/NA
EFO0136uIUuu17ao10579
Dimensions: 18x45
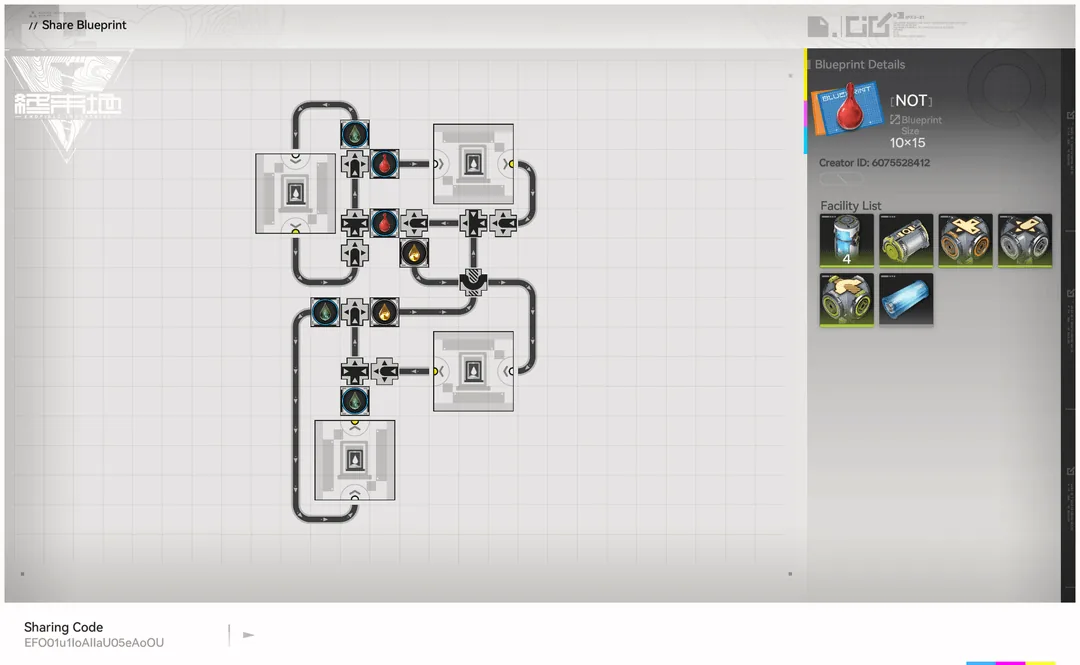
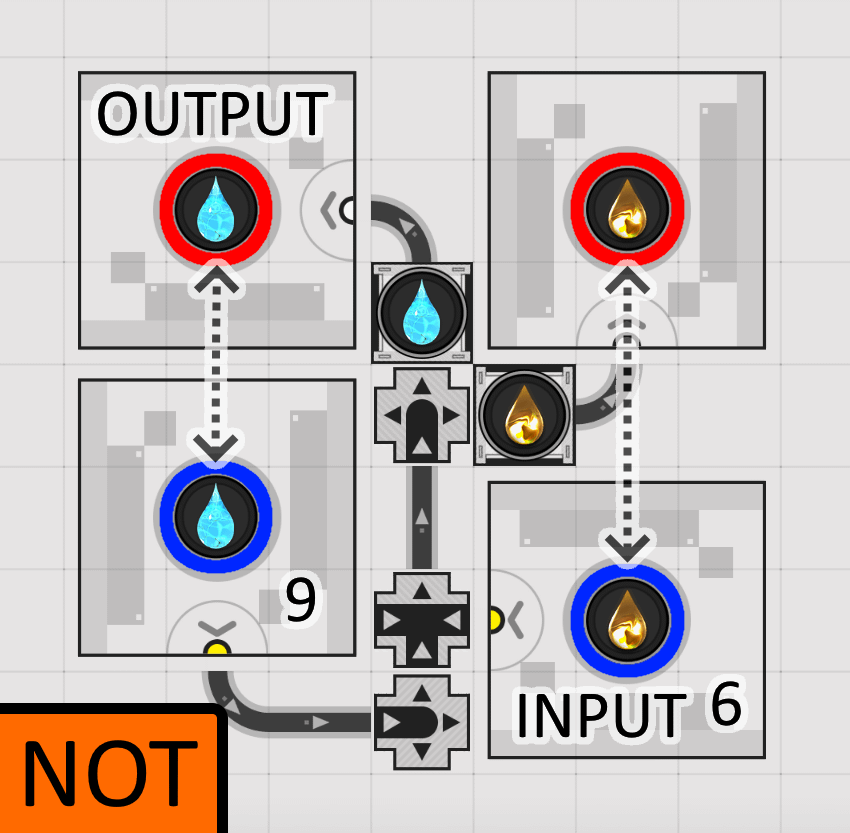
NOT Gate share blueprint screen (10x15, EU/NA)

NOT

Logic GateEU/NA
EFO01u1IoAIIaU05eAoOU
Dimensions: 10x15

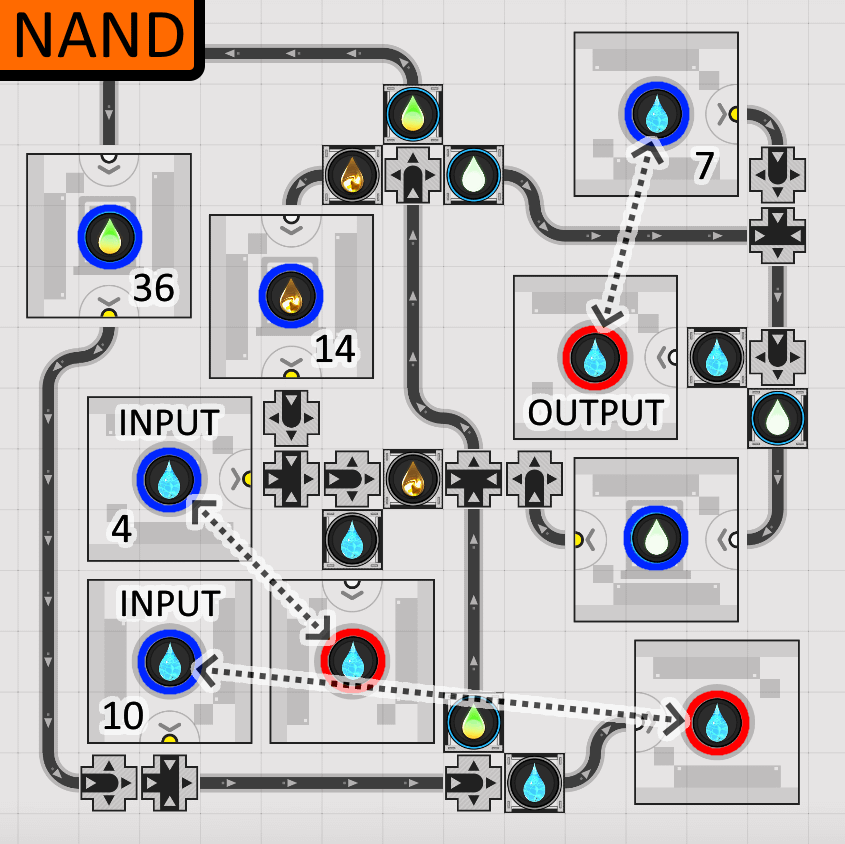
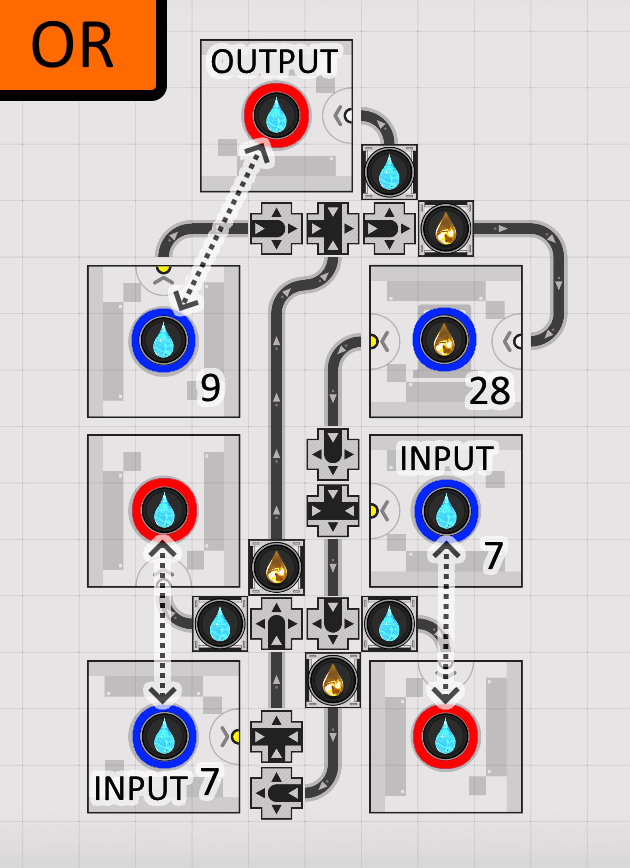
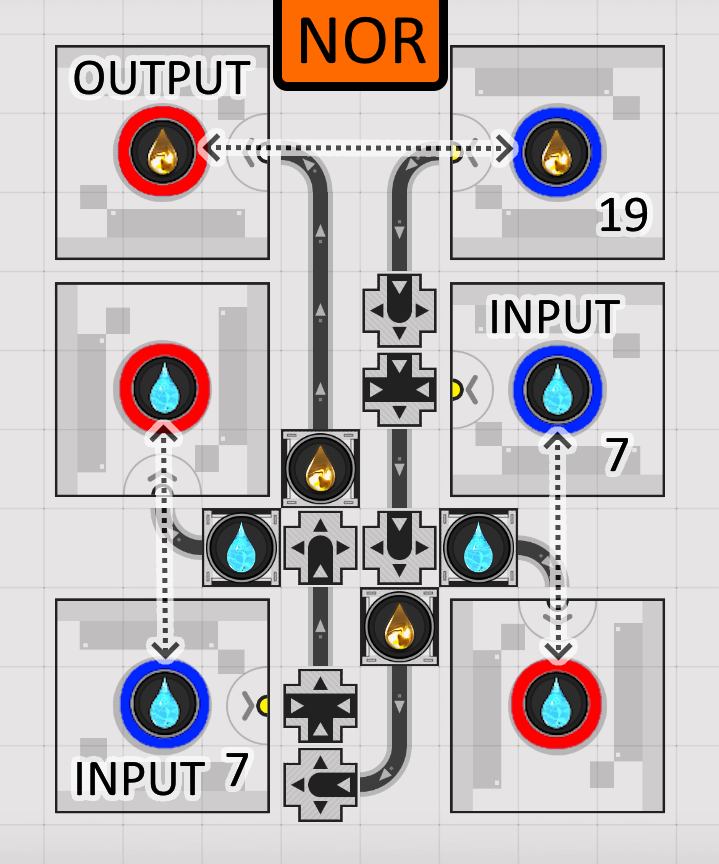
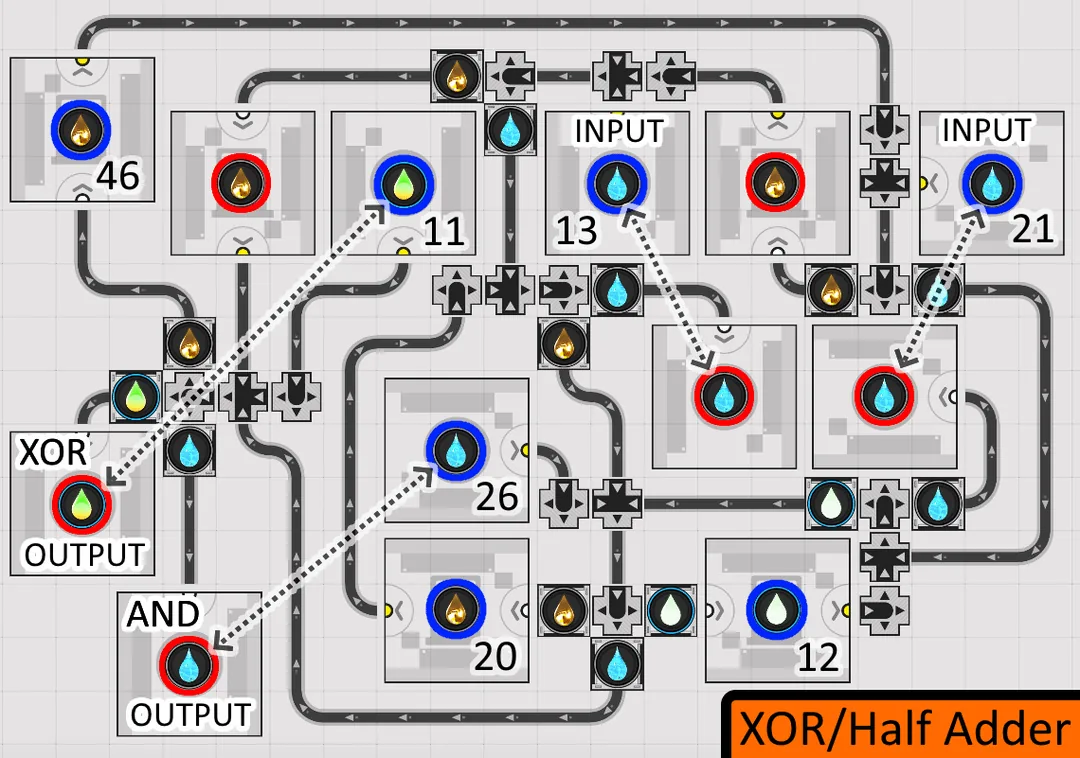
Liquid Logic Gate Collection (AND / NAND / OR / NOR / XOR / NOT)

A full collection of working boolean logic gates built entirely out of liquid flow in Arknights: Endfield. The trick: when a Splitter sits directly in front of a Converger, the Converger only draws from that Splitter if its capacity is not already maxed by the other inputs, so those other inputs take priority. Chain that priority behaviour together and one fluid stream can block another, giving you full AND, NAND,OR, NOR,XOR / Half Adder, and NOT behaviour.

These were optimised for the number of pipe logistics pieces (not just space), because the Wuling Main AIC has a hard limit of 128 pipe logistics parts. Each gate below lists its piece count so you can budget a circuit: a Full Adder, for example, needs 2 Half Adders plus an OR plus 3 inputs, so 32 + 32 + 15 + 3 = 82, leaving 46 pieces for everything else.

Credit: community blueprint collection from Reddit. NA/EU codes only.

How to Read the Gates

A liquid symbol inside a blue circle marks a Tank or Outlet you need to fill, and the number next to it is the minimum amount of liquid required. When chaining gates, it is enough to fill one of the connected Outlets/Inlets by the sum of the connected numbers.

Swap liquid types so the input and output of chained gates match. Example: OR outputs Water by default, but NOT takes Acid as its input, so change NOT's Acid to Water (which also means changing the Water used elsewhere in NOT to a different liquid).

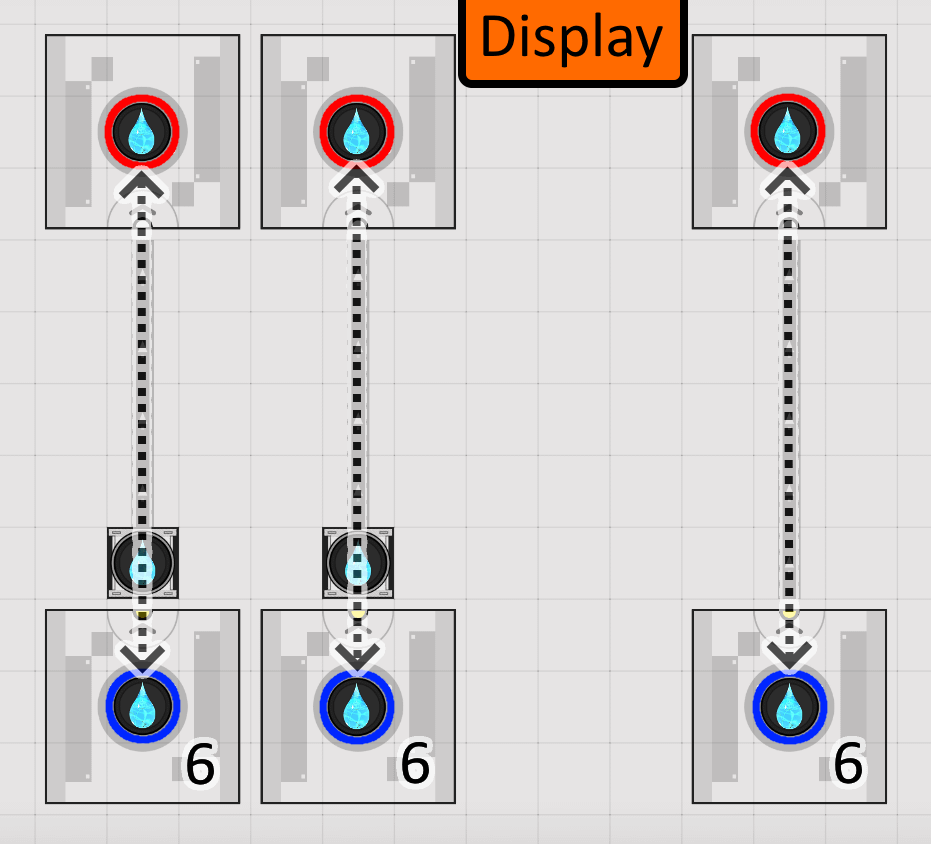
Normally you control inputs through the Display's control ports and read the output there too. If you are not using a Display, the dotted arrows show how to connect the Inlets and Outlets directly.

Important: after placing a blueprint the priority trick may not work instantly. If a gate misbehaves, delete and replace any Splitters sitting in front of Convergers (not the ones behind them with control ports coming off).
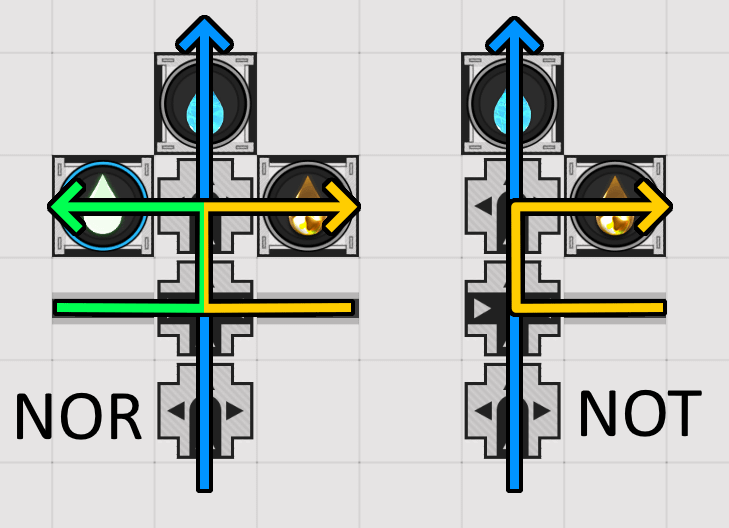
Liquid logic mechanism: how Splitter-before-Converger priority lets one fluid stream block another (NOR and NOT)

Splitter-before-Converger priority blocking the output stream
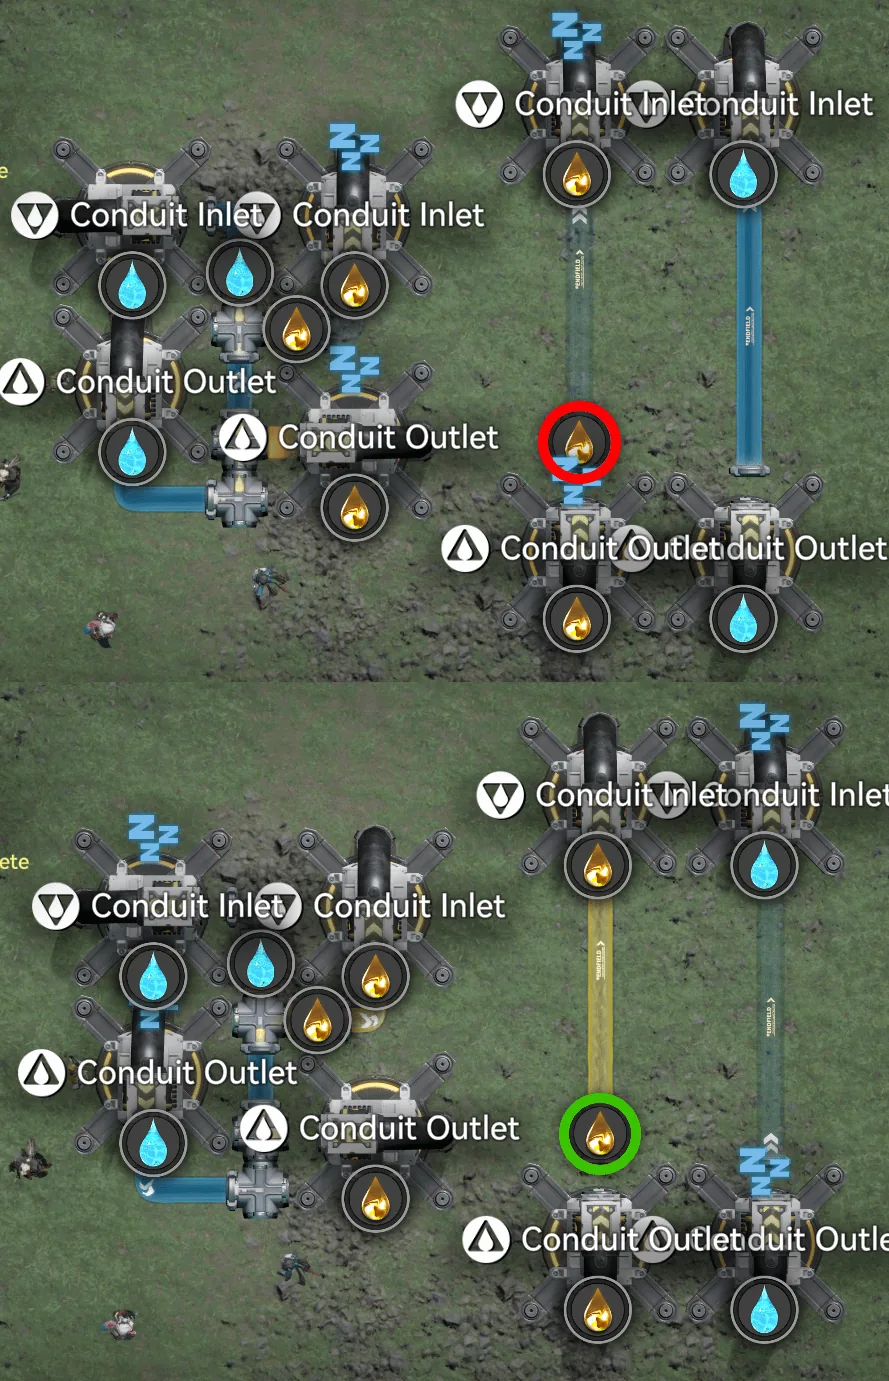
In-game Conduit Inlet and Outlet view showing the flow blocked (red) versus flowing (green) states

In-game: blocked (red) versus flowing (green)

Gates, Codes & Pipe Logistics (NA/EU)

Each card lists the blueprint code and the number of pipe logistics pieces the gate consumes.
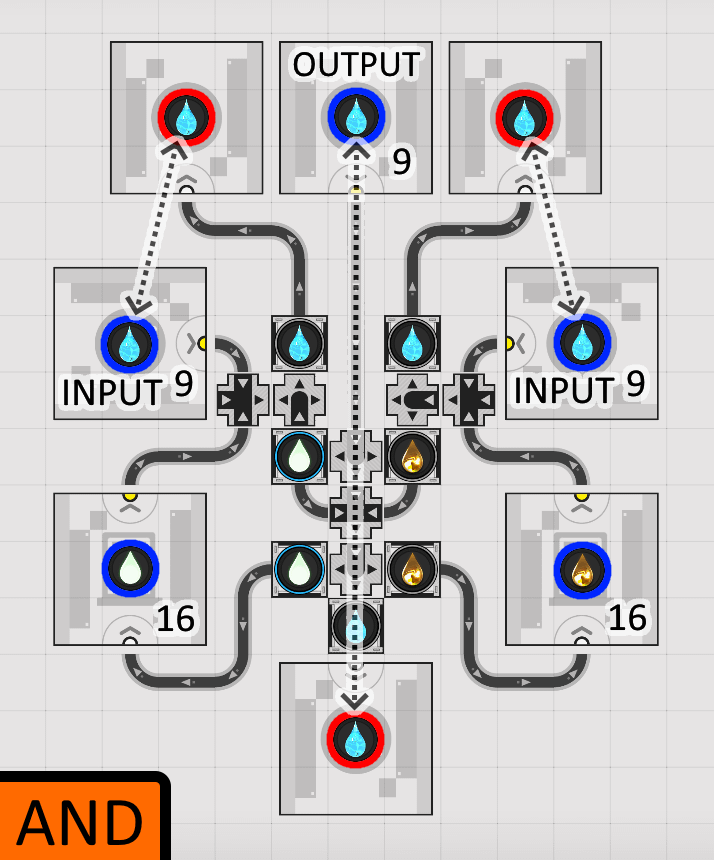
AND liquid logic gate layout for Arknights: Endfield (16 pipe logistics pieces, NA/EU)

AND Gate

Logic GateEU/NA
EFO0136uIUuu17aeU0579
Dimensions: 16 pipe logistics
NAND liquid logic gate layout for Arknights: Endfield (21 pipe logistics pieces, NA/EU)

NAND Gate

Logic GateEU/NA
EFO01o083e889i625IieO
Dimensions: 21 pipe logistics
OR liquid logic gate layout for Arknights: Endfield (15 pipe logistics pieces, NA/EU)

OR Gate

Logic GateEU/NA
EFO01u1IoAIIaU048AoOU
Dimensions: 15 pipe logistics
NOR liquid logic gate layout for Arknights: Endfield (10 pipe logistics pieces, NA/EU)

NOR Gate

Logic GateEU/NA
EFO01Iao8ioo0A9ue5o08
Dimensions: 10 pipe logistics
XOR / Half Adder liquid logic gate layout for Arknights: Endfield (32 pipe logistics pieces, NA/EU)

XOR / Half Adder

Logic GateEU/NA
EFO01iOe7oeeEI2A372U4
Dimensions: 32 pipe logistics
NOT liquid logic gate layout for Arknights: Endfield (5 pipe logistics pieces, NA/EU)

NOT Gate

Logic GateEU/NA
EFO0136uIUuu17aA70579
Dimensions: 5 pipe logistics
Display unit for the liquid logic gates: control ports for inputs and a readout for the output (2 pipe logistics pieces, NA/EU)

Display

Logic GateEU/NA
EFO0136uIUuu17aA90579
Dimensions: 2 pipe logistics

Chaining Example: XNOR with Display

The XOR doubles as a Half Adder: it also exposes the AND used in the AND + NOR conjunction that makes up the XOR. If you do not need that AND output, connect its Inlet and Outlet directly.

The diagram shows how the gates wire together (here an XNOR routed through a Display), with each colour tracing one liquid path from input to output.
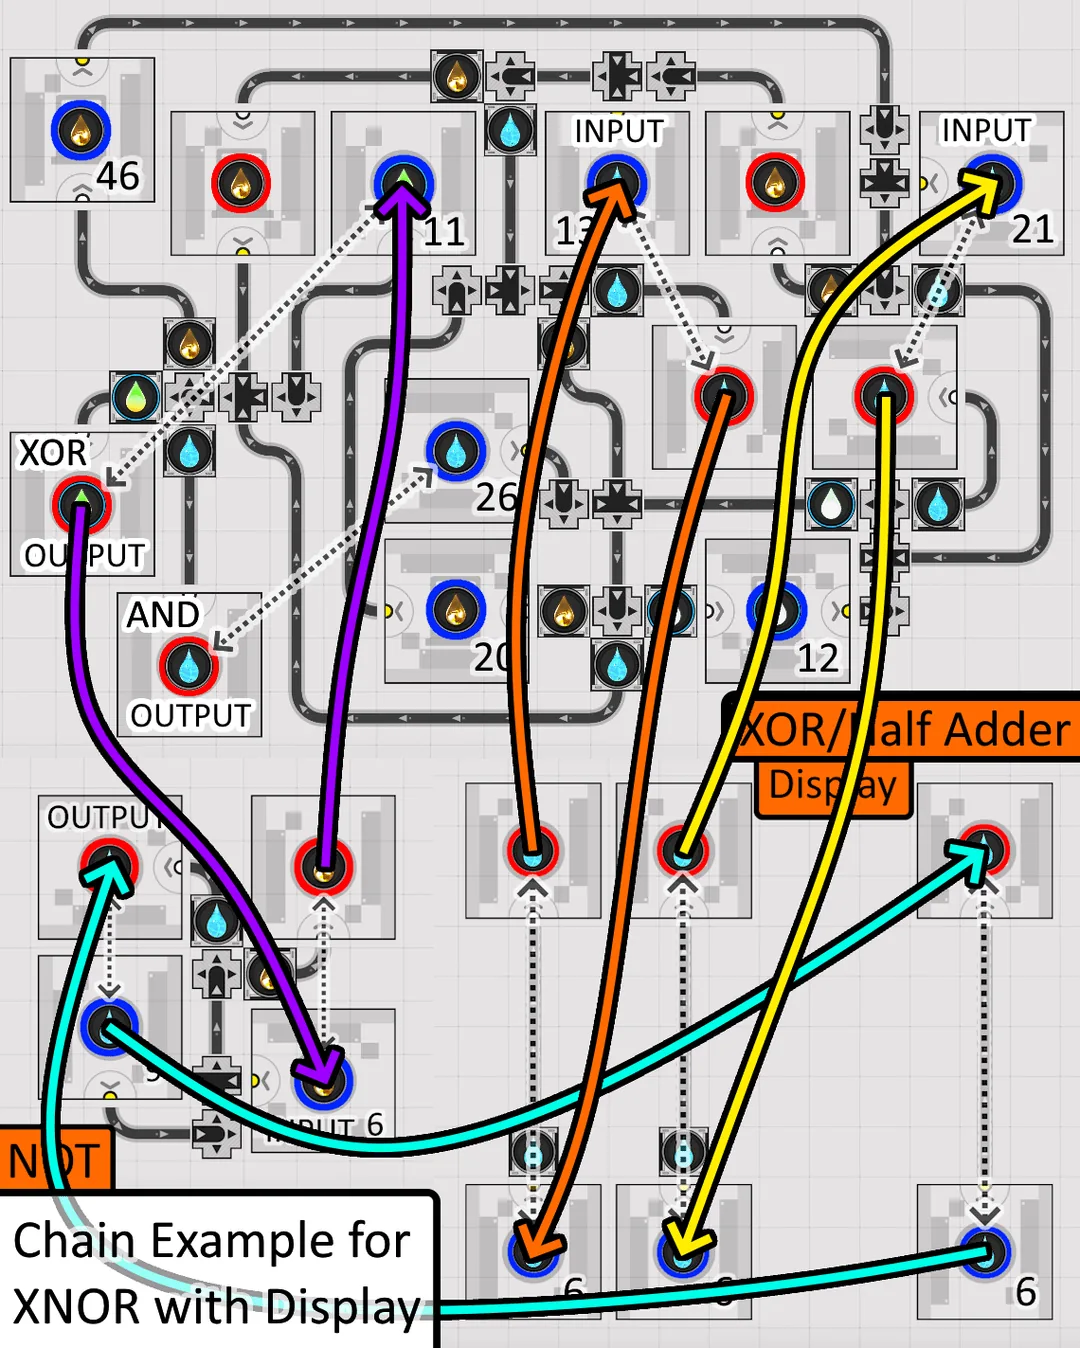

Chaining example: an XNOR built from the XOR / Half Adder routed through a Display, each liquid path traced in a different colour

How to Import Blueprints

Step 1: Select your server region (ASIA or EU/NA)

Step 2: Click the "Copy" button to copy the blueprint code

Step 3: In-game, go to your factory and open the Blueprint menu

Step 4: Paste the code and apply the blueprint to your factory

Frequently Asked Questions

What actually makes a blueprint 'good' in Arknights: Endfield?

Three measurable traits separate a great AIC blueprint from a mediocre one. First, throughput efficiency — facilities feed each other without idle ticks, and every belt runs at or near its rated speed. Second, footprint density — production lines pack tightly enough to leave free tiles for thermal banks, depot loaders, and future expansions. Third, self-sufficiency — water, acid, and power are produced or piped in cleanly without sprawling external dependencies. A blueprint that hits all three lets you import it, drop one or two pylons, and walk away.

Throughput vs space efficiency — which should I optimize for?

It depends on which AIC slot you are filling. The Main PAC has the most space but a hard power cap of around 4250 for endgame loads — so dense layouts that produce maximum stock bills per minute (like Valley IV Megabase) win there. SubPACs are smaller and usually power-constrained, so compact 7x19 or 13x22 layouts that focus on a single product (Liquid Xiranite, Liquid Heavy Xiranite) make more sense. As a rule of thumb: max throughput on Main PAC, max density on SubPACs.

Why are there separate codes for ASIA and EU/NA regions?

Arknights: Endfield uses region-locked blueprint codes — a code generated on the ASIA server will not import on EU/NA and vice versa. This is an account-system limitation, not a layout difference. The actual factory designs are identical when both regions have a code listed (such as the 36x21 Xiranite base). If you only see one region listed for a blueprint, that means the community uploader only published a code for that server, not that the layout is incompatible with the other client.

How do I import a blueprint into my factory?

Open your AIC, switch to Blueprint mode, and select Import. Paste the code exactly as copied — they are case-sensitive and any trailing space will reject the import. Most curated blueprints assume a clean factory footprint, so move existing facilities out of the area first. After import, check the requirements panel: you usually need to pipe in external water or acid pumps to the marked converger, and you may need to belt in raw ore from your nearest mining node before production starts.

Will these blueprints still work after the next factory patch?

The 36x21 Xiranite layouts and Hetonite Parts V2.2 have stayed stable since Version 1.0 because Hypergryph rarely changes recipe ratios mid-version. Major patches (1.2, 1.3) sometimes add new ore tiers or change facility unlock requirements, which can break power calculations. We re-test the listed blueprints after each numbered version and update the Last Updated date on this page when codes are reverified — check that date before pasting a code into a brand-new patch.

NordVPN: secure, fast VPN for gaming. Lower ping, play from any region.

Sponsored. We may earn a commission at no extra cost to you.

NordVPN: secure, fast VPN for gaming. Lower ping, play from any region.

Sponsored. We may earn a commission at no extra cost to you.