
WULING 1.2.1 MAX PROFIT MEGA BASE BLUEPRINT
 Razer Kraken Kitty V2Wireless gaming headset with cat ear LED lighting, THX Spatial Audio, and a detachable mic.Shop on Razer.com
Sponsored. We may earn a commission at no extra cost to you.
Table of Contents
Patch 1.2.1 rewrote what a viable Wuling endgame base looks like. The new Test Area map opened up real estate the previous megabases never had access to, and the Forge of the Sky limit jumping from eight to twelve unlocked the throughput ceiling that earlier 1.1-era layouts kept bumping into. The result is a Core AIC plus two SubAIC plan — Wuling 1 through 6 on the Core, a Marker Stone Sub AIC for Heavy Xiranite, and a Jinyu Valley Sub AIC for crops and Syringe production — that can hit max outpost profit while still cycling all three gear types in parallel.
This guide walks the full deployment, in order, with every blueprint code for both Asia and NA/EU servers. The base is intentionally designed to be plug-and-play: import the codes, follow the placement screenshots, set the depot outputs, and the production graph stabilises inside an hour. Every number you see here — 13 SC Wuling Battery per minute, 47,640 bills per hour at the lowest profit mode, the 68,000 Yazhen Syringe A depot ceiling — comes from in-game testing on patch 1.2.1.
The single most common mistake on a fresh import is using the wrong server's code. Asia and NA/EU codes are not compatible in either direction, and the game will not warn you politely — it will either refuse the import or paste in a different facility entirely. If you have already converted Valley IV to an earlier megabase, the Endgame Blueprints Part 1 guide explains the Valley IV side of the pipeline that this Wuling base ties into.
What this guide does not cover: the Valley IV blueprints themselves, the earlier 1.0/1.1-era megabases, and event-only AIC layouts. Those live in the other parts of the series. If you want the full progression from a freshly cleared Wuling to this max-profit setup, work through the series in order; if you already have a 1.2.0 base and just want to migrate to 1.2.1, you can jump straight to the Core AIC section below.
Quick Answer
The Wuling 1.2.1 Mega Base is a three-AIC outpost factory tuned for patch 1.2.1's new Test Area map and twelve-slot Forge of the Sky cap. With Jinyu Valley outpost level 3, Regional Development 10, and Wuling Depot Bus unlocked across the Core, MS, and JV SubAICs, it produces roughly 47,640 bills per hour even with all three gear lines active — a surplus over the 46,368 bills/hour buff-operator outpost demand.
Blueprint codes below are region-locked: Asia and NA/EU codes are not interchangeable. A handful of Protocol Stashes in the Cuprium area are intentionally left unpowered as item splitters, and the Yazhen Syringe A line has a 68,000 depot ceiling that gives you roughly a 31-day walk-away window before the base goes dark.
Requirements & AIC Upgrades
The Wuling 1.2.1 Mega Base is the highest-profit outpost build in the series, and it asks for matching account progress before it pays out. Skip any of the prerequisites below and the base will either refuse to deploy, sell at a reduced rate, or shut itself down within a week as a depot fills up.
On the outpost side you need Jinyu Valley Outpost at level 3 — that is what unlocks SC battery sales and the patch 1.2.1 items the base produces in bulk. Regional Development Level 10 unlocks the highest Mineral Purity tier and is what pushes the per-machine output to the numbers this guide quotes. You also need a Marker Stone Sub AIC registered at any level (the level itself does not gate this build), and finally Valley IV Regional Development level 12, which is the unlock for the Metastorage Transfer that feeds the Wuling base Dense Originium Powder.
Reaching Regional Development 10 is the slowest of those prerequisites for most players. The shortest path is to level up existing facilities like the Depot Node and Environment Terminal, unlock the Lucky Carrot and the Terminal in the new map, push every new AIC Plan node you can, collect balloons in the new map for AIC Index, and connect Mining Rigs to every mining spot available. None of those individually moves the bar much; together they get you to level 10 without grinding any single track.
The three AICs each need specific Area Expansion and Depot Bus upgrades before the imports will fit. The Core AIC needs Area Expansion 2 and at least the fourth upgrade on the bottom side, which raises the Depot Bus Section limit to 20. The Jinyu Valley Sub AIC needs Area Expansion 2 plus Wuling Depot Bus unlocked. The Marker Stone Sub AIC needs Area Expansion 1 and the same Wuling Depot Bus unlock. None of these are optional — the blueprints are sized to those exact footprints, and a smaller AIC will simply truncate the deployment.
| AIC | Required Upgrades |
|---|---|
| Core AIC | Area Expansion 2 · 4th upgrade on bottom side (20 Depot Bus Section limit) |
| JV Sub AIC | Area Expansion 2 · Wuling Depot Bus unlocked |
| MS Sub AIC | Area Expansion 1 · Wuling Depot Bus unlocked |
If you are still working toward these prerequisites, the Part 4 CRS guide covers a transitional 1.2.0 layout that runs on lower Area Expansion tiers, and the Blueprint Curation hub has smaller single-purpose factories worth running in the meantime.
Blueprint Import Tips
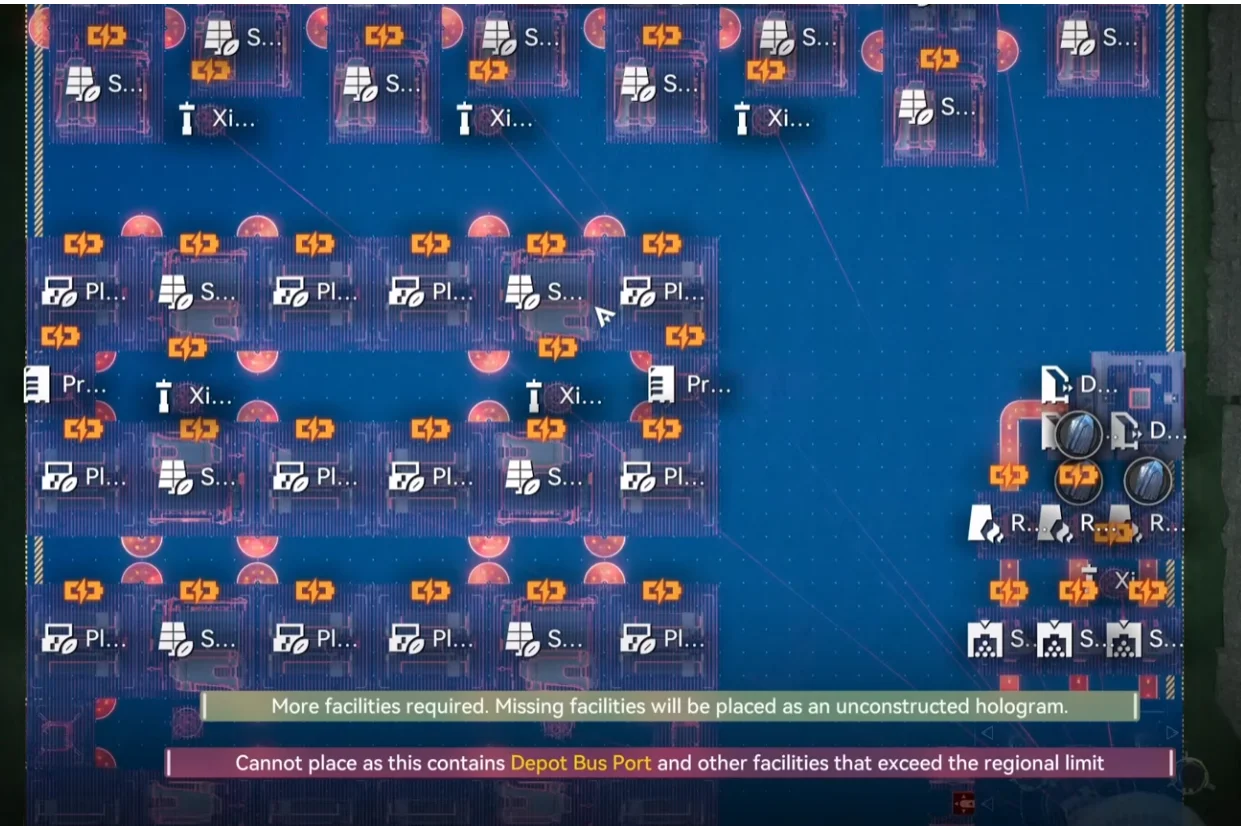
Before you paste a single code, clear the three bases out completely. Delete every existing facility on Core, MS, and JV, and walk the perimeter looking for stray Forge of the Sky units that may be sitting outside the AIC boundary — the importer will silently fail if any old facility overlaps the new footprint. Also drop the starting materials you will need inside the AIC: a handful of SC Batteries to power the first few minutes, roughly 400 Sandleafs and 400 Yazhen for the Seed Machines to begin producing, and around 1,000 Cuprium Parts so the gear lines do not stall on day one.
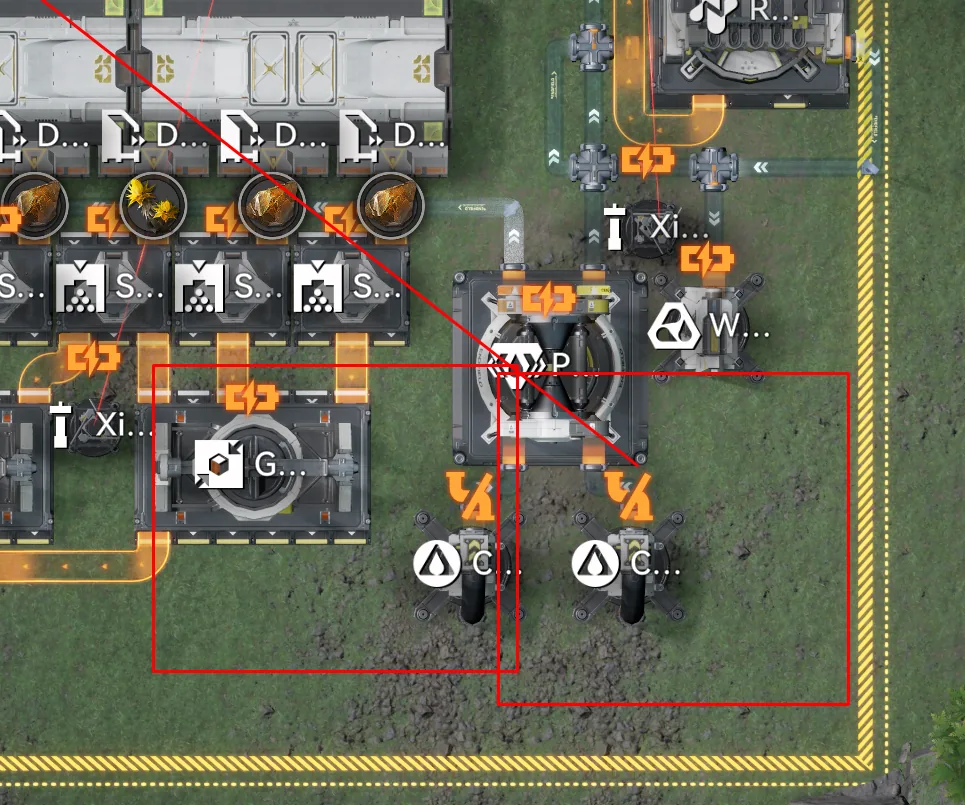
If you do not have the Cuprium Parts on hand, the temporary Cuprium blueprint below produces them quickly: paste it in, connect a fluid pump to each of the two inputs, let it run until you have around 1,000 parts in the depot, then delete it before you import Wuling 1. The temp blueprint is single-purpose scaffolding — leaving it deployed will conflict with the Core AIC placement.
The import flow itself is straightforward. Open Blueprints from the facility menu, switch to Shared Blueprints, click Import Blueprints at the bottom, and paste the code. The copy buttons on this page eliminate the most common typo: the letter O versus the digit 0. If you are typing manually anyway, also check for stray leading or trailing spaces, and remember to build any Hologram before placing connected pieces — otherwise the next blueprint will refuse to deploy on top of the unbuilt outline.
| Server | Temp Cuprium Parts Blueprint |
|---|---|
| Asia | EFO013o72e7e49a60579 |
| NA/EU | EFO014o5O1688E3i7E81A |
With starting materials in the depot and the AIC cleared, you are ready to start the actual Core deployment below.
Core AIC Setup — Wuling 1–6
The Core AIC is the heaviest of the three bases and the one that produces the SC Wuling Batteries the outpost actually pays for. Orient yourself first: face the map so the river is on your left side, then drag the Core itself to the top right corner so the placement zone clears the river bank. The blueprints below — Wuling 1 through 6 — are designed to be placed in order, each one snapping its Depot Bus to the previous piece.
Once all six blueprints are down, move the Core back to the middle of the AIC so it can collect every transport belt that runs through the layout, then set the bottom right depot output to Ferrium Powder. That single output assignment is what routes the byproducts cleanly and prevents the depot from clogging during long offline stretches.
| Blueprint | Asia Server Code | NA/EU Server Code |
|---|---|---|
| Wuling 1 | EFO0101O36708ai90E179 | EFO01U4Aiu355eOO871a8 |
| Wuling 2 | EFO01A7u1e4A6UE769ieO | EFO0172UA3844i53aO2Ai |
| Wuling 3 | EFO017i89AE70e54eO2Ai | EFO016i1a42ee0791O83e |
| Wuling 4 | EFO01eAo0UOeai4uuoui8 | EFO01eE7U8o22A404oui8 |
| Wuling 5 | EFO01Ue36i2U97O3171a8 | EFO01U4Aiu355eOoO71a8 |
| Wuling 6 | EFO012O9A5u2UE8E3e3Oo | EFO01U4Aiu355eOoa71a8 |
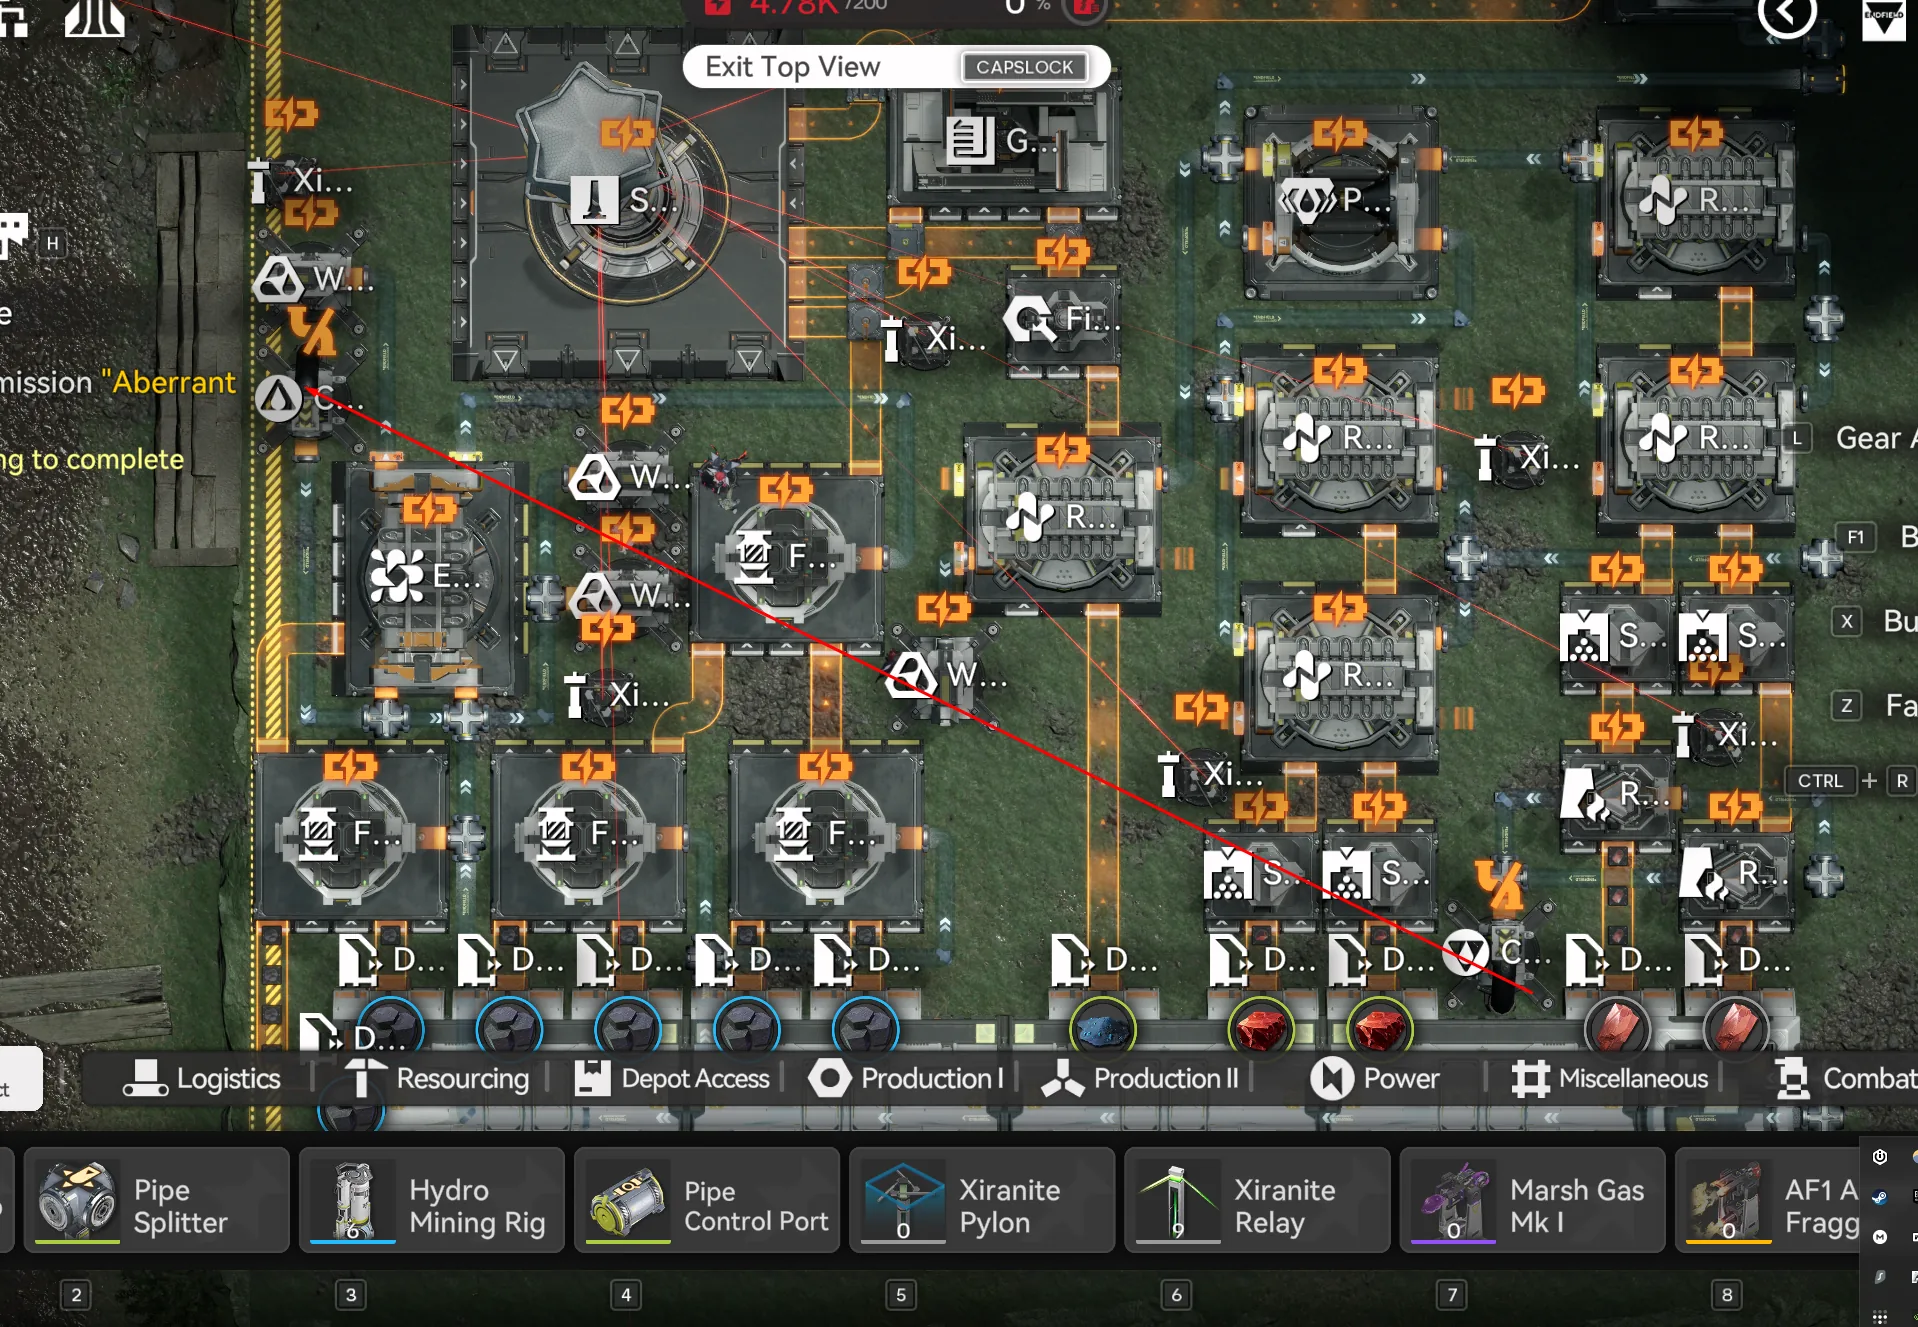
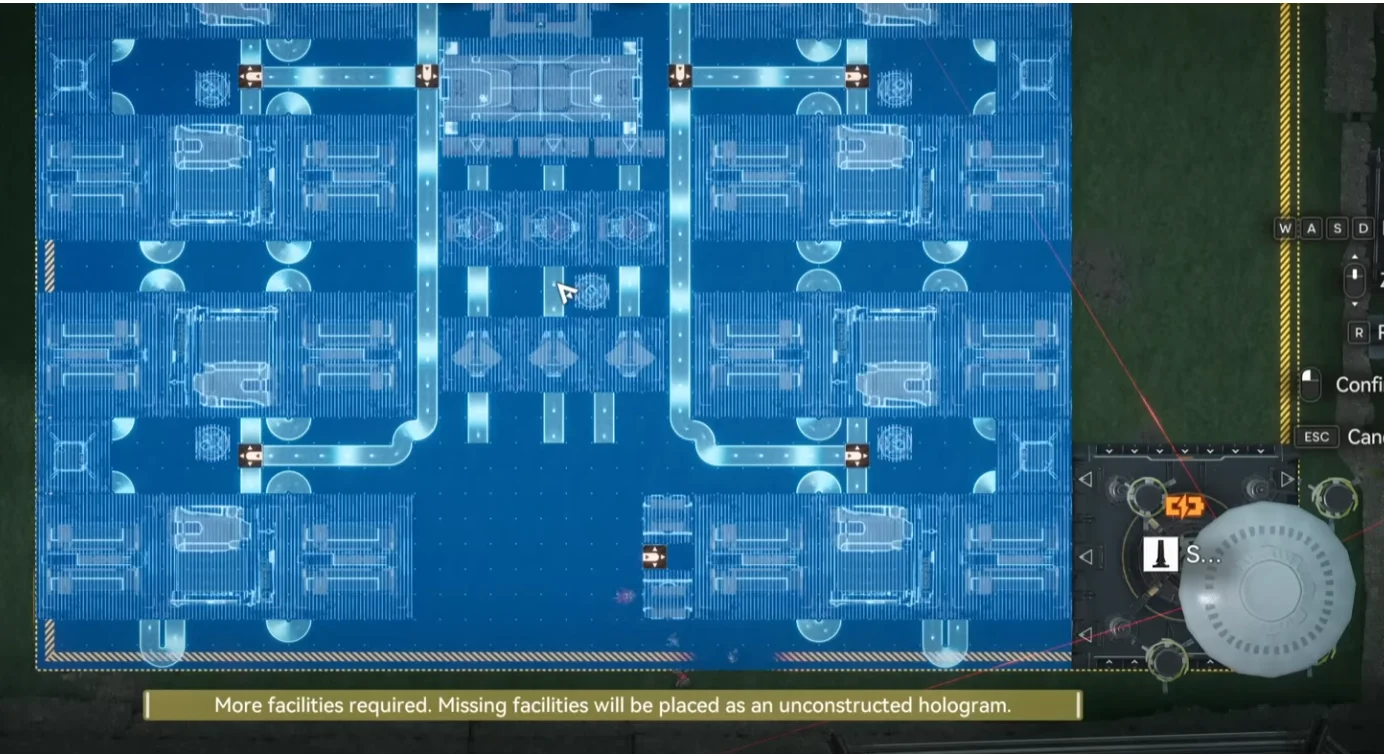
The screenshots below show each piece's intended position after import. Wuling 1 anchors the top-left corner, Wuling 2 hooks its Depot Bus into Wuling 1, Wuling 3 fills the middle and matches the Depot Bus on both sides, and Wuling 4 and 5 take the bottom row with Wuling 5 sitting flush against Wuling 4. Wuling 6 closes the layout on the top-right side. If anything looks off when you place a piece, undo and re-align before moving on — a misaligned Depot Bus will not throw an error but will silently break the belt routing later.
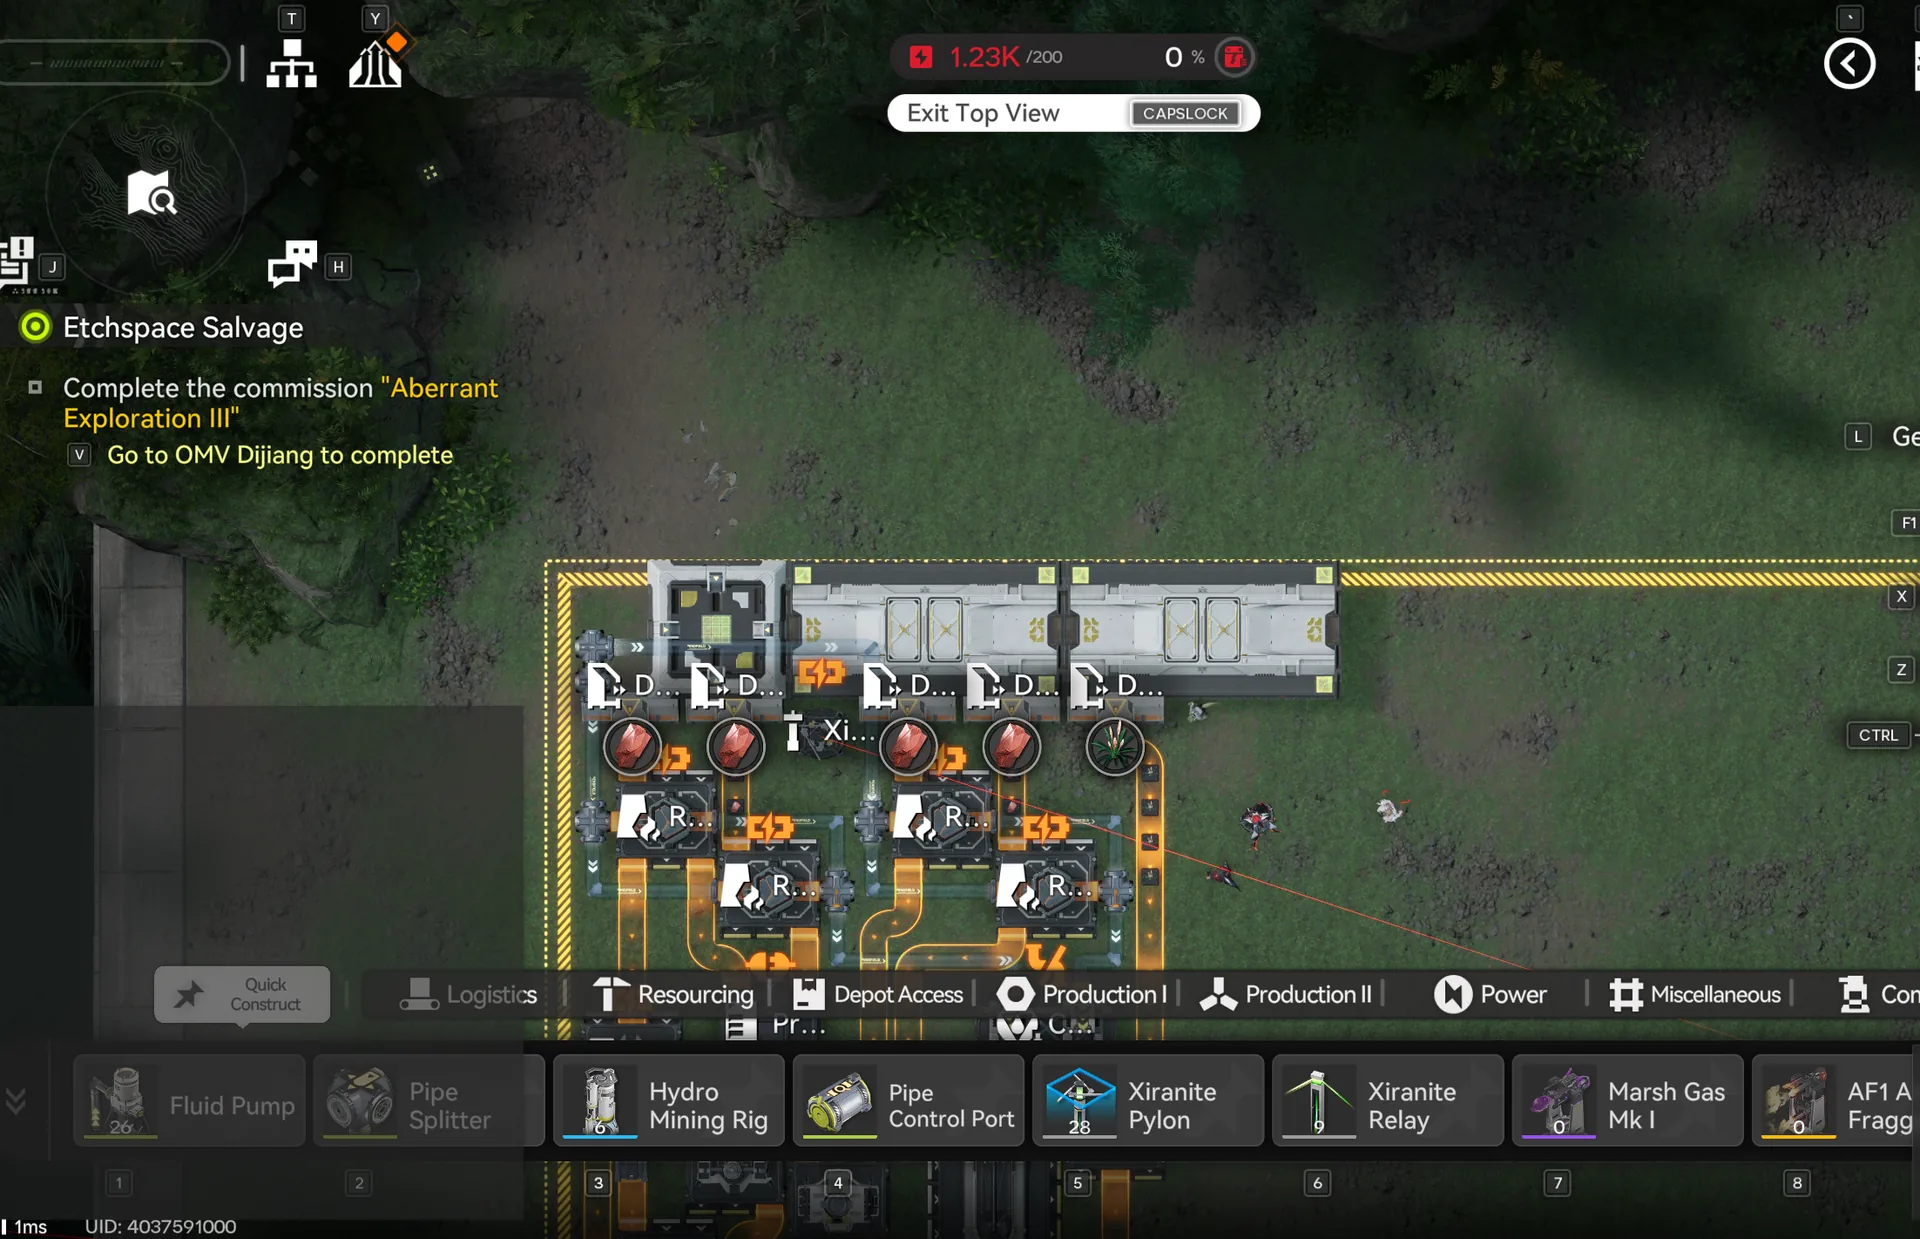
Wuling 1 — Match top left corner

Wuling 2 — Connect Depot Bus
Wuling 3 — Middle, match Depot Bus
Wuling 4 — Bottom side
Wuling 5 — Next to Wuling 4
Wuling 6 — Top right side
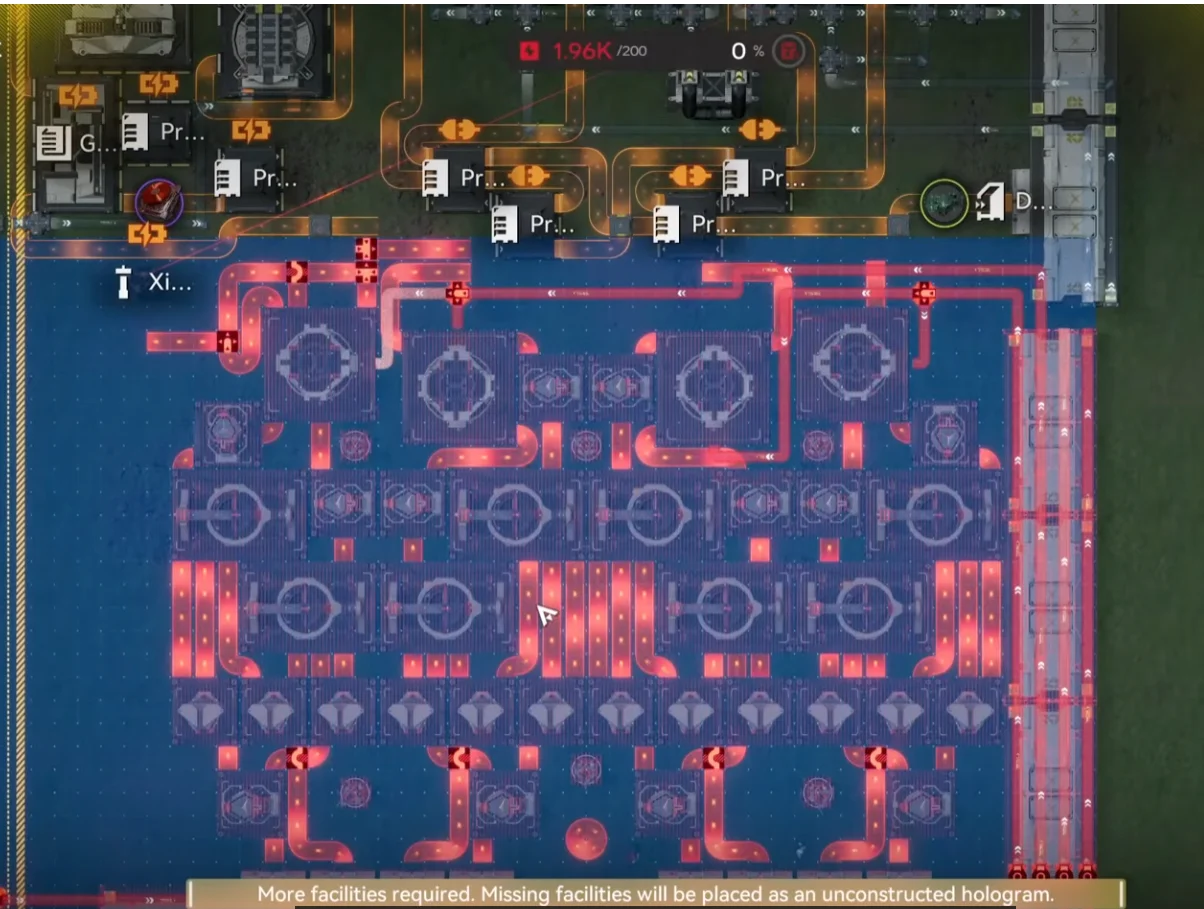
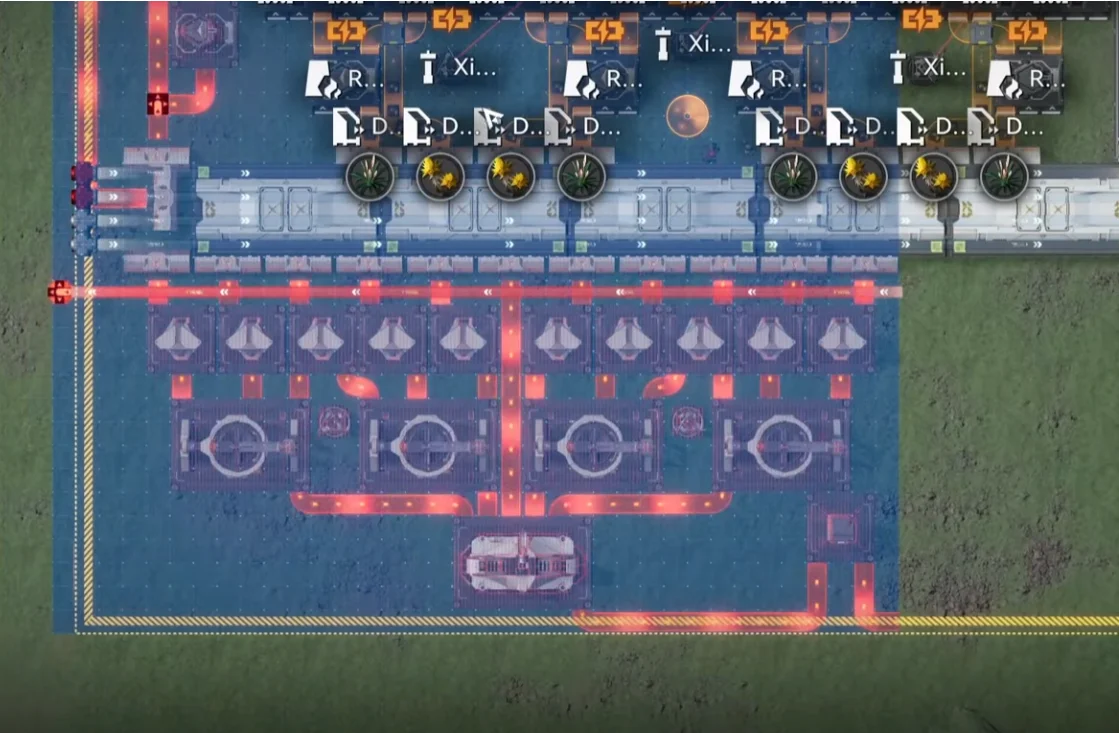
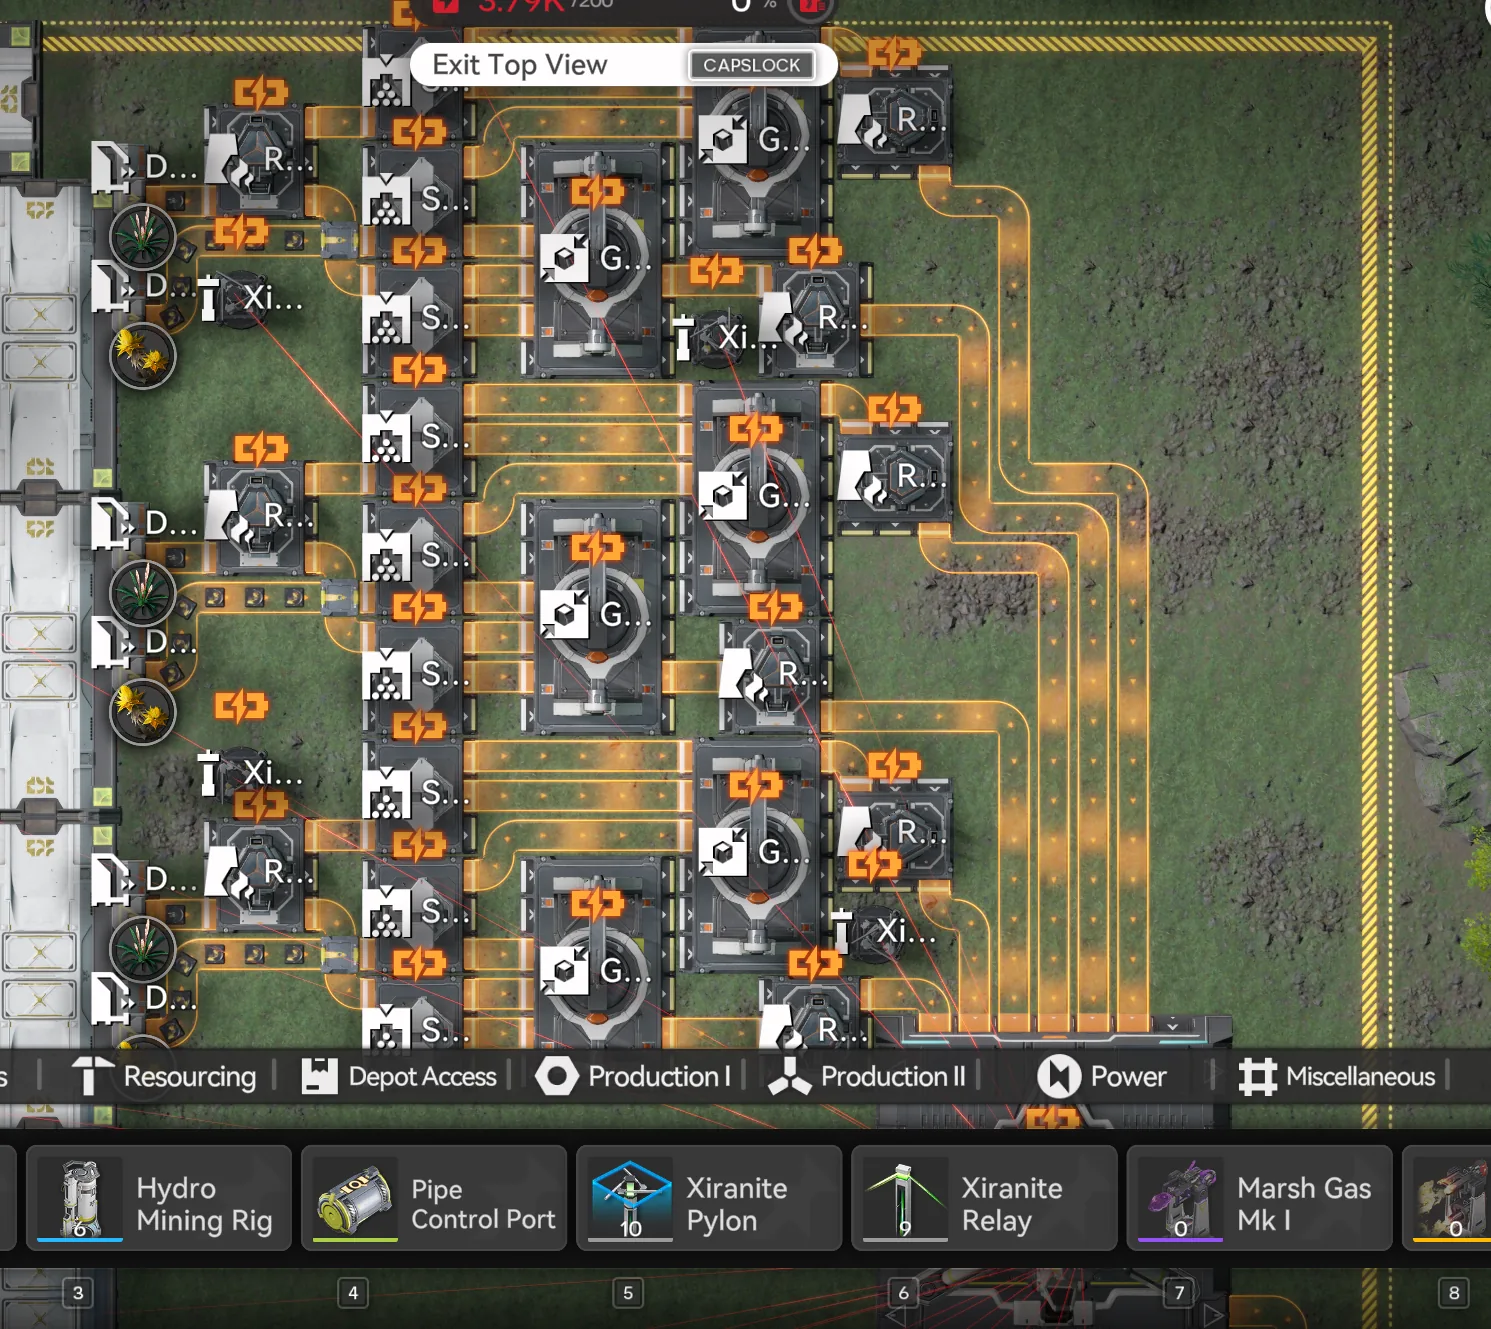
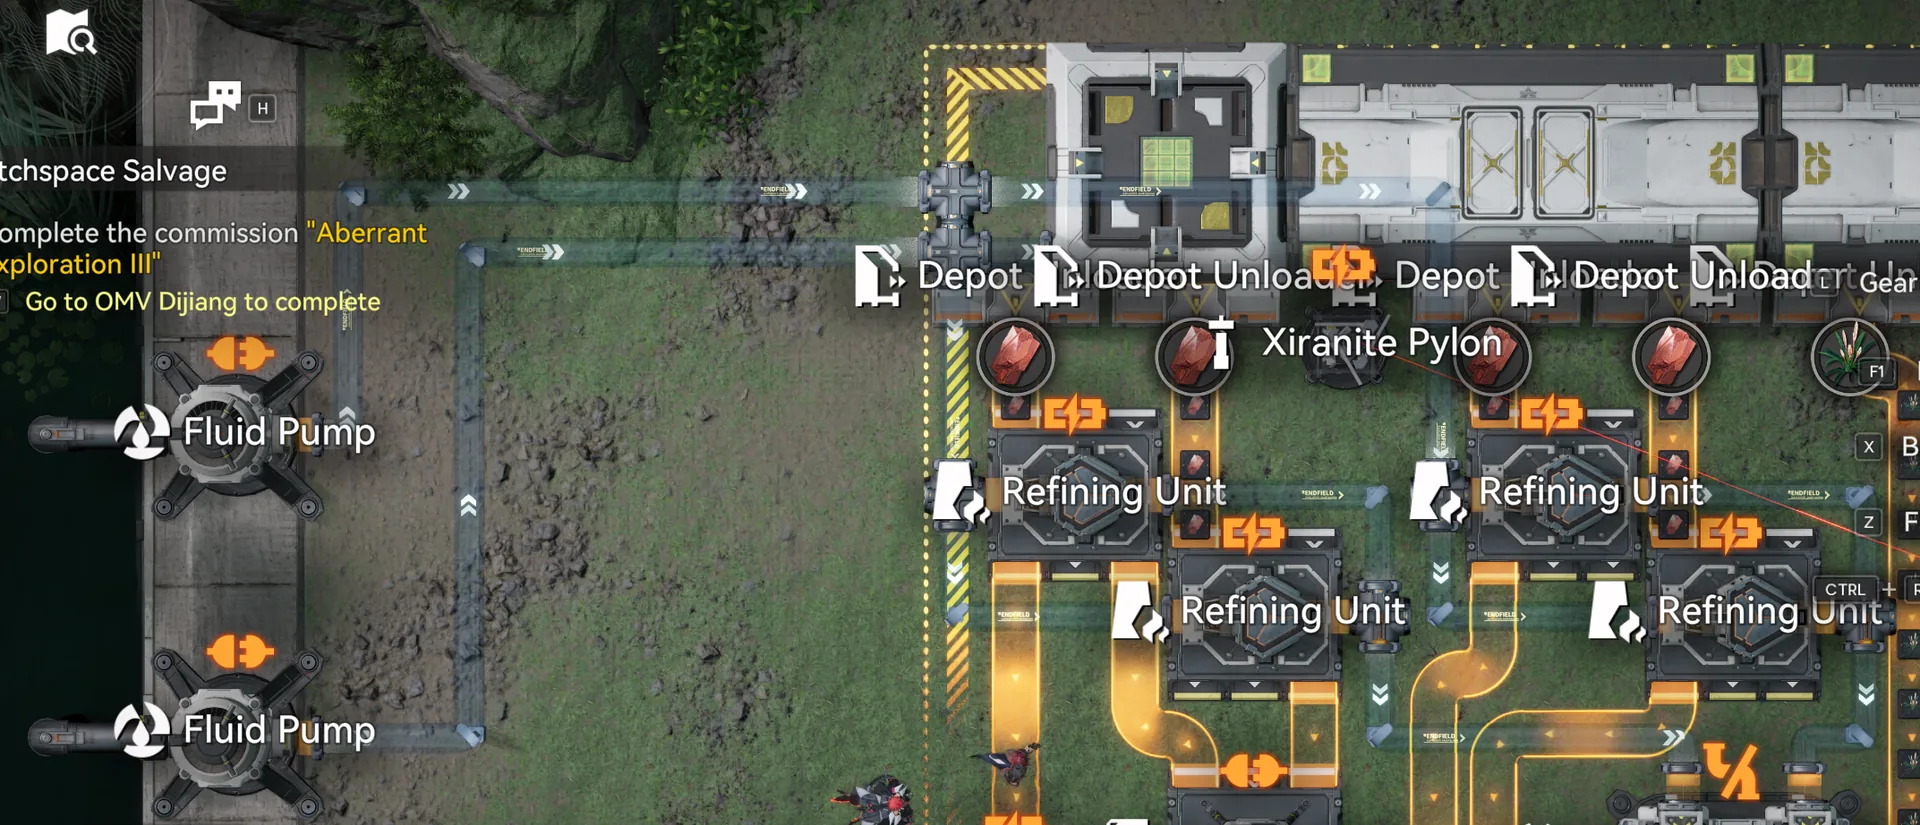
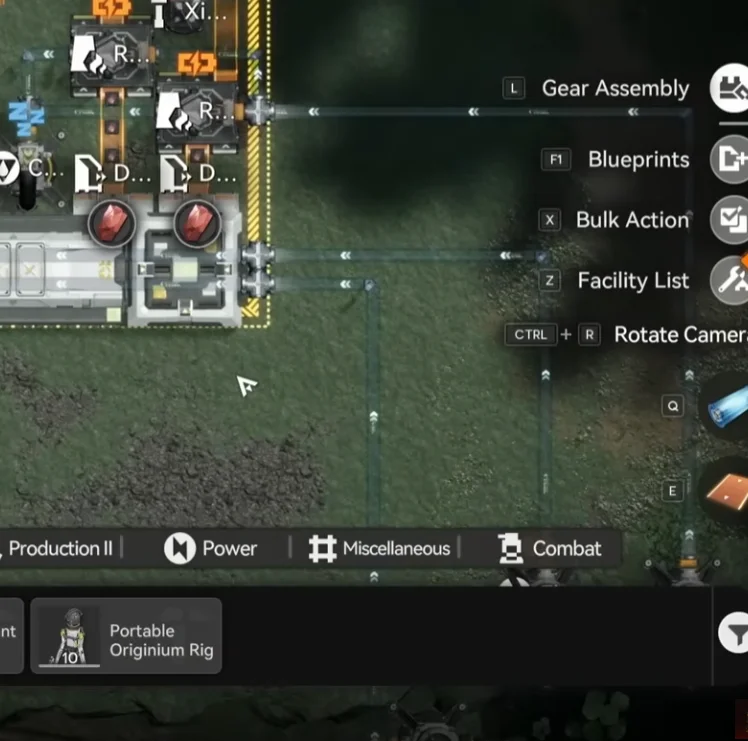
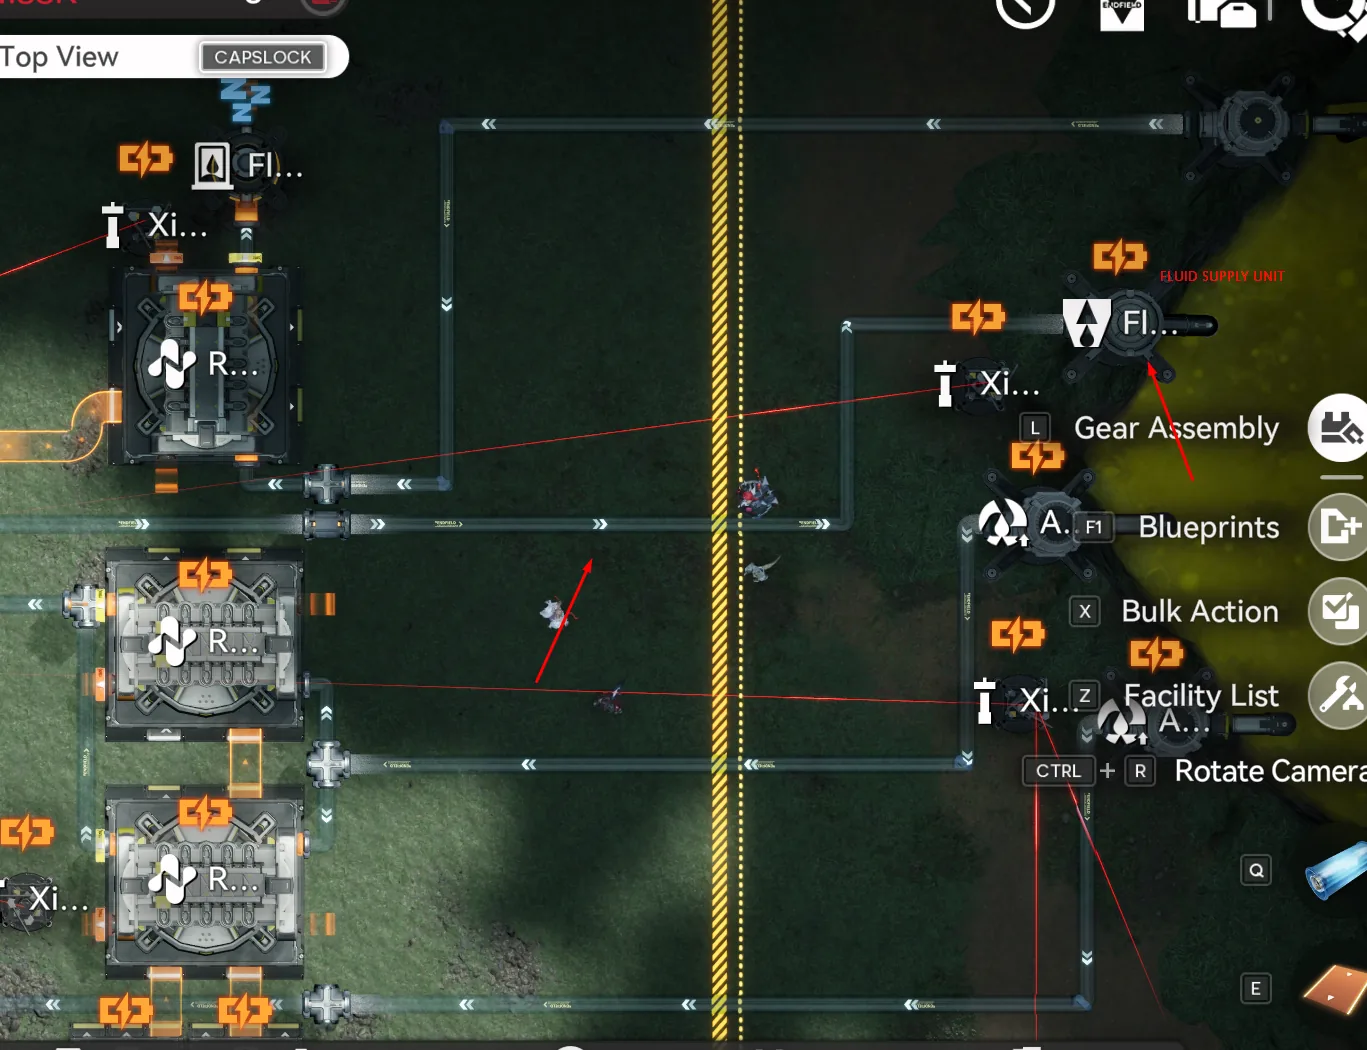
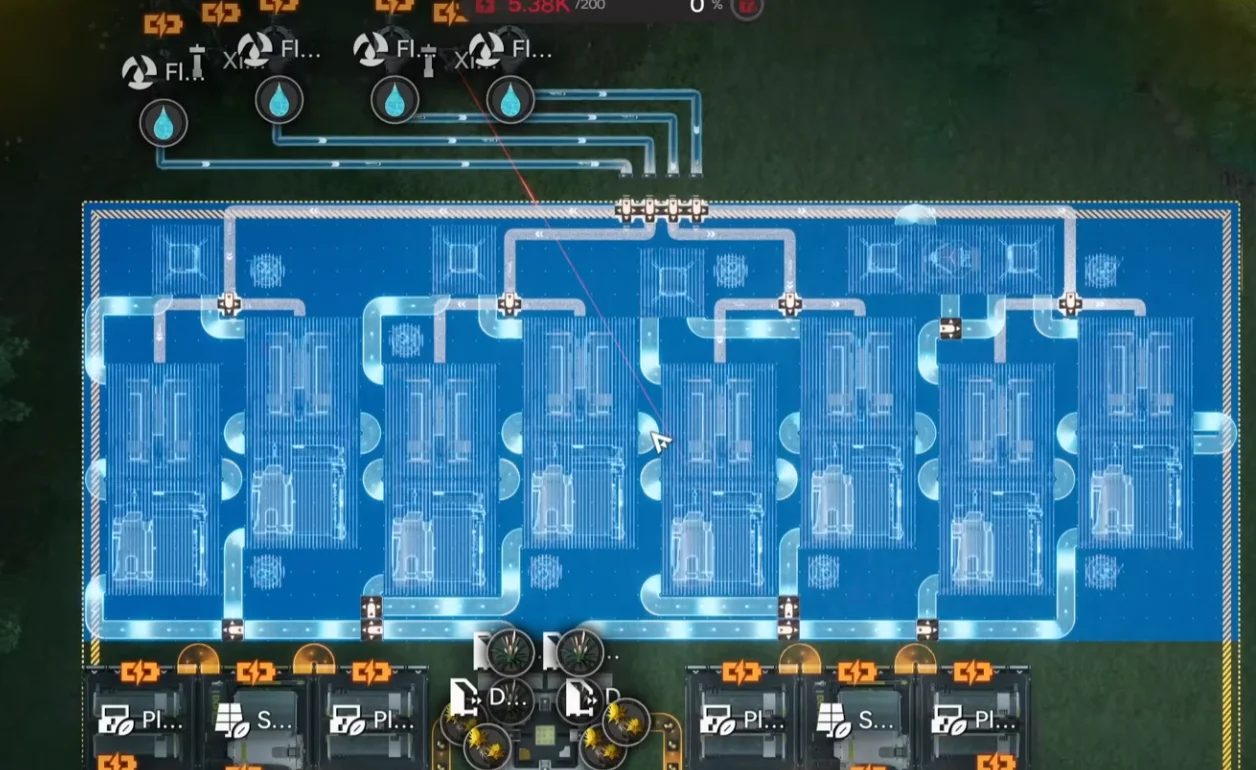
After the six Wuling pieces are placed, the next pass is the conduits. The reference photo below shows how the conduit should be linked along the top and bottom of the Core AIC — both rows route into the same drain so that pump pressure is balanced across the layout. The top and bottom conduit details follow it, and after those you place the fluid pumps as shown in the three pump-connection shots, with a single Fluid Supply Unit feeding the cluster.
This is how the conduit should be linked
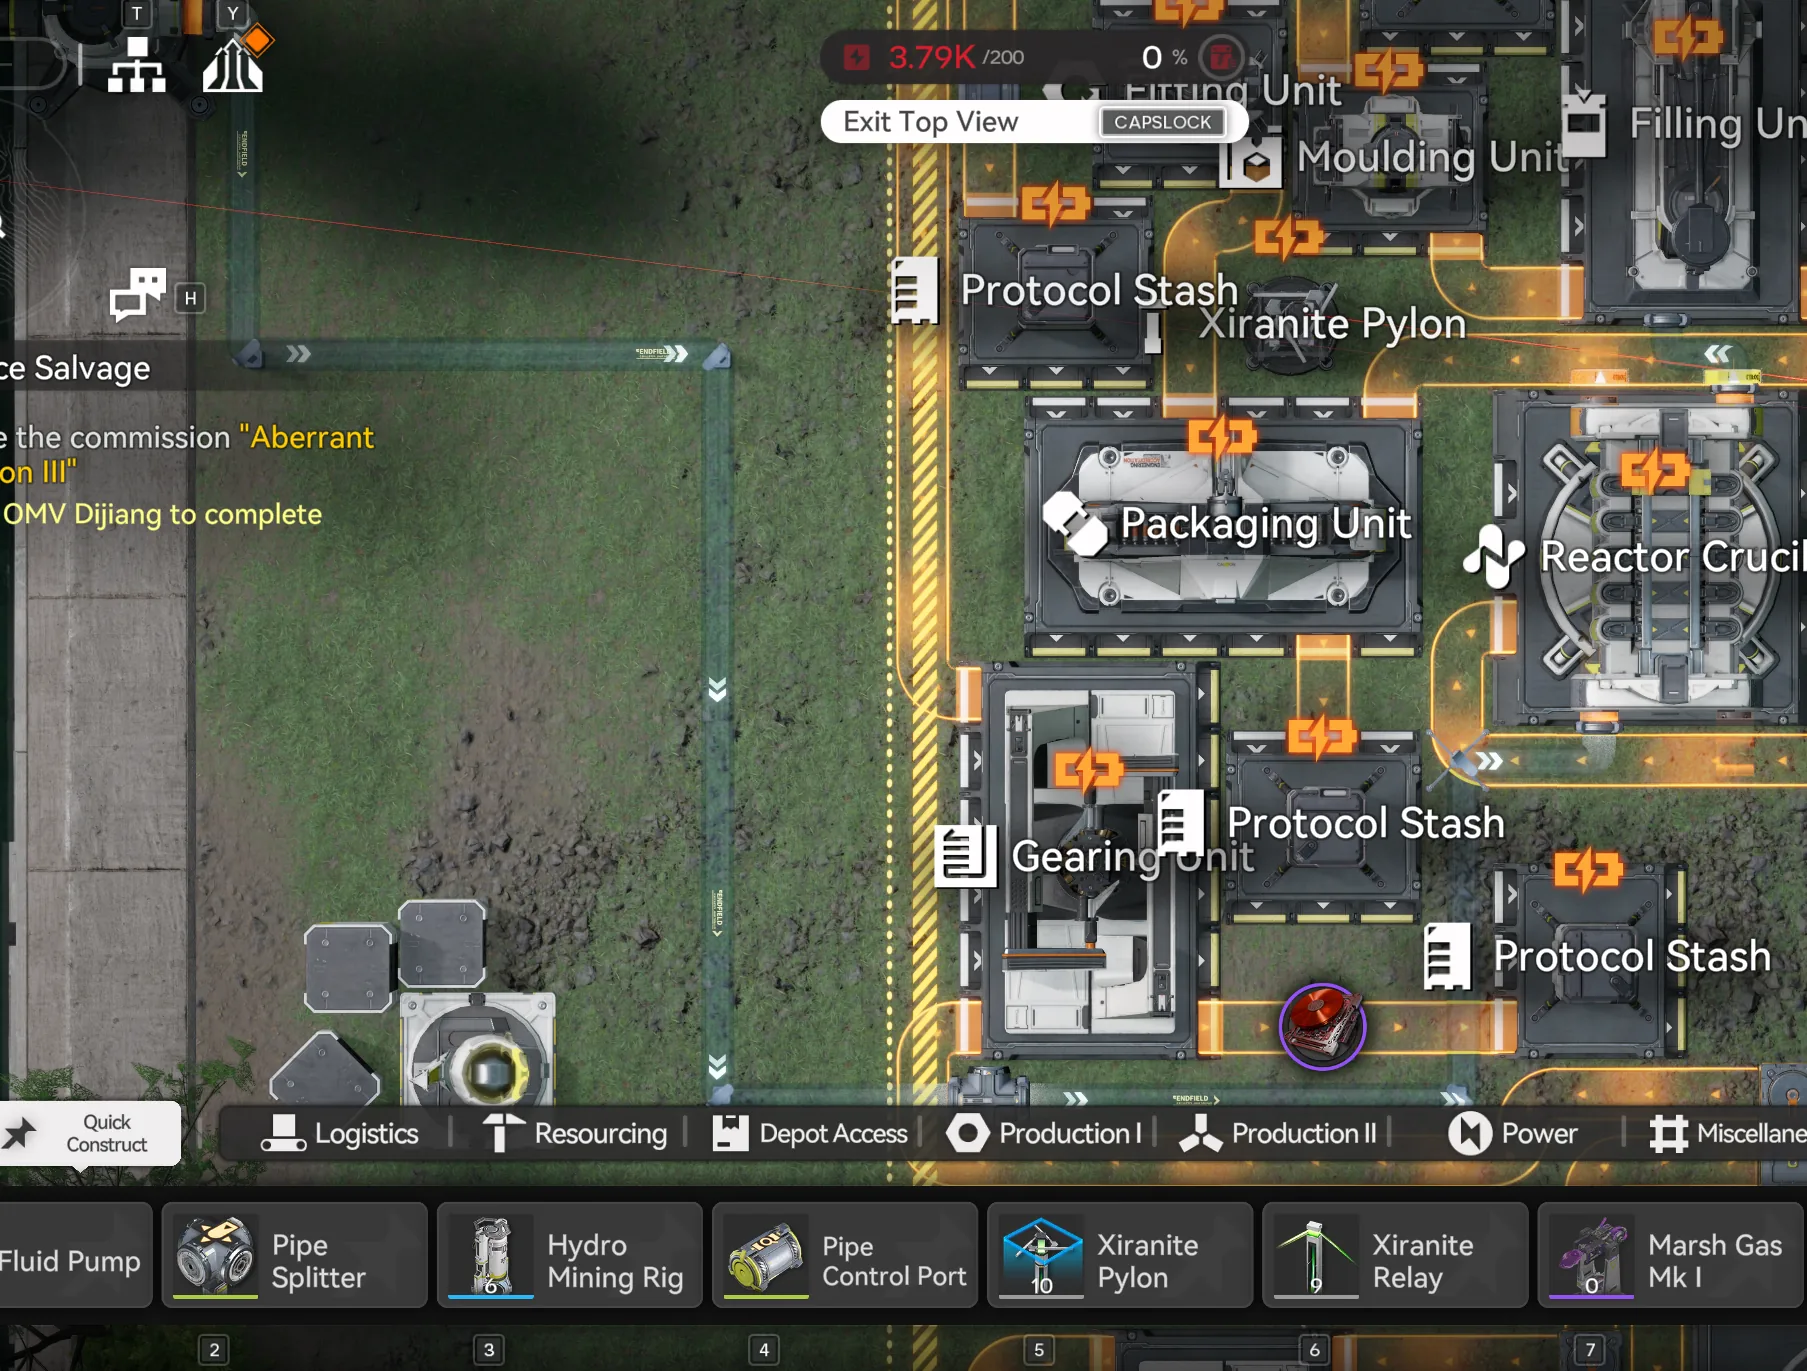
Top conduit links
Bottom conduit links
Pump connections
Pump connections 2
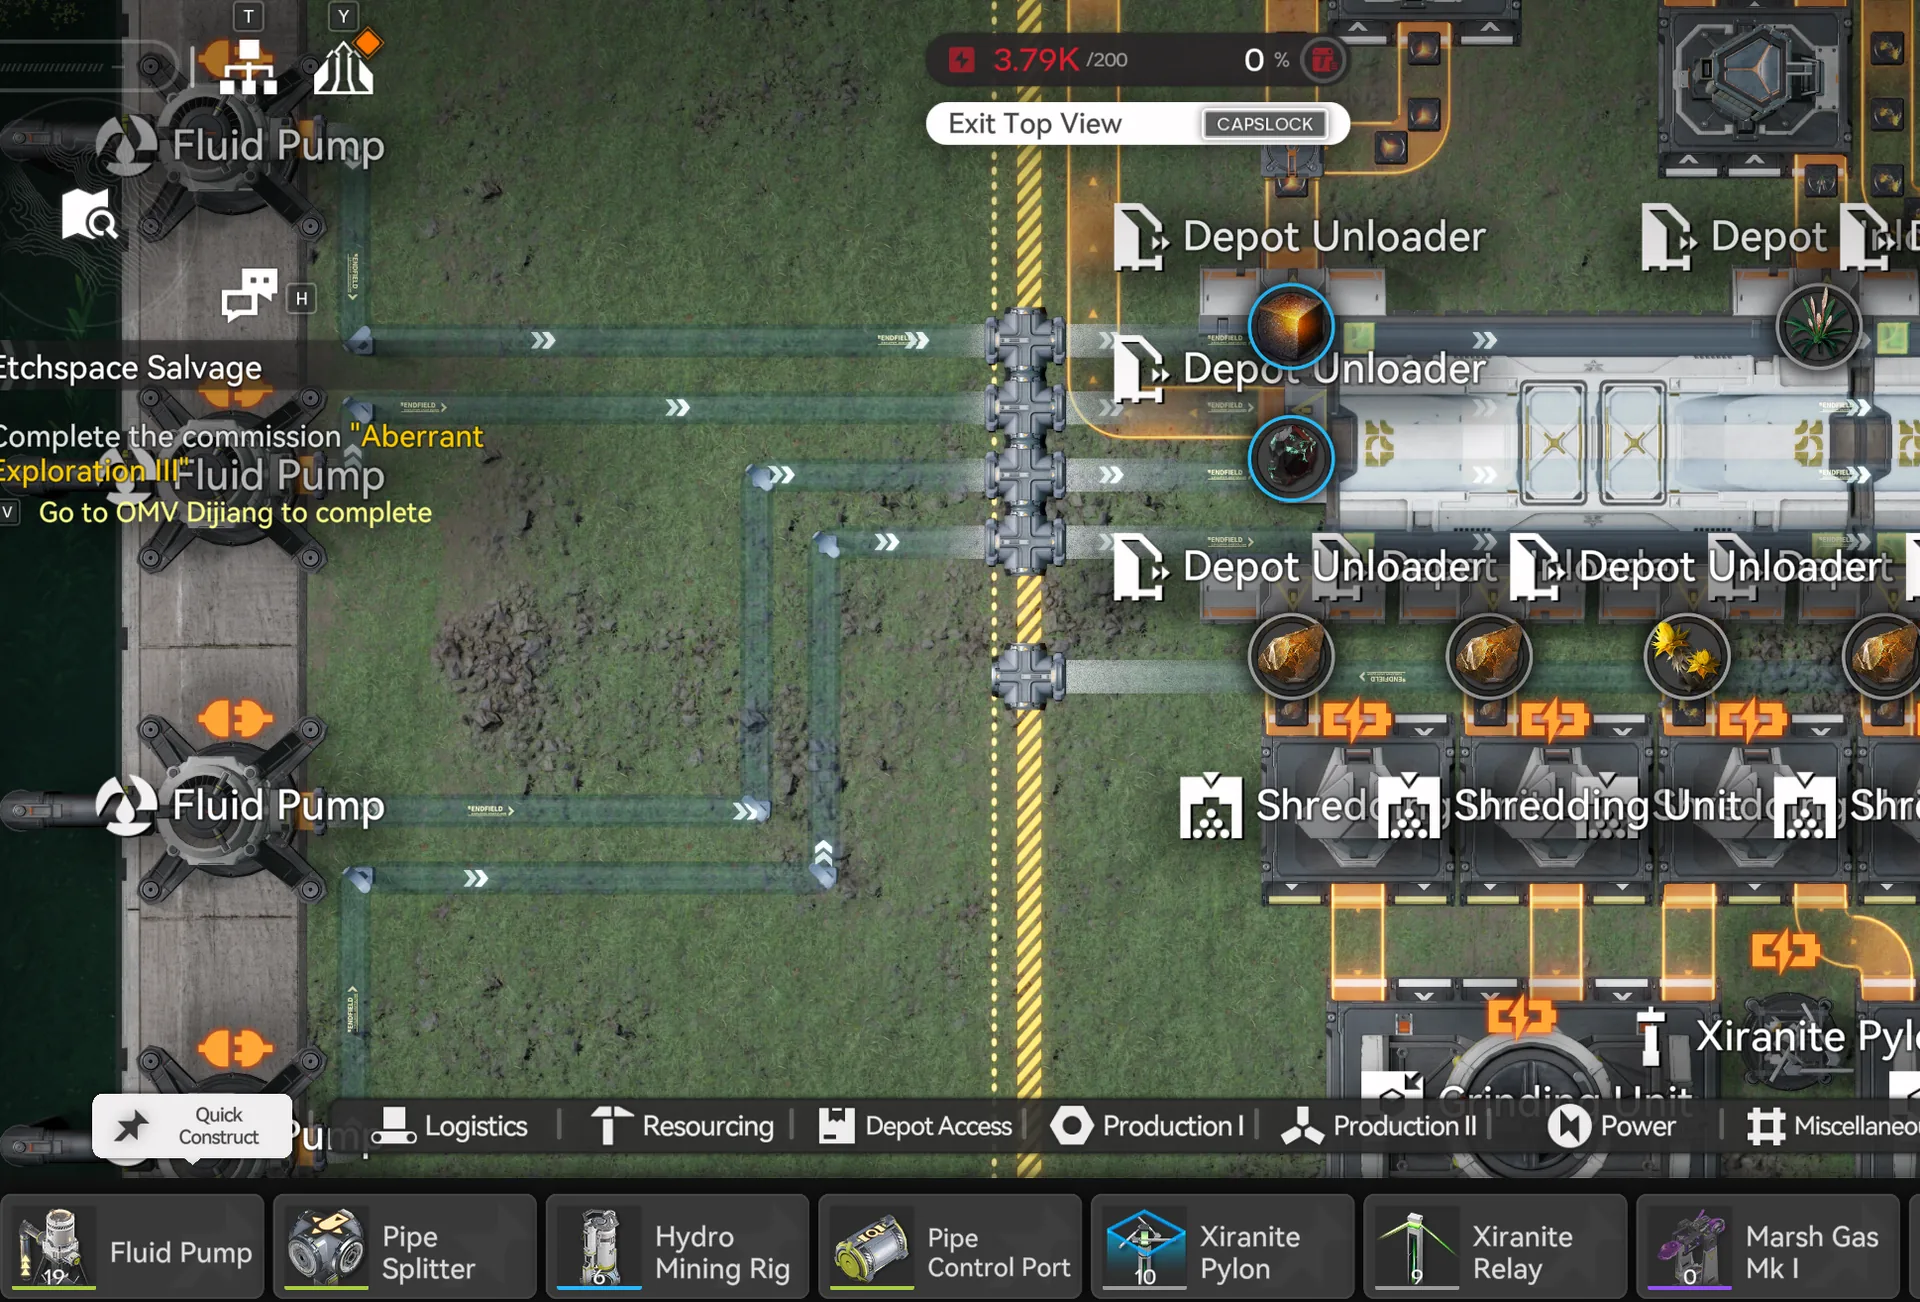
Pump connections 3
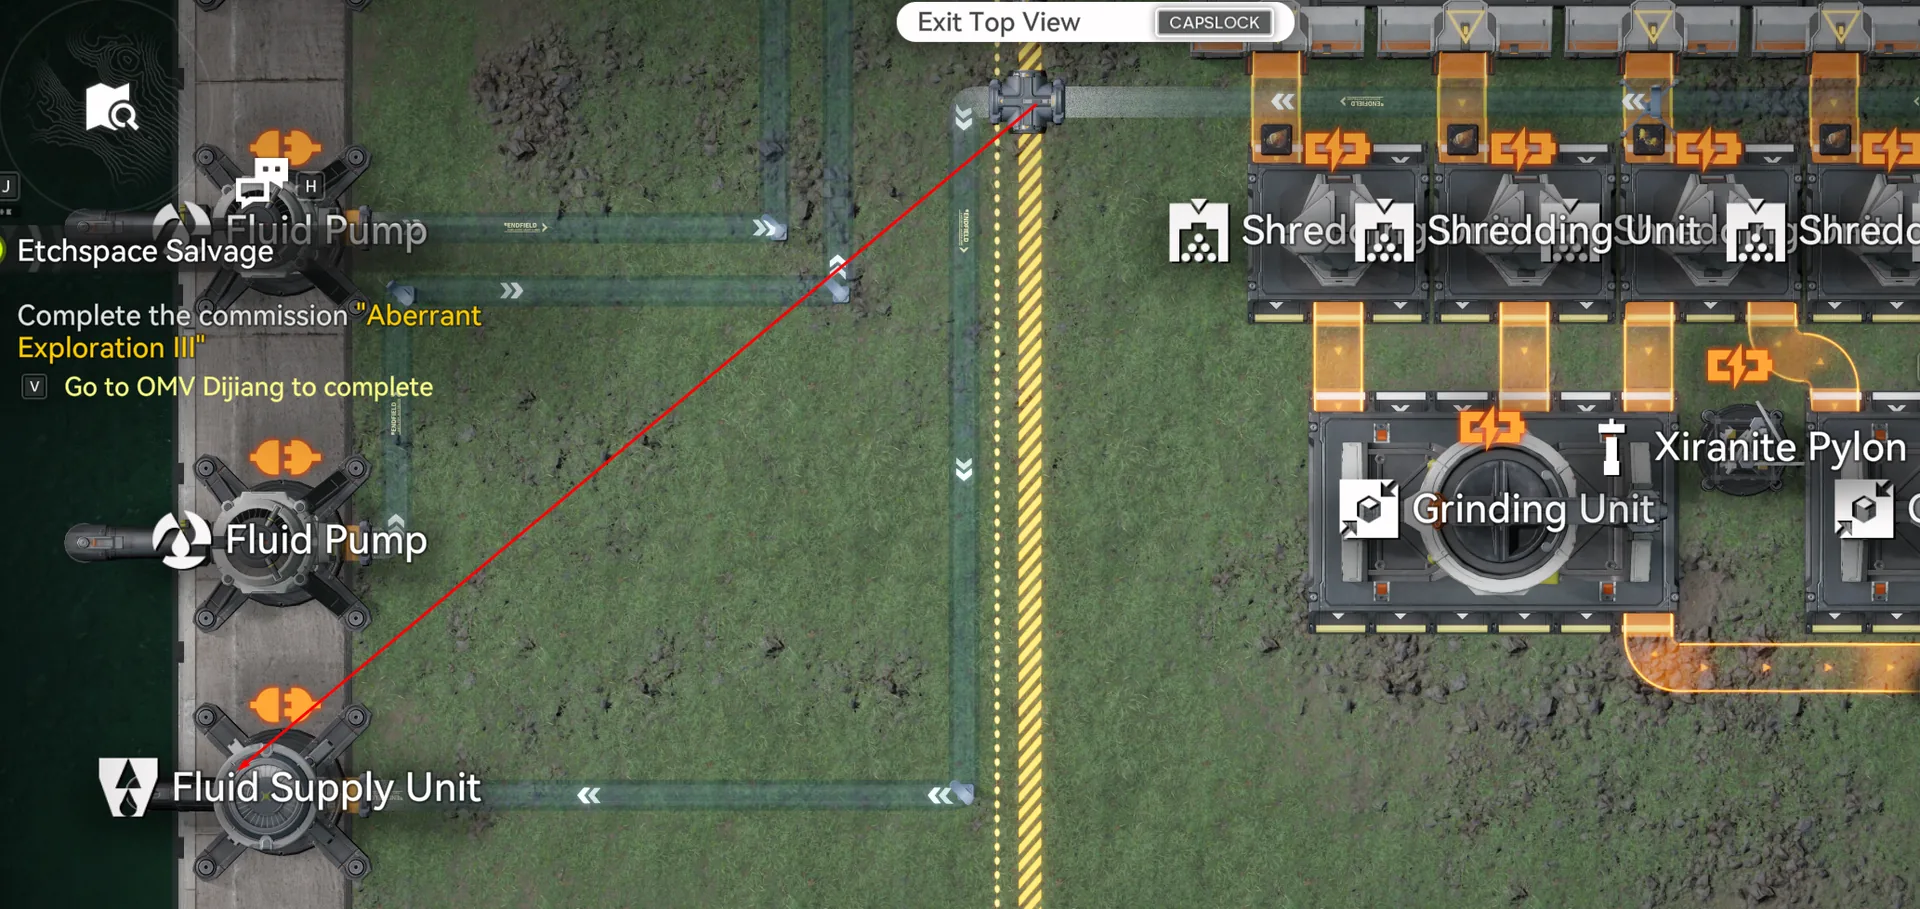
Fluid supply unit
With the Core finished and the depot output set to Ferrium Powder, you can leave it running and switch to the Marker Stone Sub AIC. The Core will idle without producing real income until the MS and JV bases are also live, since their outputs feed back into the Core's gear lines.
Marker Stone Sub AIC
The Marker Stone Sub AIC handles Heavy Xiranite, which is the most fiddly output to set up because of the acid-pipe routing around the Acid Lake. Orient yourself so the Acid Lake is on your right side, then drag the Core to the top-left corner of the AIC. Deploy the MS SubAIC blueprint matching the bottom of the AIC's footprint, then move the Core back into the layout so it captures the belt outputs, and set the top-right depot output to Heavy Xiranite.
Unlike the Core, the MS Sub AIC only needs Area Expansion 1, so the import is fast and forgiving on smaller accounts. There is exactly one shared blueprint per server for this base, and it covers everything — production cells, internal belts, Depot Bus connections, and acid-pipe stubs.
| Blueprint | Asia Server Code | NA/EU Server Code |
|---|---|---|
| MS SubAIC | EFO017i89AE70e5a8O0Ai | EFO010U96EOAA1ia8E179 |
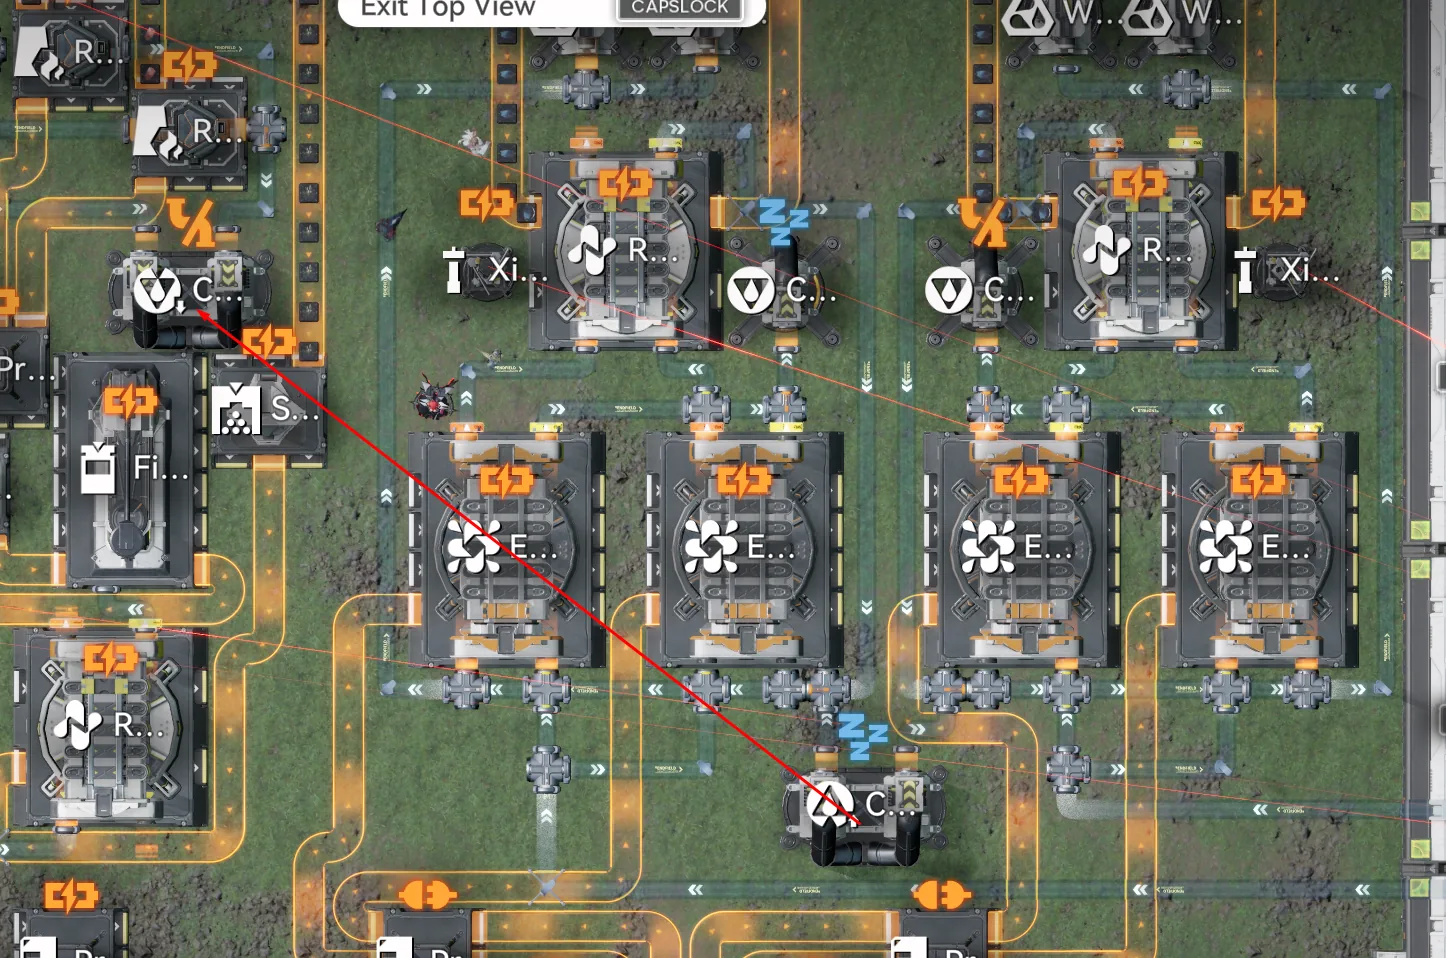
The fluid setup is where most first-time deployments get stuck. The Conduit inlet sits near the Cuprium area; it must be connected to the outlet on the left side of the AIC, not the closer right-side outlet. The bottom of the AIC takes three Fluid Pumps for clean water, one per pipe. The middle of the AIC takes a further three Fluid Pumps plus one Fluid Supply Unit — the camera rotation trick (tap the camera button twice to flip the view) helps you see the middle pipes more clearly here.
For the acid pipes, attach one Acid pump to each splitter, then trace the outgoing pipe at the end of the run to a Fluid Supply Unit positioned at the Acid Lake itself. The single most common mistake on this base is reversing that final connection: the pipe nearest the Acid Lake is going out of the base, not into it. Get this backwards and the production graph will look correct for the first half-hour, then collapse as the splitters run dry.

MS SubAIC — Deploy matching bottom limit — Output: Heavy Xiranite
MS SubAIC — Pipe connection overview
MS SubAIC — Fluid pump placement detail
MS SubAIC — Conduit connections
Cross-check the pipe routing against the overview shot above before powering on. A correctly wired MS SubAIC will show Heavy Xiranite climbing in the depot within ten minutes; if the line is flat after twenty, the issue is almost always one of the acid splitters routed the wrong way.
Jinyu Valley Sub AIC
The Jinyu Valley Sub AIC handles crops and Yazhen Syringe A — the biggest single revenue line on the base. Orient yourself so the lake is on the top side of your view, then drag the Core to the bottom-right corner before importing. You have two options here, and which one you pick depends on how much manual setup you are willing to tolerate at deployment time versus how clean you want the layout to look long-term.
The Normal JV SubAIC is a single blueprint, takes less space, and produces a cleaner-looking base. The trade-off is that you have to manually load each Seed Machine the first time: one stack of Sandleaf into each of the eight bottom Seed Machines, and one stack of Yazhen into each of the eight top Seed Machines. The AFK JV version is two blueprints (JV AFK 1 and JV AFK 2) that wire up the Depot Bus so it auto-fills each Seed Machine with 50 crops on its own. The AFK setup takes longer to come fully online because the Depot Bus has to walk crops in one batch at a time, but once it is full you never touch it again.
For most players the AFK version is worth the extra ramp time — manual reseeding becomes a chore the moment you start cycling Sandleaf and Yazhen for events. If you only check this base every couple of weeks, the AFK version is the right pick. If you log in daily anyway and prefer a tidier layout, stick with Normal.
Option A — Normal JV SubAIC
The Normal version is one blueprint per server. After deployment, place one stack of Sandleaf in each of the eight bottom Seed Machines, then one stack of Yazhen in each of the eight top Seed Machines. Connect four Fluid Pumps to the four middle pipes, confirm the Core is receiving items from the top side, and set the middle-left depot output to SC Wuling Battery.
| Blueprint | Asia Server Code | NA/EU Server Code |
|---|---|---|
| JV SubAIC | EFO017i89AE70e5a5O8Ai | EFO01a709O5UU6Ae5oe5e |
JV SubAIC — Blueprint deployment

JV SubAIC — Fluid pump & Core connection
Option B — AFK JV Version
The AFK version uses two blueprints stacked vertically inside the JV AIC. Deploy JV AFK 1 on the bottom of the AIC, matching the left corner, then deploy JV AFK 2 on top of it. The Depot Bus will start walking 50 crops into each Seed Machine on its own — expect this initial fill to take a real-time chunk of an hour before production stabilises. Connect four Fluid Pumps to the four middle pipes, move the Core into the empty space so it can receive items from the top side, and set the middle-right depot output to SC Wuling Battery.
| Blueprint | Asia Server Code | NA/EU Server Code |
|---|---|---|
| JV AFK 1 | EFO01eAo0UOeai4ueoui8 | EFO01a709O5UU6AeOou5e |
| JV AFK 2 | EFO01A7u1e4A6UE109ieO | EFO0172UA3844i53aO2Ai |
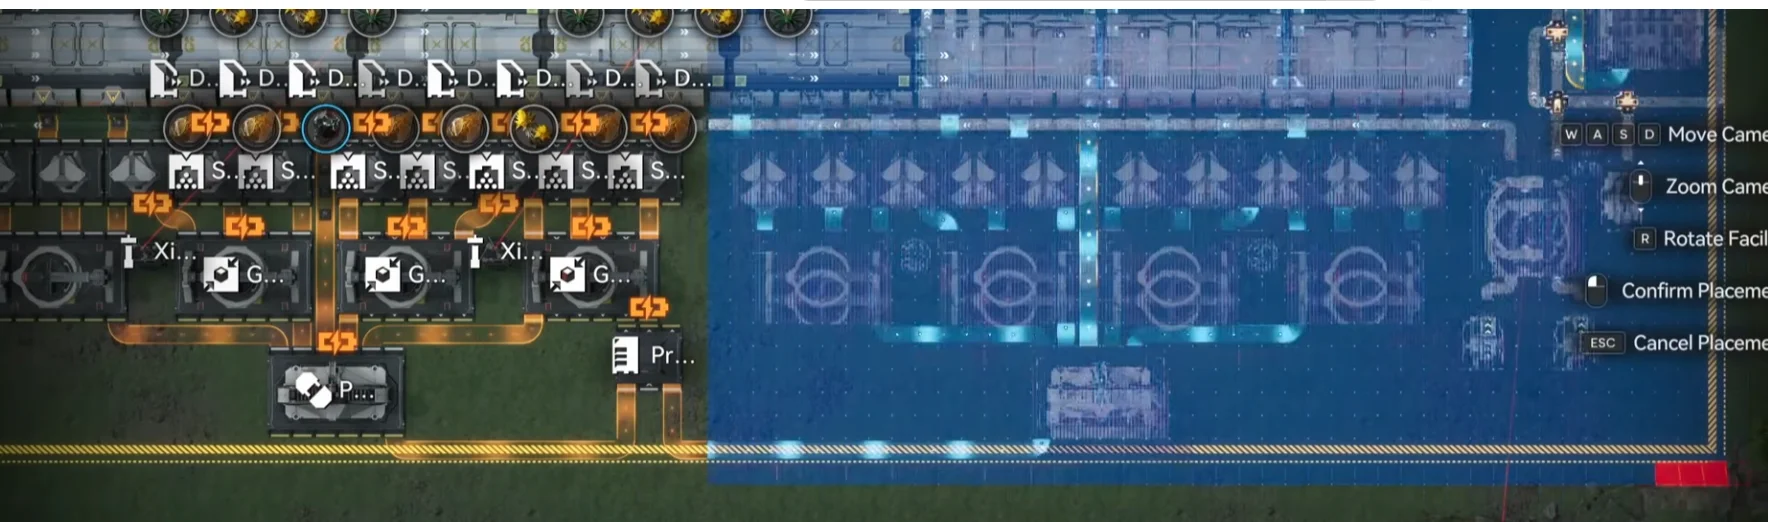
JV AFK 1 — Deploy on bottom, match left corner
JV AFK 2 — Deploy on top
Whichever version you pick, once the JV SubAIC is producing SC Wuling Batteries the loop is closed and the base will start generating profit on its own.
Metastorage Transfer Setup
The Metastorage Transfer is the trick that makes this build's profit numbers work. It creates Dense Originium Powder out of nothing — it does not consume anything from the Valley IV depot — which means you get the input material the Wuling lines need without paying for it on the Valley side. The gating requirement is Valley IV Regional Development level 12; without that, the transfer type will not appear in the menu.
To enable it, click your AIC Core, open Regional Transfer, then click Edit on the first option. If a transfer is already running, stop it first. Change the transfer type to Metastorage, click on Wuling, select Dense Originium Powder, and click Start Transfer. From that point on the base will draw Dense Originium Powder on a steady tick without you having to source it manually.
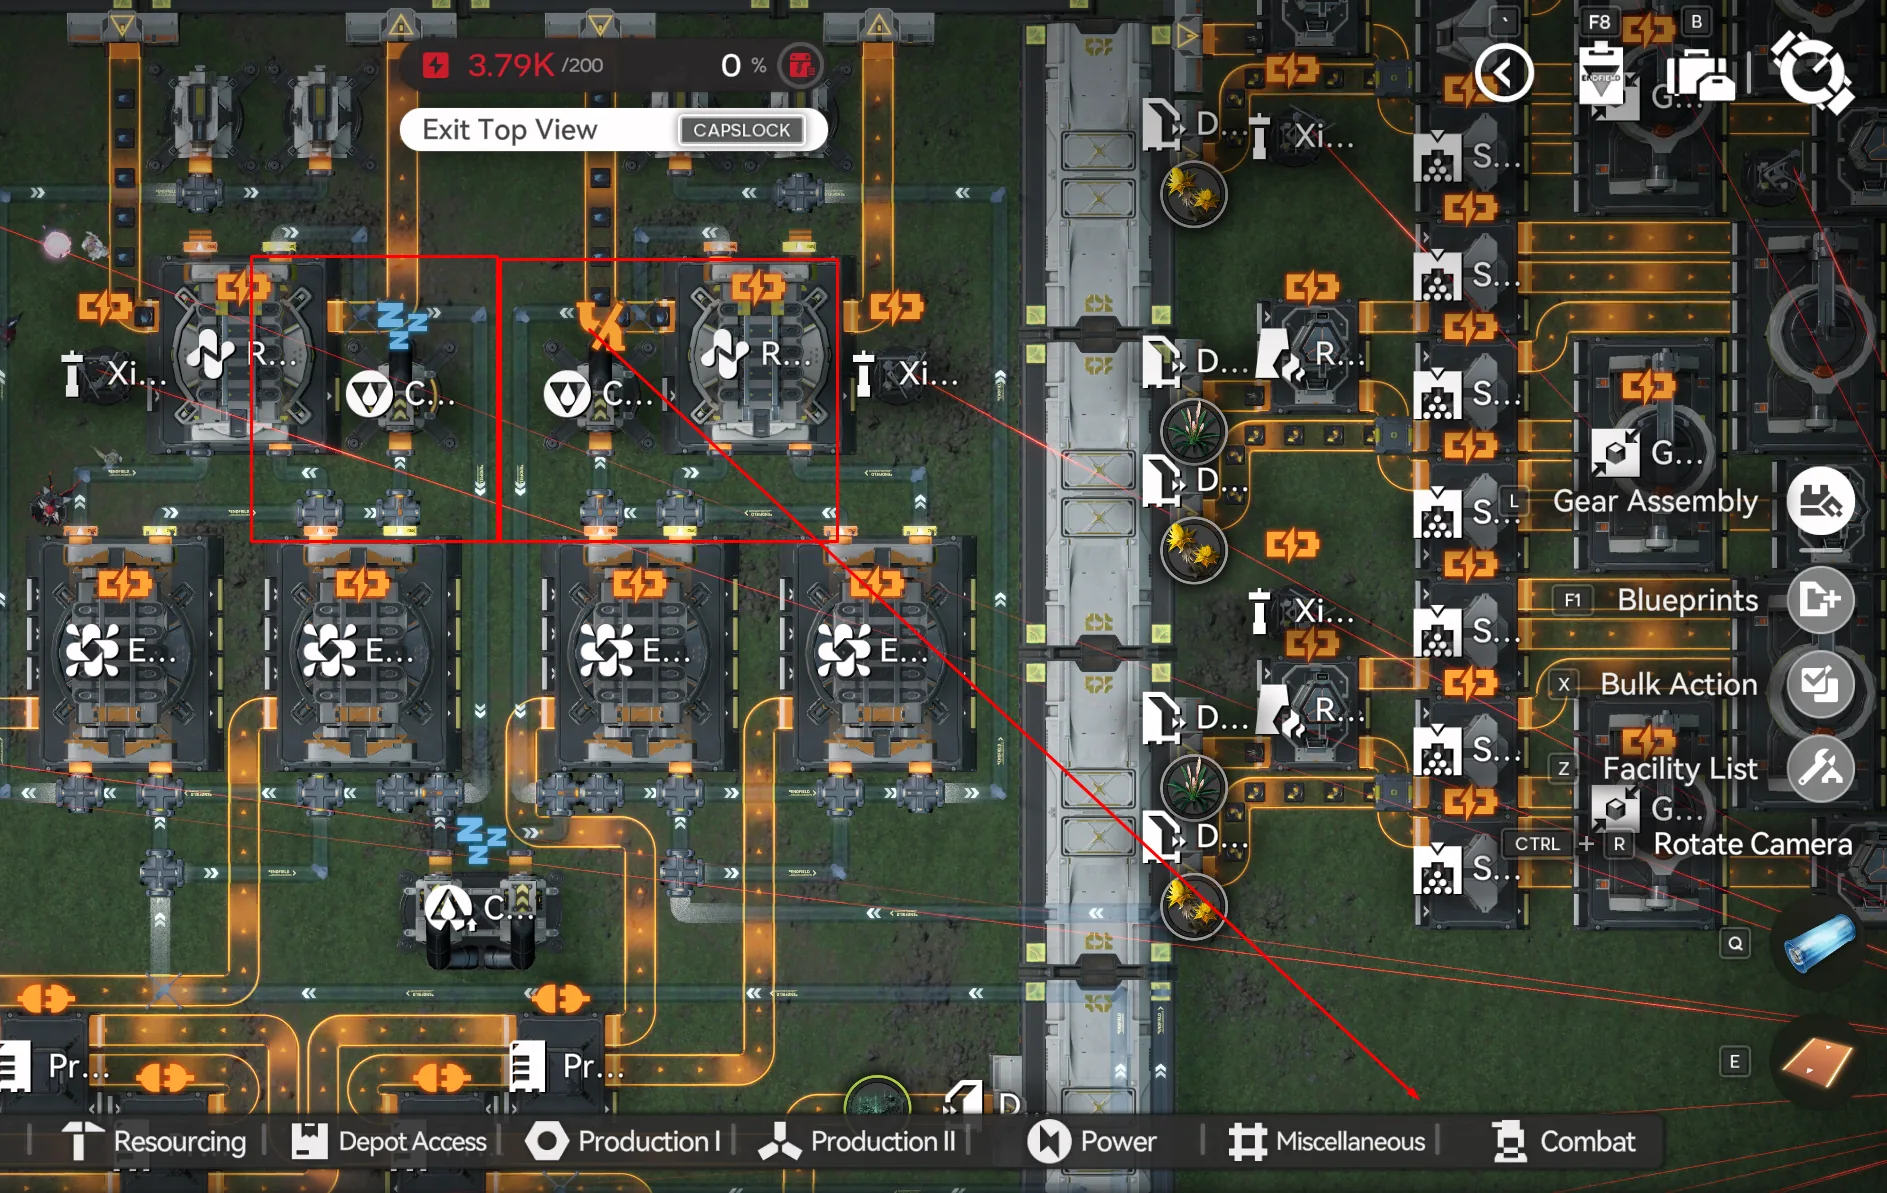
Before you walk away from the Core, there is one more thing to lock down. While building the Core AIC layout (Wuling 1–6), you will have noticed several Protocol Stashes in the middle and Cuprium area that are intentionally left unpowered. These are not bugs — they are deliberately positioned to split items equally into different machines and must stay off. Do not remove them and do not power them on. For belt-and-suspenders safety, manually toggle each of them off and set them to storage mode; that way if you ever accidentally place a Pylon nearby, nothing will get force-powered and break the splits.
Production & Profit Stats
After all three bases are running, give the production graphs roughly 30 to 60 minutes to stabilise before reading them — the JV Seed Machines need time to cycle through their first crop batches, and the Core's gear lines depend on outputs from MS and JV that take a few minutes to land. Below are the two production modes the base supports, depending on whether you have gear crafting active.
With all three gear crafting lines turned off, the base runs in its default high-margin mode. It produces 13 SC Wuling Battery, 6 Heavy Xiranite, 3 Hetonite Parts, 2.75 Yazhen Syringe A, 0.5 Xiranite Component, and 0.5 Cuprium Component per minute, while consuming 3 batteries per minute internally. With all three gear productions active — the lowest profit mode — the same base produces 13 SC Wuling Battery, 4.5 Heavy Xiranite, 1.5 Hetonite Parts, 2.75 Yazhen Syringe A, 0.5 Xiranite Component, 0.5 Cuprium Component, and an additional 0.75 Hetonite Components per minute, again consuming 3 batteries per minute.
The key takeaway is that even in the lowest profit mode, with all three gear types running in parallel, the base still pays for itself comfortably. Hourly bills at the lowest mode with buff operators active break down as follows.
| Item | Qty/hr | Bills |
|---|---|---|
| SC Wuling Battery | 600 | 32,400 |
| Heavy Xiranite | 270 | 7,290 |
| Hetonite Parts | 90 | 4,320 |
| Yazhen Syringe A | 165 | 3,630 |
| Total Bills/hr | 47,640 | |
| Outpost demand (buff operators) | 46,368 | |
That puts the surplus at roughly 1,272 bills per hour above what the outpost demand absorbs, even in the lowest-profit configuration. If you turn off any of the three gear lines, that surplus widens further — the gear crafting trades raw selling profit for finished gear pieces, so the right call depends on whether you currently need gear sets or pure bills.
Gear Production Controls
The Core AIC's left side controls Xiranite and Cuprium Component production. By default it produces both at 0.5 per minute, and the switch on each line either stops production outright or lets you cap it at a target quantity. The Cuprium Parts line is intentionally clogged on the default import — flip its switch off or raise its quantity limit if you want to start producing Cuprium Parts in volume, with the trade-off that Syringe output drops while the Cuprium line is draining.
The Marker Stone SubAIC controls Hetonite Components, producing 0.75 per minute up to a default cap of 1,000. The recommended pattern is to drop the cap to 200 and reset it whenever you need a fresh gear set for a specific character. There is also a Reactor on the top right of the MS SubAIC that lets 500 Heavy Xiranite fill a Fluid Tank for exploration purposes — useful for clearing blight zones during open-world runs.
One last note on Ferrium: the base produces about 10 unused Ferrium per minute that is never consumed. You can reach max profit without using it, and tuning the layout to consume it would mean rebuilding the gear lines in a way that conflicts with the rest of the base. Ignore the waste — it does not affect the hourly bills figure.
Maintenance & Tips
The base is designed to handle every routine clogging scenario without your intervention. The one weak point is the Yazhen Syringe A line: it has a depot ceiling of 68,000, which takes roughly 15.7 days to fill from empty at the production rate above. Once that ceiling is hit, the Syringe machines stop and the base shifts to draining whatever batteries it already produced — that drain lasts another 15.7 days, after which the base goes fully dark. The full grace window if you walk away with zero Syringes in stock is about 31 days, which is more than enough cushion for most weekly login patterns.
When you log back in after an extended break and find the base offline, the recovery is trivial: sell or discard some Yazhen Syringe A from the depot, and the base will resume production automatically. There is nothing to reset, repair, or rewire.
For day-to-day selling, the order that prevents clogging is: Yazhen Syringe A first (because it has the tightest depot cap), Hetonite Parts second if the stockpile is high, then Heavy Xiranite and SC Wuling Batteries last. Following that order keeps the Syringe line moving and lets every other product accumulate at a healthier pace.
A couple of recurring gotchas worth keeping in mind. Server compatibility: blueprint codes are region-locked, period. NA/EU codes will not work on Asia servers and vice versa, so verify your region before pasting. Code typos: if you are typing codes by hand, the most common error is confusing capital O with the digit 0; check for stray leading or trailing spaces too. The copy buttons on every code in this guide eliminate both classes of error and are especially worth using on mobile.
Frequently Asked Questions
That is the full Wuling 1.2.1 Mega Base deployment — three bases, ten blueprints across both servers, around 47,640 bills per hour even with every gear line active, and a one-month walk-away grace period before the Syringe ceiling shuts it down. If you have not built the upstream Valley IV pipeline yet, work through Endgame Blueprints Part 1 first; for the prior-patch Wuling factories this base replaces, see Part 2 and Part 3. The patch 1.2.0 CRS gear factories from Part 4 still slot in cleanly alongside this base, and the event-only layouts from Part 6 are the next page to read if you want a small standalone factory for the current AIC Palm-Top Savior event. For everything else, the Blueprint Curation hub indexes every working factory by purpose.

Sponsored. We may earn a commission at no extra cost to you.
